Pages

Comments are welcome and very much appreciated!
Showing posts with label Color Challenge. Show all posts

Monday, November 11, 2024

Impression Obsession Color Challenge

Ok, I know these are different colors for Christmas but hey,
aren't we always coming up with something different?
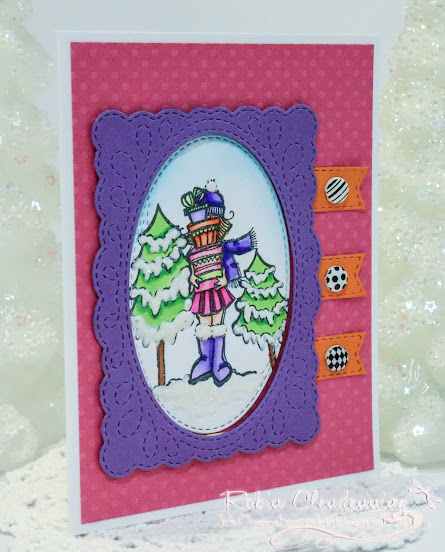
I was at Hobby Lobby the other day and the fad is pastels for Christmas (like a baby's room pastel), ummm, I think I'm sticking with the good ol' Red and Green, there is just something nostalgic for this "older" lady about those colors.  But today I'm doing the color challenge and this is what I've come up with.


My purple frame is popped up.  I used Liquid Applique for the fur on her boots and the pompom on her hat.  The snow is a combo of Snow Pen and loose glitter.  Both of these products puff when you use a heat gun on them.

I have a container full of white brads, some of which are decorative so I used 3 different ones on my banners.
I used these Impression Obsession products:


Thanks for visiting today!
Robin


Monday, August 19, 2024

Monday, July 22, 2024

Impression Obsession Color Challenge

 Welcome to the I.O. Color Challenge!


My cute littles were colored with Olo Markers, Stickles added to the water for shine and then Snow Pen with loose glitter added to the shore line, (Snow Pen puffs a little when heat is applied).
I added some pretty rhinestones to the corners.

I hope you enjoyed this "Cute and Simple" card and it inspires you to join in for the color challenge.


Thank you for coming to visit today.
Hope you leave inspired to create!
Robin


Tuesday, June 20, 2017

ODBDSLC287-Color Challenge Reminder

Good morning!

For this reminder I decided to add the pink color which I really do love!

You can find all the information about joining our challenge HERE
There will be a $15 gift certificate toward ODBD stamps for one random prize winner and an award for one card using ODBD stamps called the Shining The Light Award, and your card will be featured on the ODBD blog.


I started with the designer paper and cut and oval for a window then cut the same from a piece of white Fun Foam to pop up the entire first layer.
I glued the die cut silver Boho Background to the back of my Fun Foam layer, added the pink frame on the oval window, the ribbon wrapped around then glued the Fun Foam layer on top of my pink folded card base.
I stamped the Happy Wedding Day verse with Orchid Brilliance (pink) and die cut it with the Oval and framed it with the Ornate Oval.  
I die cut the Layering Heart, Fancy Foliage and Bitty Blossoms from card stock and foamed the bitty Blossoms then added Prills to the centers.
My Heart is edged with Brilliance.  I stamped and die cut the love birds from Happy Wedding Day then finished decorating my "window" with all of my die cut pieces.
To finish off my card I added pearls and a sheer pink bow.
ODBD stamps: Happy Wedding Day
ODBD paper: Wedding Wishes


For more inspiration please visit my design team sisters

Thank you for visiting today!

Robin
New ODBD products used


                 Ephesians 5:25-26New King James Version (NKJV)
25 Husbands, love your wives, just as Christ also loved the church and gave Himself for her, 26 that He might sanctify and cleanse her with the washing of water by the word,


Tuesday, June 6, 2017

ODBDSLC287- Color Challenge

Good morning!
It's time for another Our Daily Bread Designs challenge.
This month it is a color challenge.
For this card I chose the white, silver, black and gray.

ODBD stamps: Happily Ever After
ODBD paper: Wedding Wishes

This month's new release at ODBD is a wedding theme and this stamp set and paper is part of the release.  What goes better with weddings than pearls right?  So my card is full of pearls as well. 
To see all the information about this challenge and about prize information, click HERE.

For more inspiration, please visit my design team sisters.


There will be a $15 gift certificate  toward stamps at the ODBD on-line store for one random winner as well as one winner for the Shining the Light Award. 


Matthew 6:19-21
19 “Don’t store up treasures here on earth, where moths eat them and rust destroys them, and where thieves break in and steal. 20 Store your treasures in heaven, where moths and rust cannot destroy, and thieves do not break in and steal. 21 Wherever your treasure is, there the desires of your heart will also be.
Thanks for visiting today!!
Robin

Tuesday, January 3, 2017

ODBDSLC282-Color Challenge

Good morning!
Time for a new challenge at Our Daily Bread Designs!!!
This month we are doing a color challenge (I love color don't you?).
Purples and yellow, they are perfect for one another!!
Complimentary colors with great eye appeal.


I used purple ink to stamp my flowers on ivory then used the Vintage Labels to cut them out also using the "Out of the box" technique. I used my Copic markers to add a bit of pinkish purple and yellow then sponged yellow around my die cut.
I also stamped my sentiment with purple and die cut using one of the dies in the Filigree Frame set.
I added a bit of ribbon and a small bow to the bottom portion, rhinestones in the corners and on the butterflies head and popped up my sentiment with foam tape.

Please visit my design team sisters for more inspiration

To submit your own card or project for the challenge please click HERE and then clink on the linky at the bottom of the page.
Remember to use at least one ODBD, Artistic Outpost or North Coast Creations stamps for your entry.
There will be one random winner who will receive $15 toward stamps at ODBD and One Shining the Light Award to one entry (only those who use ODBD stamps can win the Shining the Light Award).
You have until Feb. 3rd to join us for a chance to win!

Thanks for visiting today!
Robin

John 14:1-3New King James Version (NKJV)

The Way, the Truth, and the Life


14 “Let not your heart be troubled; you believe in God, believe also in Me. In My Father’s house are many mansions;[a] if it were not so, I would have told you. I go to prepare a place for you.[b] And if I go and prepare a place for you, I will come again and receive you to Myself; that where I am, there you may be also.

Thursday, November 17, 2016

DRS Everyday Like Christmas!


Good morning!!
This card was done for a color challenge (See the color palette below).

I've used the new DRS new release 1024F Potted Berry Tree, Good Friends sentiment and also 487L Season's Greetings.
I admit, these are not the typical Christmas colors but hey, every year it seems they come out with new colors for Christmas so,why not!
I also used double stitch dies from ODBD to do all the mats and framing.
The upper corners have blue Liquid Pearls added to it and I've added paper Candy Dots to the corners.
That's about it!
Thanks for visiting today!
Robin

Thursday, September 15, 2016

DRS Challenge #244- Inspired By Color

Good morning!
Time for a new challenge at DRS Designs.

Today's color palette

I also used a grass border punch and fence border punch by Martha Stewart, Sizzix grave yard die, and I.O. little ghosties.
I brayered color onto my bg pieces and then stamped the Grim Reaper, masked and stamped the grave yard.  I used a silver color pencil to change the color of his reaping blade and I used bleach to change the color of his had to "bone" white!
The highlights were added with white acrylic paint and I also rubbed the die cut grave yard with metallic Rub-Ons.  The little ghosties have white mist drifting down from them by using a cotton swab with white Distress ink.
I made this an easel card because of the very fun Halloween sentiment that seemed to fit perfectly with this Grim fella and of course it needs a space of it's own.
If you don't know how or have forgotten how to make an easel card, it is very simple and this horizontal one goes like this:
All you need to go with this basic base is a full 4 1/4 X 5 1/2" top decorated and an inside panel of any size but part of the inside needs to be raised up to act like a catch to keep the card open.
Today I used two black pearl halves but normally I will pop up a middle layer with foam tape or dots.

To see all the designer's cards this week and to submit your own entry see below.

To enter, show us your card  by linking it at DRS & please be sure to link back to DRS!  The deadline for this challenge is Wednesday, September 21, at 6:30 pm ET and please link new creations only (no back dated or duplicate entries)We are now limiting the number of entries to 3 per personChallenge entries don't have to use DRS Designs stamps, but if you use them on your challenge card, you'll get an extra entry into the prize drawing.

Thanks for visiting today!


Thursday, July 21, 2016

DRS Challenge #236 Color Inspiration

Good morning!
Time for a color challenge...yay!!


I did a Bendi Frame card for this serene beach scene; the base (5 3/8" X 4 1/4") has the lighthouse and boat stamped on it, line drawn for a horizon and shoreline drawn in then boat and lighthouse masked and sky sponged in with clouds (I used a torn paper towel and sponged blue, moved the paper towel up and over and sponged blue again and so on until my sky was done).
I then colored in my water, sand and scene using a bit of white paint to make shine spots on the water.  I used a palette knife and texture paste to make my waves then while the texture paste is still wet I added glitter to it.
I stamped my sentiment on another piece of white, die cut it into a circle and colored it yellow to be a sun in the sky...well, that was my intention.
I added a torn piece of tan paper on the base and added castle, shovels and bucket.  
Now for the Bendi Frame part: I die cut the frame from a 5 1/2" X 4 1/4" piece of dark tan shimmer paper by picking a rectangle die the size I wanted my scene to be and then placed it in the center of my panel and there's my frame.  Now I added more torn tan pieces to the back of the frame (creating dimension) and added the chair and palm trees.  I threw the towel in with a tiny piece of stripe paper fringed at the bottom and glued to the arm of my chair. I also added coconuts using a hole punch and brown paper. The birds are glued to the base and one is popped up.
Now you can put your slightly larger frame onto your base.  Put foam tape on the two SIDES of your frame (none on top or bottom); starting with one side at a time, stick your frame to the base by matching up the edges on the sides, this will create your bend because your frame is 1/8" larger than your card base.
This idea came from Kittie Caracciolo at KittieKraft. She does the most wonderful scenes.
The chair, birds, castle and beach toys are dies from I.O. and the palm trees die is from Joy! Crafts.  The frame and circle stitched dies are from ODBD
Thanks for visiting today!!
Please visit the DRS BLOG site to see all the designer's samples and to enter your own submission for a prize.
Robin


Thursday, May 19, 2016

DRS Challenge #227 Color

Good morning!
Time for a new challenge.

It's a color challenge!!
DRS stamps used: 947F  Golf Bag, 451L Birthday Candle Burst, new release Birthday Greeting.
I chose the 3 greens and added a couple more colors.
I cut 2 frames (My Favorite Things) and off set them over my white folded card.  Before I foam taped them down I stamped my sentiment and birthday candles.  My frame for the golf clubs was done with Color Burst in dark green and light green with a bit of yellow.  I die cut my golf bag with a Spellbinder nesting die and die cut my frame made with the Color Burst. I then mounted it on top of my frame adding foam tape to the right side of the oval to keep it even.  That's it!!  Easy card to make. 


I hope you will join us this week and enter for a chance to win.  Submit your card HERE at the DRS blog site where you will also see all the other designer cards!!

Thanks for visiting today and have a blessed day!
Robin


Thursday, April 21, 2016

DRS Challenge #223-Color

Good morning!
Today is a color challenge!

DRS stamps used: 1092H Dogwood Branch, & 203B Just Because.
I stamped the branch all over my panel and then die cut the center.  The center flower was colored with Copic Markers.  I die cut the pink frame with two nesting dies.  The top black and white was popped up with foam tape and each side wrapped with the sheer pink ribbon then adhered to another pink panel.  I added my center flower in through the circle opening and glued it flat (no foam tape). Everything was then glued to a white folded card base and my pink bow was added along with my pink circle frame.  The Just because was stamped and die cut then sponged on the edges with pink ink. I foam taped it on top of the circle window and Ta-da, done!
Here are the colors to choose from.
For more inspiration and to find the link to submit your card, please click HERE for the DRS website.

Thanks for visiting today!!
Robin

Thursday, October 15, 2015

DRS Challenge #196-Color

Good morning!
It's time for a new color challenge!

After stamping and coloring my fall scene I cut it out using a Spellbinders die, the framing is also Spellbinders. I used a Cuttlebug embossing folder border for each side of the white base.  Everything is popped up and basically that is it, a very simple card..
To see all the designer's cards and to join in the fun please check out the DRS Designs Blog HERE.

I love the colors of fall, it is my favorite season because of the brilliant colors and the sun is at a different angle which makes  a more pleasing blue sky.  When you have that blue sky and the orange, red and yellow trees, well, that is why I love fall. My next favorite season is winter, lucky for me since it is right around the corner!
If you are ever in California in October, make sure you drive the 395 from Bishop to Bridgeport and while you are driving it, stop at Bodie State Historical Park. The old wood against that blue sky I was telling you about is outstanding.  It is a very large gold mining "ghost" town.  Everything was left behind and there is so much to see.  Also along the 395 are Aspen groves that have the most beautiful fall color!
Thanks for visiting!
Robin


Thursday, July 16, 2015

DRS Challenge #183- Color Challenge

Good morning!
Time for a new color challenge at DRS Designs!


DRS stamps used: 437G Circle Lily,  and 203B Just Because.
I stamped my circle lily on white and colored with Copic markers.  I added the dots to make it a Tiger (or Leopard) lily like we have here in the Sierra Nevada mountains.  I used a stitched circle die (Die-namics) to cut it out using the "out of the box" technique then framed it with a new decorative circle die (from Spellbinders).  I also used an oval die from Spellbinders for the sentiment and colored the inside before removing the die.  the outside of the oval is sponged with yellow.  The white background is embossed with an embossing folder from Cuttlebug and has tiny white Liquid pearl dots on each cross section (hard to see, I know). It is framed by an orange mat about 1/8".  I used a border punch under the sentiment and topped it with a pretty yellow/orange sheer ribbon and yellow button.  My outside is a stitched frame die from Die-namic (My Favorite Things) as well and is framed with a dark blue mat about 1/16", then mounted to a white folded card.  That's it!
I hope you can join in the fun of this challenge.  To see all the designer's samples and to submit your own sample, where you could win a prize, click HERE.


Tuesday, July 7, 2015

ODBDSLC245- Color Challenge

Good morning!
Yay! It's time for another ODBD challenge.  Today it is a color challenge (see photo below my card for colors).  Color challenges are one of my personal favorites.


ODBD stamps used:Fragrance, Mini Tag Sentiments 


I started by stamping the Fragrance blossoms on white cardstock and die cuting with the inner die of Layered Lacey Squares and before I lifted the die, I embossed it and inked the open spaces.  I cut another light pink layer then the outer Lacey Square in a dark pink. I then cheated a bit and cut the outer Lacey square twice with white, cut an extra scallop from each side of the extra square and made my white square larger all the way around with the extra scallop on each side, sponged the edges with pink and Cut a square to fit just inside the scallops to cover any cut lines.  I mounted this square onto a folder square card base.
For my flowers, I stamped the front bottom flower twice and colored then cut out petals to pop up to make my flower really 3-D.  I then used some Prills (by US Art Quest) for my centers.  I stamped the sentiment on a scrap piece of white and die cut with the Mini Tags.  I sponges some pink on the edges before mounting under the large pink bow.
Images is colored with Copic Markers.

See more inspiration by visiting my design team sisters!!
Robin Clendenning (that's me)

To see all the projects created for ODBDSLC245 or to join the challenge click here. You have until July 12, 2015 at 8:00pm EDT to join us. By participating in the challenge, you have a chance to win a  $15 ODBD Gift Certificate good towards the purchase of stamps in the “stamps column” on the ODBD website, or to be spotlighted on the ODBD Blog at our next challenge. The random prize winner will be posted on our next challenge post. Please do not post on Flicker as many of us do not have the ability to comment on your cards nor can we spotlight your cards on the blog.

Do your know some fragrance scriptures?  Well, there are several about smells and especially in the Song of Solomon but the one I am thinking of is in Philippians 4:18-19 It's when Paul is speaking to one of the churches about their giving.
"Indeed I have all and abound.  I am full, having received from Epaphroditus the things sent from you, a sweet smelling aroma, an acceptable sacrifice, well pleasing to God.  And my God shall supply all your need according to His riches in glory by Christ Jesus."  It WAS a sacrifice, they were (some of them) barely scrapping by but they gave to Paul because paul was spreading the Gospel where they could not.  Think of it...according to GOD'S riches...the creator of the universe, are you kidding me, wow!  It may be a sacrifice to give (and when you give, give as unto God).  But God is faithful and He will provide.  Plus, your reward is waiting for you in heaven where NO ONE can take it away from you!  Jesus said, (Matthew 6: 19-21) "Do not lay up for yourselves treasures on earth, where moth and rust destroy and where thieves break in and steal, but lay up for yourselves treasures in heaven, where neither moth nor rust destroys and where thieves do not break in and steal.  For where your treasure is, there your heart will be also."
Where is YOUR treasure?


Tuesday, March 3, 2015

ODBDSLC229-Pastel Colors


Good morning everyone!!
ODBD stamps used: The Shepherd 
I used blue, pink, lavender and yellow today.
I made my daffodils from purchased paper flower, scrunching the yellow ones to look cone like (as much as possible!)
Each color in the background has a different embossed design. I sewed around the edge of each colored panel as well, I did the Beautiful Border in yellow and then white and added some lace underneath.  Die cut my Doily from white and did a yellow border (which I pierced) around the image panel. I added ribbon and pearls for a finishing touch.
Please visit my talented design team sisters for more inspiration

To see all the projects created for ODBDSLC229 or to join the challenge click here.  You have until March 8, 2015 at 8:00 pm EDT to join us.  By participating in the challenge, you have a chance to win a $15 ODBD Gift Certificate good toward the purchase of stamps on the ODBD website, or to be spotlighted on the ODBD blog at our next challenge.  The random prize winner will be posted on our next challenge post. Please do not post on Flickr as many of us do not have the ability to comment on your cards nor can we spotlight your cards on the blog.

Bless the Lord, O my soul.  O Lord my God You are very great; You are clothed with honor and majesty.  You cover Yourself with light as with a garment; You stretch out the heavens like a curtain.  Psalm 104:1-2
God paints the sky like a canvas with colors of pinks, lavender, yellows, blues and orange creating a masterpiece each night for us to enjoy. Throughout creation is the signature of God! He is so good to us and has created so much.
Have you seen a time-lapse video of flowers blooming, opening, turning toward the sun then closing up at night? Have you seen one of the human body from conception to birth? Do you think the God who created each cell in your body can not also heal those cells?  Do you think He can not care for your needs?  Really, tonight look at the sky, think about the galaxies He has created, the planets, moons, suns, stars all  in complete order in their orbits and in their places.
Think of all the colors, smells, taste in everyday life, in flowers, trees, plants and animals...wow! That is all I can say! He is awesome!
Trust in the Lord with all your heart, and lean not on your own understanding; in all your ways acknowledge Him, and He shall direct your path. (direct [yashar]: to be straight, right, upright, pleasing, good.) Proverbs 3:5-6
Have a wonderful week and trust God for your needs!  He is able!
Robin