Pages

Comments are welcome and very much appreciated!
Showing posts with label Nature Scene. Show all posts

Sunday, October 15, 2023

Hello Friend!

  Hello crafty friends!

It's new release time, my favorite time of the month!

October 15th & 16th The Impression Obsession Team will be sharing new projects with the NEW clear stamps, dies, stencils, and paper packs! You can find a list of participants on the Impression Obsession Blog each day through the event.

Two lucky customers who place an Impression Obsession order during October release week (October 15th – 22nd) will be chosen and will have a very special Impression Obsession prize package added to their orders! Good luck!

My first card features some very cute little animal friends.


I did a letterpress technique using an embossing folder for the background by rubbing an ink pad over the surface of the embossing folder before running it through the Big Shot machine.

My next card is a mini slimline.


I just couldn't stop myself, there are so many cute animals in this set that ideas kept popping into my head!
I mean come on, look at this darling owl!


Thanks for visiting today, I hope you will continue with the hop and also find lots of goodies to fill your cart at I.O. Hey don't forget, you can possibly win the prize package!!

Find the list of designers at the top portion of this post and
I'll see you tomorrow for more exciting new stamps and card ideas!!
Robin


Tuesday, September 22, 2020

High Sierra Happy Birthday


Good morning!
Bendi cards are so fun to make!
Today I've featured the new Stamp and die sentiment sets!


Elaborate Birthday Die

Elaborate Birthday Stamp Set

Create a ‘scape Backcountry Die

Create a ‘scape Backcountry Stamp Set

Create a ‘scape Wilderness Die

Create a ‘scape Wilderness Stamp Set

Create a ‘scape Trout Lake Die

Create a ‘scape Trout Lake Stamp Set

Create a ‘scape Nature Die

Create a ‘scape Nature Stamp Set

Wilderness Retreat Paper Collection

Woodsy Critters Die

Woodsy Critters Stamp Set

Memento Tuxedo Black Ink

Metal Tip for Adhesive Bottle

Dries Clear Adhesive

Rajni Chawla’s Crystal Clear

Crystal Ultrafine Transparent Glitter

Go Man Go Prills

I Cannot Tell A Lilac Prills

Minnie Pearl Pearls

Deluxe Flower Shaping Paper Pack of 50-White

Other products:

White cardstock, Dark green cardstock, Acrylic Shimmer additive, Brilliance Copper Ink, Copic Markers: C1, C2, C3, C5, W1, W3, W5, E53, E31, E33, E35, E97, E99, E51,E93,YR04, R43, R24, R39, G94, YG63, YG03, YG17, YG05, B91 ,93, B41, YR82

Card size: 6 X 6 3/4".  Make card base from dark green cardstock: Back is 6 X 6”, side flaps are 3 1/2 X 6” and 4 1/2 X 6”.  Score 1/2" on 1 side of both flaps, fold down and score well.  Draw a line on the other side of both at 1/4" then drawn in a tab (both flaps).  Cut away above and below each tab (to reinforce tabs glue acrylic packaging [like dies are packaged in normally] over the tab and inward about 1”, this will be covered by paper later).  Make a slot for the right flap in the back at 1 1/2"from left side by lining up the bottom of flap and back then drawing a line at the top and bottom of the tab made earlier.  Use a ruler and craft knife to cut.  Make a slot for the left flap into the right side flap at 2” from right side using the same method of lining up the bottoms then drawing lines at top and bottom of tab.  (Nothing is glued together at this point because side flaps still have to be die cut with the mountains). 

Using 2 pieces of the same paper design, cut panels for the inside back and both flaps (a continuous lake used in this sample). Save the sky for the inside mountains (die cut only because they are backwards) and for the die cut base of the large sentiment.  The outside of the flaps are stamped scenes pieced together.  Start with the mountains, you need 5 1/2" of mountains on each side so you have to stamp it once then mask the end and stamp again to lengthen mountains.  When you die cut, be careful to only cut the tops not too far down so that you keep mountains together.  You will want each mountain scape to be the width and height of the side flaps.  Die cut a piece of sky paper along with the stamped mountains so that you have mountains for the inside of flaps (add a little color to make them look more like mountain ridges).  Now place the die cut mountains on the dark green flaps then draw a line on cardstock, now cut the dark green cardstock flaps to match mountains.  Color the mountains and tree line then color the rest of the panel green to blend in with other stamped elements.  Glue the backward mountains on then glue the inside decorative paper lake on both side and the back. Now glue each flap to the back panel (in back) using the 1/2" scored tab.

To finish the inside: Stamp the ducks and 2 extra ducks, the deer set, bunny, squirrel, 2 cardinals, 2 sets of cattails and pine tree using Tuxedo Black, color with Copic markers. Glue deer over paper deer, bunny and squirrel on far left, ducks to the back right side.  Glue cattails where needed.

Die cut large sentiment base from dark green (as well as the sky colored decorative paper die cut, glue them together then glue to the back panel over hanging top of back by about 3/4".  Stamp and die cut sentiment using black then glue it to the sentiment base layer.  Sponge copper ink on the edges of the sentiment base. Now glue the cardinals top right and bottom left of sentiment base, glue 1 extra duck to the bottom right and the other extra duck on top of scene duck.  Add white and lavender Prills to the ground sections.

To finish the outside (front) of flaps: Stamp 2 sets of deer, Trout Lake, extra trees of Trout Lake, flowers, rock landscapes, die cut and color all with Copics.  For the right side, glue the Trout Lake extra trees, deer, flowers (cut apart) and rock landscapes and 1 deer piecing together to look best. For the left flap, glue more extra trees, rock landscapes, flowers and 3 deer.   Add Prills to the bottoms of both flaps.  Glitter mountain ridges and lakes inside and out, glitter Happy Birthday panel. Tuck small tabs into the slots to close card, card stands while closed because of the bowed front.


My second card uses another of the new 
sentiment stamps and dies.


Large Garden Zinnia Die

Small Garden Zinnia Die

Large Garden Zinnia Stamp Set

Small Garden Zinnia Stamp Set

Large 3D Zinnia Shaping Mold

Small 3D Zinnia Shaping Mold

Summer’s Garden Paper Collection

3D Leafy Accents Shaping Mold

Leafy Accents Die

Leafy Accents Stamp Set

Groove Golf Tool Set

Decorative Circle Frames Die

Eyelet Circle & Basics Small Die

Fancy Special Day Die

Fancy Special Day Stamp Set

Archival Ink-Majestic Violet

Archival Ink-Buttercup

Archival Ink-Cactus Flower

Archival Ink-Leaf Green

Archival Ink-Fern Green

3-D Crystal Lacquer

Metal Tip for Adhesive Bottle

Dries Clear Adhesive

Rajni Chawla’s Crystal Clear

Crystal Ultrafine Transparent Glitter

Go Man Go Prills

Deluxe Flower Shaping Paper Pack of 50-White

Other products:

White cardstock, Acrylic Shimmer additive, Fun Foam sheet

For more tips on creating with the flower shaping molds, watch the tutorial at https://youtu.be/FSdPL7nXvQE.

For more ideas on creating with the 5 x 7 Decorative Frame Dies, watch the tutorial at https://youtu.be/qdBFA5VpmSo

Card size: 4 3/4 X 6 3/4".  See video for making shaped cards then cut another front from purple decorative paper.  Cute large decorative die from white also from Fun Foam sheet.  Cut 2 eyelet circles from the die set from purple decorative paper and 1 circle in between eyelet circle sizes out of white along with another Fun Foam sheet circle to fit.  Stamp sentiment using Majestic Violet, die cut and die cut sentiment base from white.  Stack all layers together and glue. Tip, when using foam sheets for dimension, after gluing, lay a book or something with weight on top so that it dries nice and flat, if needed put a piece of wax paper on top before book so that nothing sticks).

Stamp medium and small zinnia using Majestic Violet, sponge with the same plus some Cactus flower in the centers.  Stamp smallest zinnia again using Buttercup, sponge with Buttercup, die cut all the flowers, shape in molds.  Use Groove Golf tool for shaping the tubular yellow centers of the zinnia (larger flower).  Glue 4-5 layers together for each flower and fill centers with Prills.  Stamp leaves with Fern Green, sponge with Leaf Green, die cut, shape in the leaf mold then cut apart to use as needed.  Arrange flowers and leaves on the right and left sides of the circle with sentiment.  Glitter the card front and use Rajni’s Crystal Clear to glitter the flowers.

Thanks for visiting today!

Robin

Psalms 139:23-24

23 Search me, O God, and know my heart;
Try me, and know my anxieties;
24 And see if there is any wicked way in me,
And lead me in the way everlasting.


Tuesday, November 19, 2019

Wilderness Gatefold

Good morning!
I know this card is similar to last week's card but at the 
same time it is also totally different.
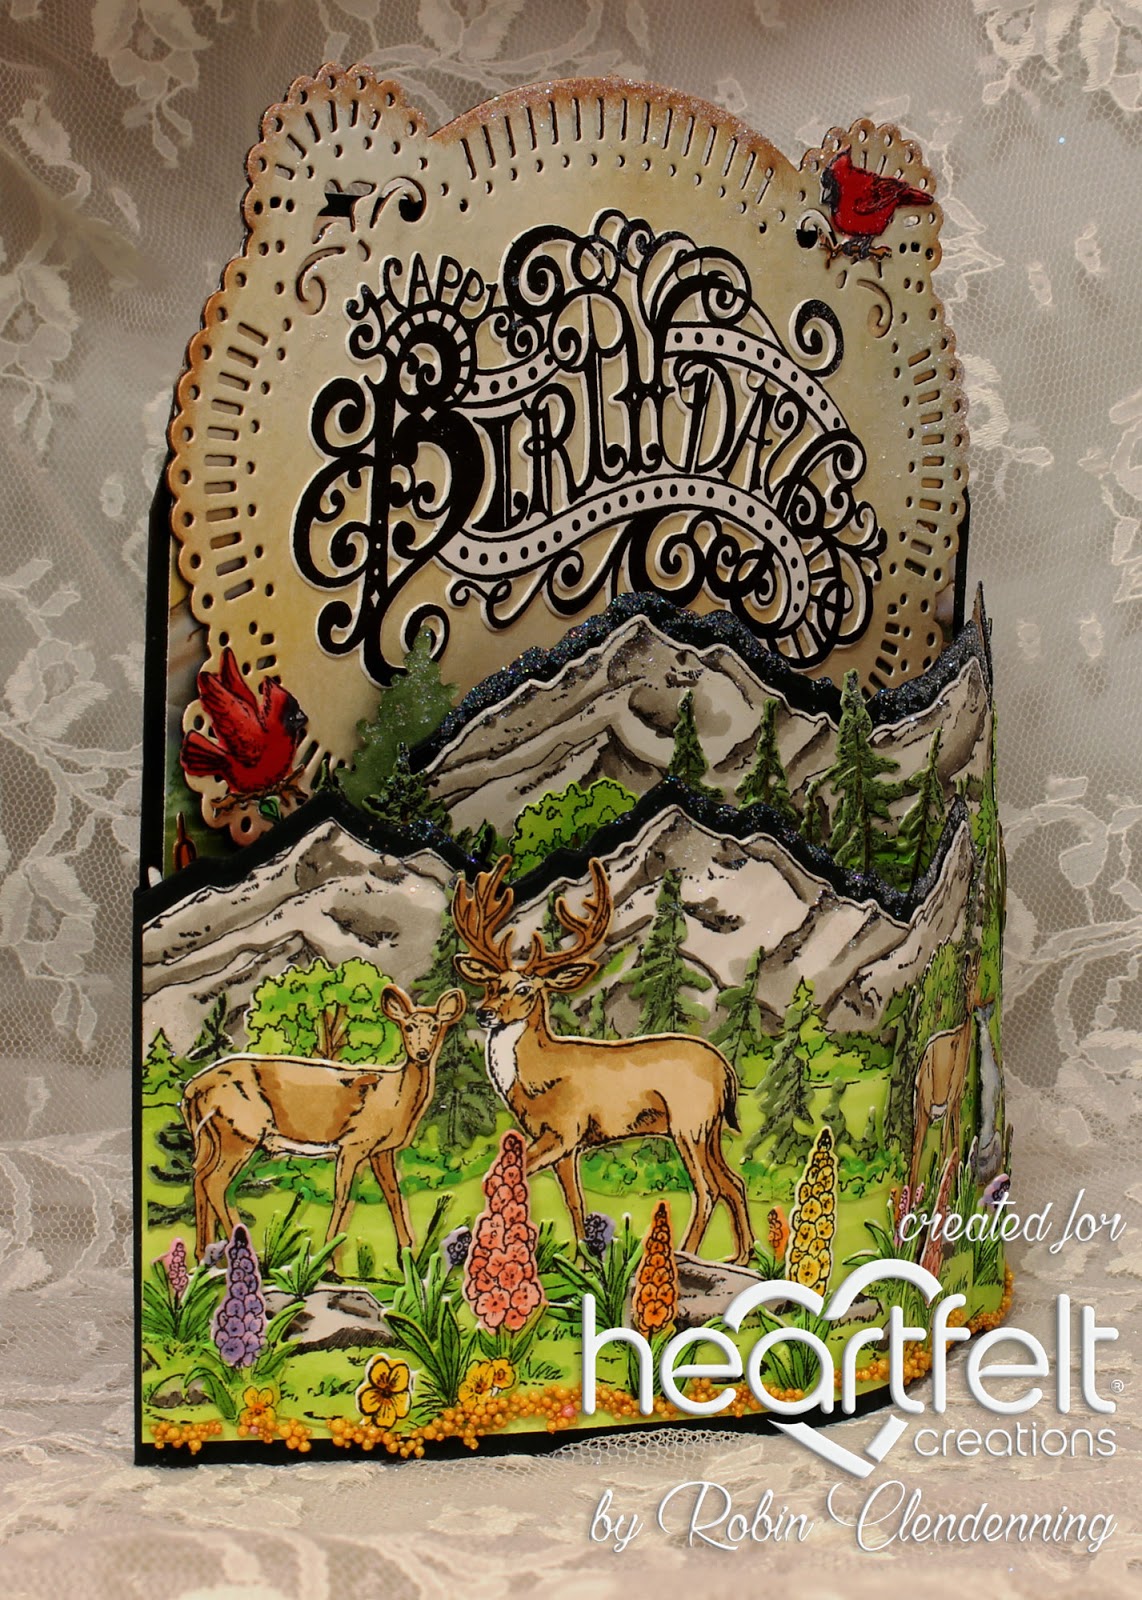
You'll find this card is a gatefold card using the beautiful 
Adorn it die to make the gates.  I also made a beautiful
Belly Band to hold the card closed until
the recipient opens it.
I used rub on metallics to try and make the copper
and black look like aged metal.


Inside I used dyed texture paste to make flower fields.
I also used glue with Prills as well.

You'll also notice that I used the Seaside clouds in the sky.  They are perfect for High Sierra 
summer clouds.


HC PRODUCTS USED       


Other Products:
Black cardstock, white cardstock, bronze/gold cardstock, snow pen, foam tape, re-inkers in blue, orange, yellow and pink, Copic markers:  YG03, YG17, YG23, YG63, R21, R20, R17, R29, R22, V01, V12, V15, RV10, RV02, Y38, Y15, Y11, B00, B01, BG11, C2, C3, C5, W2, W5, G21, E50, E53, E33, E35, E59, E42, E43, E44, Distress Oxide Ink: Carved Pumpkin, Worn Lipstick, and Mustard Seed, Fun Foam/foam sheet.

For more tips on creating with the flower shaping molds, watch the tutorial at https://youtu.be/FSdPL7nXvQE
Instructions:
Card size: 6 X 7 1/2". Make a card base by cutting 2 Adorn It dies out of bronze cardstock, Use sponges or finger to add other metallic colors to it with the Mousse colors.  Cut 1 Petite Pocket Accent wide and narrow decorative dies out of bronze, use the mousse on them and glue them together.  Cut black heavy cardstock 6 3/4 X 8” Score the 2 sides at 1”  Glue the 2 Adorn It die cuts to the outside of folded 1” tabs on the sides. Save the Petite Pocket Accent die cuts until the end to glue on top of card.

Scene building: start with 5 7/8” X 6 1/4” white cardstock and sponge the sky area with Orange pink and yellow Oxide inks.  Stamp, die cut and color: clouds, mountains X 2, water wheel scene X 2, stump, squirrel, deer, foreground with rocks an flowers X 2, hollyhocks, flowers from Woodsy set, 2 spruce from Snow Kissed set, cattails.   When cutting out one of the water wheel scenes, make sure to extend the sides out to almost 6” (the die only cuts the top part so this is easy to do as long as when stamping you allow plenty of room sides and bottom of image).  Extend the river edge on the right side all the way to the left side of the panel (ground part of panel is now 3 3/4 X 5 7/8” [not counting trees and waterwheel building]).   Extend the left side of rivers edge on over to the far left as well, no need to use a pen, pencil is fine for this.  Color this entire scene adding “flowers” to ground where there is blank space that needs it.  Add the color reflections to the water, I looked at the decorative paper for this. Now before adding all the popped up elements and animals. Flowers etc.  Use texture paste in VERY SMALL amounts, add a tiny bit of color to each small batch then add more foreground flower patches to the areas where needed. Yellow, orange, pink and blue is what is used here, sprinkle with glitter and let dry.

When coloring the mountains add some “Alpine Glow” to one side or the other for interest.  Add these colors to the clouds.   Die cut extra waterwheel building with tree and die cut the die cut the other tree as well finishing with fussy cutting the trunk.  One set of mountains is glued down to the sky, the next set is popped up.  Add a piece of Fun Foam from the mountain bottom to the bottom of scene panel then glue the waterwheel scene to it.  Now start adding the extra features like the popped up waterwheel building with tree, the popped up extra trees, the Spruce glued on the sides, the deer glued.  Now do the foreground by adding flowers and cattails to the sides (leave most of deer visible) and then the very bottom with the grassy rocks and flowers.  Now glue stump and squirrel to the right bottom of panel.  Cut off any portion that extends over the bottom or sides of scene panel. Making it even all the way across the bottom and sides then glue it to the card base in the center. 

For a final touch, add glitter to all the flowers and add some snow pen to the water coming off the waterwheel then heat to puff slightly. Now finally flue the top decorative die cut to the top of card base over parts of the sky.

To make the belly band: Cut a piece of black cardstock 12 X 1 1/2", cut a piece of bronze cardstock 1 X 6 1/4".  Score and fold black strip at 2 3/4" on both sides (it does not meet in the middle but that will be covered). Make sure it will slide over card, if needed make a second score make next to the first to add some depth to the band.  Glue the bronze piece on to the top over part that doesn’t meet.  Add some Mousse colors to the bronze edges.  Die cut the Daydream Bridge decorative die out of black, add mousse.  Die cut eyelet diamond out of black add mousse to edges.  Glue the eyelet diamond to the center of the decorative die from Daydream Bridge.  Die cut a scene from decorative paper with diamond small enough to go over eyelet diamond and glue it to the eyelet diamond.  Cut out sentiment to fit, add fish tails to both side, curve then glue to center of diamond.  Glue this whole decorative part to the front of bellyband so that diamond is centered.  Now slide it onto the gatefold card.


 HC PRODUCTS USED       


Other Products:
White cardstock, pink cardstock, green cardstock, matte enamel dots, Copic Markers: BOO, B01, RV10, RV02, Y32, E53, E33, E35, YG03, YG23, Foam sheet.

For more tips on creating with the flower shaping molds, watch the tutorial at https://youtu.be/FSdPL7nXvQE
Instructions:
Card Size:  6 X 6”.   Cut a green piece of decorative paper 5 7/8 X 5 7/8” and glue it to the folded white card base.  Cut 4 pink Arianna Lace and 4 white Arianna Lace dies, glue them together slightly offset.  Glue 1 set to each corner of the card.  Die cut 1 foam sheet Diamond Basic and 2 white Diamond Basics sizes to mat Eyelet Diamonds.  Cut 1 Decorative paper pink Eyelet Diamond and 1 light green Eyelet Diamond.  Stack and glue them together according to size with the foam sheet on the bottom.  Glue the stack to the center of card. 

Stamp Arianna Blooms using Vibrant Fuchsia, sponge with Buttercup and lightly Fuchsia, die cut and shape in Floral Basic Shaping Mold (see video). While blossoms are still damp, pleat pedals with your fingers.   Stamp leaves using Fern Green and sponge with Leaf Green, die cut and shaping in Leafy Shaping Mold.  Stamp sentiment onto pink decorative paper using black then die cut with a small Diamond Basics, glue it to the Diamond stack.  Stamp birds on branch using black, die cut then color with Copic markers.

Glue 3 blossoms per flower, pierce hole in the center then insert stamen.  Cut leaves apart as necessary and form an arrange on the left side of Diamonds.  Foam tape the birds on a branch and adhere to the top of the Diamonds.  Glitter the flowers.  Finally add a pink dot to each corner.
Thanks for visiting today!
Robin

Job 37:5-6 New King James Version (NKJV)

God thunders marvelously with His voice;
He does great things which we cannot comprehend.
For He says to the snow, ‘Fall on the earth’;
Likewise to the [a]gentle rain and the heavy rain of His strength.