Pages

Comments are welcome and very much appreciated!

Tuesday, July 26, 2022

Happy Holidays

 Good morning!


Stars, stars and more stars!!

Material List HERE

Card size:  5 1/8” X 7 5/8”.

Die cut shaped card using the Decorative Circle Frames outer die (see video). Cut the silver border using the outer die and the decorative die together.  Die cut a light blue card front from decorative paper using the outer die.  Die cut the decorative die from white and die cut a large circle from silver.  Glue the blue paper to the card front followed by the silver frame and then the white decorative die cut.  Cut another large circle from foam sheet then glue foam and silver circle to the card center.

Stamp the large star X 2, small stars and the snowflakes using clear embossing ink then sprinkle with silver powder, shake off excess, heat emboss then die cut.  Do the same process for the Happy Holidays and the poinsettias and 4 leaves.  Cut a Happy Holidays from silver. Sponge the leaves with New Sprout or other light green ink.

Shape the poinsettias and leaves in the Shaping Mold, glue at least 2 together for each flower, pierce the center of each flower then insert wired silver beaded stamen. 

Pop up large full star then also pop-up center embossed decorative snowflake in star then glue it to the silver circle.  Glue the flowers and leaves to the left side of card. Use hot glue in thick layers under the stars, flakes and the embossed Happy Holiday.  Use more hot glue to glue Happy Holidays to the silver die cut mat for words.  Use more layers of hot glue under the silver and set aside to cool.  Hot glue stars and flakes to the card as desired (the more hot glue layers the higher they will pop up). 

Add Stickles to flake centers and dots on stars, on flowers and as desired.

Last step is to hot glue the left side of raised words to the bottom section of card over flowers and star as needed.

Thanks for visiting today!

Robin

Now faith is the assurance of things hoped for, the conviction of things not seen.

Monday, July 25, 2022

Bless You


Good morning crafty friends! 
I had this idea in my mind to do a decorative edge of some kind on a slimline
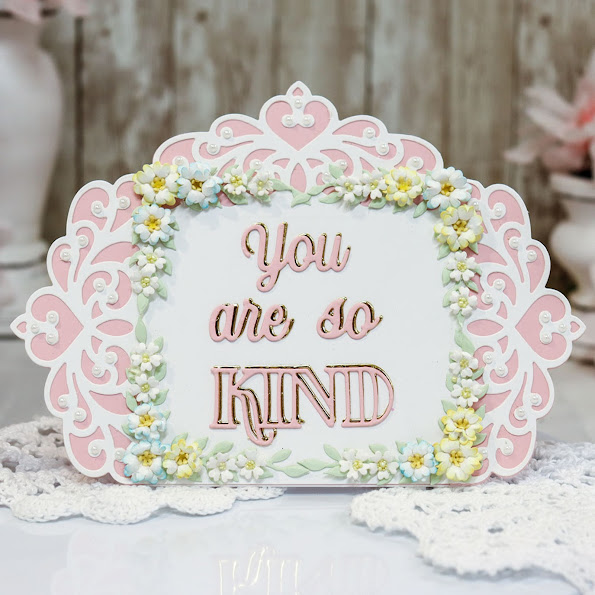
card and this die set (S5-514 You Are A Blessing) worked perfectly for what I had in mind.
I used an embossing folder on the light pink background then attached it to a 3 1/2 X 8 1/2"
Slimline card base of white.


As you can see by this photo, I cut 2 flower corner s to use on this card then I used just the outer portion of the flower corner die to cut the top of the card.  I was then able to glue the white flower die cut on the cut edge and the other one below toward the bottom of the card.  I added white pearls to just the cross sections of the right side of the card.


All I had to do now was cut Bless You out of Pink and out of white.  The Bless You is popped up a bit.

Thank you for stopping by today!

Robin


Tuesday, July 19, 2022

Heartfelt First Christmas


Good morning!
Isn't this baby precious?  He is the new addition to my great nephew's family.
This photo inspired me to make this page using all the blues and whites.

Material list here

 Card size:  12 X 12”

Use light blue decorative paper as a scrapbook page base, splatter with white acrylic paint, sponge some areas with Blueprint Sketch Distress or Distress Oxide Ink.  Tear a piece of darker blue decorative paper from the side all the way across on the top and bottom of paper.  Tear another smaller piece for right side of matted photo.  Curl the torn edges up on both sides of both pieces.

Use a snowflake stencil with white pigment ink on the large piece of dark blue toward the left half of paper.  Glue both pieces of dark blue paper onto 12 X 12 page centering vertically on page with small piece glued to the right side.

5 X 7 photo used in sample, create a plain white frame with the Frame A Card Leafy Border (no insert used) then mate underneath with silver.  Glue photo to white and silver frame then glue it to the page about 2” from right side.

Die cut 2 sets of the Swirly Border Accents (4 pieces altogether) from white.  Cut pieces of white gauze then spread them out to make them thin and not so uniform looking.

Stamp blue cardstock using embossing ink then emboss with white embossing powder the stars and the snowflakes from the Large Holiday Star set then die cut.  Stamp the stars including the large star with Blueprint Sketch Ink, die cut.

Create a large star bouquet at left bottom corner of matted photo including 3 Swirly Borders, stars, large star, snowflakes and gauze.  Create another smaller bouquet of stars at top right corner including stars, snowflakes, gauze and 1 Swirly Border.  Also add a little gauze and 1 snowflake to far left side of page.

Add Crystal Stickles to center dots of each snowflake (including snowflakes on the paper) and snowflakes in the stars.  Add rhinestones to stenciled snowflakes and as desires.

Die cut a “1” and “st” using the ‘Letters and Numbers Die, from dark blue leftover decorative paper and from silver.  Stamp and emboss with clear ink and powder, Christmas onto dark blue decorative paper, die cut then die cut Christmas from silver as well.  Layer silver under letters, number and word slightly offset.  Use pop ups under the 1 st and Christmas then attach to page over the large star bouquet.

Thanks for visiting today!

Robin

Romans 12:2
  Do not be conformed to this world,[c] but be transformed by the renewal of your mind, that by testing you may discern what is the will of God, what is good and acceptable and perfect.[d]

Monday, July 18, 2022

Kindness

 Good morning!


I applied grit paste to the brass gears and key, let dry then stippled on some brown paint.
I then applied Foundry Wax and heat it.
I applied Foundry Wax to the rusted corners as well.
Under the gears I added some burlap and denim and some thick jute at the top. 


My background (tan paper) was done using some Distress Oxide Inks and then applying embossing ink with a porous sponge and sprinkling with embossing glaze.  I added some walnut Distress ink to the blue decorative paper as well and then die cut with the design from Thank You for Your Kindness.
Before stitching on the machine, I cut some denim to use under the stitching. I also handstitched a few X stitches with thin jute twine (I got this idea from Stacy Hutchinson).


I've used: Thank You For Your Kindness S5-513 from Amazing Paper Grace.

Other products used: Elizabeth Craft Designs paper
Ranger: Grit Paste, Foundry Wax-Mined, Distress Ink, and Tea Dye Embossing Glaze. 
Sewing machine stitching and hand stitching
Steampunk gears/findings, hardware
Brown Acrylic paint
Jute, burlap and denim

Thank you for visiting!
Robin
Romans 12:2
Do not be conformed to this world,[c] but be transformed by the renewal of your mind, that by testing you may discern what is the will of God, what is good and acceptable and perfect.[d]


Friday, July 15, 2022

Amazing Paper Grace Shaped Card Tutorial

 Good morning!

This tutorial is exclusively at Amazing Paper Grace Creative Encouragement FB page


Tuesday, July 12, 2022

Heartfelt

 Good morning Heartfelt friends!


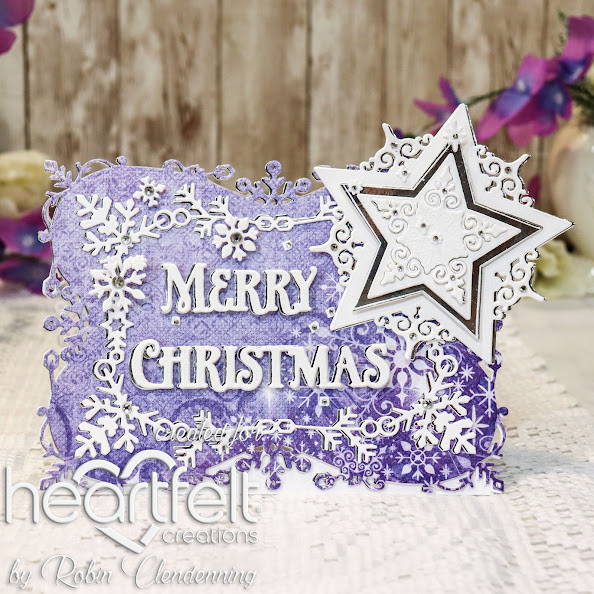
Material list HERE

Card size:  5 7/8” X 8 1/8” (Includes overhanging star).

See video on making a shaped card and follow instructions except do not cut all the way to the bottom for this Holiday Snowflake Frame die as it is a little too delicate for standing on fine edges.  Leave a small amount of straight cardstock at the bottom.  Cut another Holiday Snowflake Frame from Silver and 1 from purple decorative paper.  Glue the siler to the card base then glue the purple but off-set just a little bit.

Cut the inner Holiday Snowflake Frame from silver and from white, glue them off-set then glue them to card front, centering.

Stamp Holiday Star set using embossing ink on white and on silver (Tip: use a “magic” powder pouch on the cardstock before stamping so that embossing powder shakes off easily).  Use white embossing powder, shake off excess then heat emboss.  Also stamp snowflakes from the Large Holiday Star and Merry Christmas from Starry Holiday Greetings using embossing ink, white embossing powder and heat emboss.  Die cut all.  Die cut Merry Christmas and the outer Holiday star from Silver as well. Die cut Merry Christmas from white foam.

Glue the silver Holiday Star under the embossed white Holiday Star-off-setting, do the same with the Merry Christmas. Add foam to the next layer of the stars (silver with white emboss), add foam again then glue smaller white embossed star.  Last glue siler decorative snowflake inside white star then glue white embossed snowflake design on top off-setting a tiny bit.  Glue this stack to the upper right corner of card front (it hangs over the edge side and top). Make sure there will be enough room for the Merry Christmas.

Glue silver Merry Christmas under white embossed Merry Christmas-offset then glue foam Merry Christmas under the stack then glue it to the card front.  Add foam tape or dots to the decorative small, embossed snowflakes and glue them to the card front as desired.

Last step is to add rhinestones as desired.

Thanks for visiting today!

Robin

Galatians 5:22-23 and 19-21
 22 But the fruit of the Spirit is love, joy, peace, patience, kindness, goodness, faithfulness, 23 gentleness, self-control; against such things there is no law. 

I listed the good first but beware of what is not right before God.  This is not from me, this is from God's word, He is your judge, not mankind.

19 Now the works of the flesh are evident: sexual immorality, impurity, sensuality, 20 idolatry, sorcery, enmity, strife, jealousy, fits of anger, rivalries, dissensions, divisions, 21 envy,[d] drunkenness, orgies, and things like these. I warn you, as I warned you before, that those who do[e] such things will not inherit the kingdom of God.

Commit yourself to pleasing God not people.  God will bless you. 

Monday, July 11, 2022

Sorry For Your Loss!

 Good morning crafty friends!


Today I have a very pretty, sweet sympathy card with Layered Cherry Blossoms.
To make this mini slimline I used the Half Slimline Oval (shortened in the center) and the Sweet Leaf Mini Slimline.  The sentiment is from All Occasion Sentiments and Die Set.

The flowers and flower centers were die cut from colored cardstock, the leaves and stems were die cut from white then sponged with color.  I also added a darker pink to the pink blossoms.

When I finished putting my card together, I added rhinestones to the sentiment banner 
and some glitter to the flower petals.

I hope you like today's card and it gives you ideas for making your own Slimline or Mini Slimline card.
Thanks for visiting today!
Have a blessed day!

Robin

Tuesday, July 5, 2022

12X12 Fairy Penny Page

 Good morning friends!

I got this idea from a page I saw on Facebook by a girl named Chrissy, I'm sorry that is all I know about her but I just loved this flying V shaped layout of hers and the colors went perfectly with this photo of my great niece, Penny.  I always liked the colors purple and peach mixed on flowers, I've used it several times on cards in the past.  So Chrissy the fussy cutter, thank you very much for an excellent layout design.

Material list HERE.

Card size:  12x12

Pick a lavender color decorative paper (Sweet Pea Collection).  Spray with Saltwater Taffy (peach/pink-coral) Oxide spray ink.  Sponge with Saltwater Taffy ink pad and Deep Purple ink pad randomly in the flying V shape as shown on sample.  Stamp a few leaves from the Large Urn set at left corner over sponging.  Color with Zig Clean Color markers.

Stamp leaves again using Leaf Green on Deluxe Flower Shaping Paper, stamp Leafy Accent leaves using green, sponge with aqua and green, also a little light coral color (Saltwater Taffy), die cut, shape and set aside.

Stamp Rustic Sunflowers using Deep Purple, sponge with purple and Saltwater Taffy (Penny’s dress is peachy pink, choose color that best suits the photo using for scrapbook page), die cut then glue 2 same size blooms together for each flower.  Glue a pearl in the center of each flower except large flowers, use something larger if possible (large corduroy covered brads used here). 

Die cut 4-5 swirly leaves from the Cut Mat Create 2A from aqua color paper.  Cut 1 or 2 apart to be used around photo and to add to the embellishments going up the left top from photo.  Glue the others center right of photo and photo toward left bottom.  Adhere decorative strip down about 1/3 of the way across the page from left edge. Adhere photo using pop ups on the right side to compensate for the pearl trimmed strip. 

Arrange flowers and leaves going up to left top, going down to left bottom and some just to the center right of photo.  Glue all securely.

Stamp fairy using Memento Black, die cut then color with Copics, glue to flowers at left side of photo.  Stamp Magnolia Buds using London Fog, sponge with Saltwater Taffy and Leaf Green, die cut then insert where desired in arrangement.

Make loops with 16” white ribbon, fold the loops in half, secure fold with hot glue then inset as desired.

Glitter fairy wings, buds and flowers then randomly glitter 12 x 12 page. 


Thanks for visiting today!

Robin

For by the grace given to me I say to everyone among you not to think of himself more highly than he ought to think, but to think with sober judgment, each according to the measure of faith that God has assigned.

Monday, July 4, 2022

July DOM Amazing Paper Grace


I love making Trifold cards and this die is perfect because the sides do not cut.
Amazing Paper Grace is genius!
Before it was a stress trying to be so careful with cutting plate placement and cutting, 
sometimes needing a bigger machine to accomplish the task.
Thank you Amazing Paper Grace!!
 
Today's creations were created with the dies supplied by Amazing Paper Grace.

There are 13 cutting dies included in the Tiara Trifold.


Supplies:
Amazing Paper Grace July 2022 Die of the Month – Tiara Trifold.
Thank You For Your Kindness S5-513, Just A Note Sentiments and Tag SDS-169, nesting circles dies
gold metallic cardstock, white cardstock, pink cardstock, green cardstock, pearls, yellow Prills

The Amazing Paper Grace Die of the Month is available exclusively at Spellbinders Paper Arts during July 2022, Tiara Trifold along with other membership perks.

View this month’s Amazing Paper Grace Die of the Month! https://youtu.be/DDsj1W-BzAE

Follow me on Facebook!
Follow me on Instagram!

Tuesday, June 28, 2022

Fairy Wonderment Easel Card

Good morning!
 
Materials List HERE

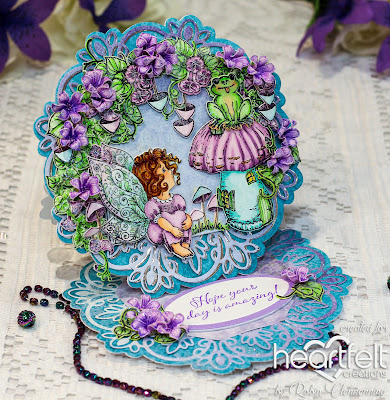
Card size:  5 1/2 X 5 1/2".

Make a shaped card using the Simply Elegant Centerpiece outer die on a folded 5 1/2 X 5 3/4" card overhanging the folded edge about 1/4" (see video).  Score the left side in the center parallel to the center fold, fold down toward card center. Unfold and lay flat, put glue on the bottom half of front only from score line down, when front is glued on and card is closed flat, sides, top and bottom edges should all match.

Die cut turquoise color decorative paper 2 times using outer die, glue 1 to inside and 1 to front.  Die cut decorative part of centerpiece from silver and from lavender twice. Glue silver and lavender together off-set then glue to card front, glue lavender to inside.  Die cut 2 Simple centerpiece pieces for the centers measuring 3 1/2" X 3 1/2". Glue 1 to the inside and pop up the other 1 on the card front.

Stamp sentiment on white using Majestic Violet then die cut with the large Eyelet Oval & basics to fit sentiment, die cut a lavender mat. Die cut foam sheet to pop up inside (this will be the card front “stop” so that card will display open). Stamp Hyacinth petals using Majestic Violet and using Deep Purple, sponge with Majestic Violet, die cut then shape in the mold.  Add Prills to the centers, curl under tips.

Stamp fairy, frog, mushroom cottage, mushrooms X 2, Ivy X 2, hanging Morning Glories X 3, Morning Glory bunch X 2, fence using Black Memento (if using alcohol inks to color), die cut then color.  Shape back of fairy wings, leaves, mushroom heads, frog head and body, and cottage top with a large stylist on foam.  Put foam tape on backs of formed sections to keep their shape. Add lacquer to frog and leaves.  Glitter fairy wings, card front and inside, flowers with lacquer and ultrafine clear glitter.

Glue and pop-up cottage, frog, mushrooms, fence and fairy. Glue and pop-up vines, 1 Ivy, glory bunches and some upside-down mushrooms around sides and over top.  Use hot glue to glue Hyacinth petal flowers around sides and front.  Glue some flowers on both sides of sentiment inside.  Cut apart the other Ivy then use leaves around flowers inside.


Robin


Psalms 119:1-3

[a] Blessed are those whose way is blameless,
    who walk in the law of the Lord!
Blessed are those who keep his testimonies,
    who seek him with their whole heart,
who also do no wrong,
    but walk in his ways!


Monday, June 27, 2022

You Are Amazing!

 Good morning!

My card today uses the You're Amazing die set from the Right Words release.  This border die can be used with or without the outer rectangle cutting die so that you could make the whole background panel of your card with the fan design if you want to (see post from June 14th for a sample of this).


The black and gold look fantastic against this multi-color Distress Oxide background!  Everything
just pops in contrast.
My flower today uses the Grand Cinch and Go Blossoms.
I have inserted yellow beaded stamen in the center and made it with multiple layers and layer sizes to give it a very full look like a dahlia or zinnia would be.


Close up of the gold being just a little offset from the black.


See how just a little gold showing gives these letters and design a little extra pop.

I hope you like today's design.
Go get crafty!
Thanks for stopping by!!

Robin


Tuesday, June 21, 2022

Best Wishes Fairy

Good morning!
 
Material List HERE

Card size:  5 X 6 7/8”.

Make a shaped card (see video) using the outer die of the Flourished Companion Frame die set from white cardstock, Cut another front from heavy cardstock and from decorative paper in aqua and purple colors. Optional, cut another decorative paper piece for the inside.

Using the second and third die in the set, cut a silver decorative frame and a purple inside.  Glue them both to the card front centering.

Stamp the fairy, several morning glories, frog, 3 bees/bugs, small mushrooms X 2, fence, mushroom cottage (choose one of the mini-mushroom cottages), X 2, and frog using black Memento ink.  Die cut then color. Shape leaves, fairy wings, bees, small mushrooms from the back with large stylist on foam. Add foam to the back of shaped parts to keep their shape. Add Wink of Stella to the wings of bugs, fairy wings, windows and frog eyes.

Stamp Hyacinth on Deluxe Flower Shaping paper using Deep Purple on some and Majestic Violet on some, sponge all with Majestic Violet, die cut then shape in the mold, finish shaping with Groove Golf Tools and Deluxe Flower Shaping Kit.  Stamp sentiment on white with Deep Purple, die cut with small tag then sponge the edges. Add Lavender Prills to the centers of flowers and glitter flowers.

Make a little scene with the fairy, cottage, frog, fence, mushrooms and bugs, popping up as desired.  Add the morning glories to the left and right corners going downward. Use hot glue to add flowers to the right and left corners. 

Randomly glitter the card front, insert tag into arrangement on the left side. Finish the inside as desired.

Thanks for visiting today!

Robin


Mark 8:34-38  The words of Jesus
34 And calling the crowd to him with his disciples, he said to them, “If anyone would come after me, let him deny himself and take up his cross and follow me. 35 For whoever would save his life[d] will lose it, but whoever loses his life for my sake and the gospel's will save it. 36 For what does it profit a man to gain the whole world and forfeit his soul? 37 For what can a man give in return for his soul? 38 For whoever is ashamed of me and of my words in this adulterous and sinful generation, of him will the Son of Man also be ashamed when he comes in the glory of his Father with the holy angels.”


Monday, June 20, 2022

Joy

Good morning!


My card this morning is done with the Half Slimline Diamond Etched Die (S4-1197) and 
water and squeezed or pleated together at the ends to create a ruffled look.

I also used the Petite Floral Potpouri (S3-420) as fill in flowers.
I inserted some turquoise flower stamen into the centers of the large flowers
and I used yellow Prills for the centers of the small flowers.
I also embellished the card with some Aquamarine Gems from Spellbinders (SCS-169).

I hope you have enjoyed today's card and it inspires you to create one yourself!!
Thanks for visiting!

Robin


Wednesday, June 15, 2022