Pages

Comments are welcome and very much appreciated!

Tuesday, November 26, 2013

ODBDSLC180 Fancy Ornaments

ODBD the Babe stamp set
Hello friends,  I am so excited to bring you my card for the Shining the Light challenge at Our Daily Bread Designs.
This week's challenge is to use circles or squares...you must incorporate more than 3 of one or the other and that does NOT include layering.
For more inspiration please visit my talented DT sisters:
To see all the creations in one place or join the challenge, click HEREYou have until December 1st to join us.  For this challenge you may use any stamps but if you have any Our Daily Bread Designs stamps we would love to see you use them.  If you participate, you have a chance to win a $15 certificate toward ODBD stamps or to be Spotlighted for the Shining the Light Award (The Shining the Light Award is only for those who use ODBD stamps).  We would love to see your creations.
Today I used the beautiful Fancy Ornament die set from Our Daily Bread Designs (this includes 3 ornaments and a corner piece).  I also used one of the sentiment stamps from Our Daily Bread Designs  The Babe.
The other circles I used are regular circle dies embossed with embossing folders.
The Blue ornament was cut twice and I popped up the middle.  The large ornament is stamped with Rejoice and double popped up.
I hope you like my sample and want to join in our our challenge!!
"Rejoice in the Lord always. Again I will say rejoice!" Phil. 4:4

Friday, November 22, 2013

ODBD Cathedral Window

Our Daily Bread Designs (ODBD) Cathedral window die set and Cathedral window-wood stamp set made this beautiful window using an embossing resist technique.  I also used one of the scripture verse stamps- collection 9 from ODBD.
After stamping and heat embossing with clear, I rubbed Wild Plum and Stream dye inks (Adirondack) over everything then used a clean paper towel to wipe away excess from embossed areas. I then cut about 1/4" away from the edge all the way around window (to have somewhere to apply glue for frame). Do not die cut stamped window or you'll end up with lots of little pieces! LOL!
Die cut Cathedral window inset (brown part), It is suppose to look like wood so I used a wood veneer "paper" I don't recommend that. It is too brittle and has some kind of coating which makes it hard to die cut especially something with a lot of cut lines. After die cutting inset, glue it to the window. Die cut frame from white (or whatever color you want) and apply glue to that 1/4" border you left around the window.  I chose to edge the frame with gold leaf because I was putting it on such a light background and didn't want to lose it! (The background is "dry" embossed with a Spellbinders double sided embossing folder.  It is also rubbed with a sponge and Antique Linen Distress ink.)
The flourishes and boughs are from Cheery Lynn designs.  The trio of butterflies is a punch from Martha Stewart.

Wednesday, November 20, 2013

Special Iris

I know bright comes to mind! But this card is for a special lady who is turning 91 this month and she had to leave her beloved gardens, especially her Iris', to go and live with her daughter.  I thought to "brighten up" her day!!  I think this might do the trick!!
I stamped, colored and tooled the Stampbord oval then found some card stock and paper to go with.  I used a variety of Spellbinder dies for matting and framing this pretty Iris.

Christmas Cardinal

Christmas Cardinal- By Northwoods.  This was for a color challenge,  great colors for Christmas!
I used paper ribbon (I've had in a stash for probably 15 years). The dies are by Spellbinder.
This sentiment is from Uptown Rubber Stamps...not sure if they are even around anymore, sorry.

ODBDSLC179 Holiday Our Daily Bread Designs Ornament-silver and gold


Our Daily Bread Designs makes the most beautiful Ornaments dies.  Here is one of a set of three.  The background silver embossed snowflake is from Our Daily Bread as well as the sentiment. The background stamp is large enough to stamp 4 1/2 X 5 3/4".  The Sentiment is part of the Chickadee Ornament stamp set.
Border dies are from Spellbinder.
Embossing folders from Cuttlebug and Sizzix.
Thanks for dropping by to see my sketch challenge card, hope you like it!
As Christmas draws closer so do my thoughts about how good our God is!! He provided a way for us all to be with Him if we will believe and turn to Him,  Jesus!  Born to save us all!!

Tuesday, November 19, 2013

ODBDSLC179 CHRISTMAS COOKIES


ODBD Custom Window and Curtain Die set
Hi there friends!! Today I am very excited to be sharing my third card as a guest for the Shining the Light challenge at Our Daily Bread Designs.
This week's challenge is to make a holiday card, specifically Thanksgiving or Christmas!!
For more inspiration please visit my most talented DT sisters:
                                                        Jan Marie Ennenga, Diana Nguyen
                                                 Cheryl Scrivens, DJ Rants and Chris Olsen
Oh, and if you didn't know...Chris Olsen is one of the newly chosen Dirty Dozen at SplitCoastStampers...Congrats Chris, you so deserve it!!
To see all the creations in one place or join the challenge, click here.  You have until November 24th to join us.  For this challenge you may use any stamps but if you have any Our Daily Bread Design stamps we would love to see you use them.  If you participate, you have a chance to win the $15 certificate toward ODBD stamps or to be spotlighted for the Shining the Light Award (The Shining the Light Award is only for those who use ODBD stamps). We would love to see your creations.
For this holiday card I use: Our Daily Bread Designs Snowflake Background stamp, Our Daily Bread Designs Sweet Christmas Wishes stamp set and The custom Window and Curtain Die set.
Thanks for stopping by and as always, comments are always welcome!!

Saturday, November 16, 2013

Die cut metal Winter Birthday

I used Elizabeth Craft Designs pine bough and pine cone dies on card stock and placed them on a piece of card stock.  Cut the border from a Cuttlebug border die and glue it on the card stock panel. I  then die cut the panel with the rectangle Spellbinders and cut a piece of thin metal the same.  I glue them together and started tooling the metal around the die cuts.  I then used black acrylic paint on the entire metal piece and wiped it off.  It stays in the deep crevices. I used Viva 3-D paint in copper, gold and turquoise here and there as well, wiping most off.  I die cut the Make a Wish from Cheery Lynn Designs from gold colored aluminum and glued it on.  Last, I cut the front of a black folded card a bit shorter than the back and added a gold metal edge to it then added a silver panel on top of a black panel inside the front to finish it off and make the front the same height as the back.
For more information on metal tooling/embossing go to Ten Second Studio...they are the experts and they have many tutorials to watch.  You can also buy all products/tools from them.

Thursday, November 14, 2013

Poinsettia Wreath

This wreath card was made mostly with a punch and die cuts.  First, I used Memory Box background die (diamond/stars) on white and glued it to white. Now it looks like a deeply embossed background.
I cut a ring from fun foam (mentioned today by my friend, Sabrina) I thought that was a great idea because now I don't have to add foam tape to the bottom to pop it up.
I punched a bunch of "pine branches" with a Martha Stewart punch in silver, white linen, white opalescent and white glossy and filled my ring making my wreath. Then I die cut a bunch of small poinsettia pieces (Memory Box) and formed them with a stylist and foam pad (needs to be dense like a mouse pad). I put the pieces together to form my flowers and glued them to the wreath with a leaf or two between each and at the ends.  I also used a Cheery Lynn holly flourish (just the flourish) on each side.  I added silver studs and white pearls for ornaments.  Added silver microbeads to centers of flowers.
I used a "Bow Easy" to create the 4 loop bow and some silver thread at the top as a hanger.
Lastly, silver heat embossed the Christmas Cheer and cut it out then glued it to my card!

Wednesday, November 13, 2013

Lake Wobegone

This card is part of the Tea Potters card driver for a very special patient in Minnesota.  Hopefully it help to bring a little cheer.  It is from the story of Lake Wobegone where the women are all strong, men are all good looking and all the children are above average...and in my story, the flowers always bloom!
The image stamp is from Flourishes, words from Inky Antics.
Embossing folder is from Cuttlebug. Other small stamps in front are from Stampscapes.

Peaceful Night.

This stamp is from Wild Rose Studio.  I masked the bears and splattered the background with clear fluid embossing liquid then embossed with white powder. I then used a brayer to apply color from my Kaleidacolor multi-color pad.  It turned out to look a little like Northern lights.

Tuesday, November 12, 2013

ODBDSLC178 WARM WINTER WISHES


Hello friends!  Today I am bringing you my second card for the Shining the Light challenge, at Our Daily Bread Designs  (ODBDSLC178, Sketch). I love this snowman scene, it actually has a coordinating window die that can go with it; then the scene is outside the window!!  Here I used it as an ornament.
This week's challenge sketch:
For more inspiration and very creative ideas,  please visit my talented DT sisters:
                                                 Jan Marie Ennenga, Diana Nguyen
                                            Cheryl Scrivens, DJ Rants and Chris Olsen
To see all the creations in one place or join the challenge, click here.  You have until November 17th to join in the fun.  For this challenge you may use any stamps but if you have any Our Daily Bread Design stamps we would love to see you use them.  If you participate, you have a chance to win the $15 certificate toward ODBD stamps or to be Spotlighted for the Shining the Light Award (The Shining the Light Award is only for those who use ODBD stamps). We would love to see your creations.
 Be sure to add ODBDSLC178 to your title and if you have a gallery on SCS, put it in your "key word".

Saturday, November 9, 2013

Labor of love-hidden panel card w/instructions


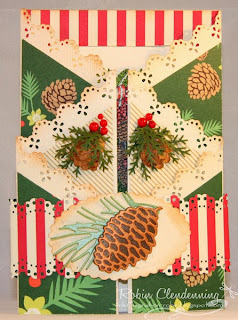
This is one of the cards I taught in class today.  I call it the hidden panel card.  As you can see in the forth picture, there is a message panel under the main image. I first saw this card (one similar, different theme), on the Cheery Lynn Blog.  I clicked on it and was directed to the page of the author where she had instructions on how to make it (and a translation thankfully since it was Swedish or something).
I also went to Kittie Kraft's Blog (Kittie Caracciolo) to get her tutorial on making pinecones.  There is no one better at making stuff out of paper than Kittie in my opinion!  If you click on Kittie Kraft Blog above I've linked it to her tutorial.
The paper I used on this card is from American Crafts.  The stamp is by Northwoods.
The ladies all loved their project but said that I stretched them with this card!! It WAS quite labor intensive even though I had the main card cut and scored, the panels cut at an angle, the die cuts made...still took us about 3 1/2 hours to complete the card with the tiny pine cones. I believe they all thought it was very worth it.  

Friday, November 8, 2013

Fire and Ice

This is basically a non paper card (except the card base itself). I used gold, red, copper and white glaze on the base applied with a sponge brush then stamped into with a Hero Arts background stamp. I then glued on some gold mesh pieces. got some aluminum foil and inked it with alcohol inks (orange and wild plum) then crumpled and straightened.  I die cut the Dream from a gold colored aluminum sheet.
The Half Dome was stamped with StazOn on Stampbord (clay base scratch board). I inked it with dye ink and used scratch tools and steel wool. added the little stars and moon.  inked the edges of the Stampbord with gold leaf pen!

Wednesday, November 6, 2013

Christmas!

This is a card I did this morning for the sketch challenge over at SCS. They always come up with really cool challenges over there.  For more info on joining in on the SCS challenges click here.
The stamps used for this card are from Inky Antics.  They so look like the snowman is lifting his arms in praise of what God did for us on Christmas day by sending His only Son to be born in a meager manger...do you realize that He left unimaginable wealth and constant praise and His majesty to live here on earth with us, be spit on, rocks thrown at Him, ridiculed then whipped and crucified to die for the sins of the world?  Can you even imagine giving your only son for someone else to live?  Thank you Father in Heaven for doing that for us and Jesus for obeying!! And YES, for Easter morning, when He rose again from the dead and reigns forever!!  It is because He rose again that we all can have life eternal if we BELIEVE in and put our trust in Him!

Tuesday, November 5, 2013

ODBDSLC177 LITTLE TOWN OF BETHLEHEM

ODBD Chickadee Ornament stamp set (words)
Hello friends!
Today I am so excited to be sharing my first card as a guest for the Shining the Light Challenge at Our Daily Bread Designs.
This week's challenge is "Be Inspired by a Song or Music".
For more inspiration, please visit my very talented Design Team sisters:
                                                            Jan Marie Ennenga, Dianna Nguyen,
                                                        Cheryl Scrivens, DJ Rants and Chris Olsen.
To see all the creations in one place or join the challenge, click here.  You have until November 10th to join us for this challenge.  For this challenge you may use any stamps but if you have any Our Daily Bread Designs stamps we would love to see you use them.  If you participate, you have a chance to win the $15 certificate toward ODBD stamps or to be Spotlighted for the Shining the Light Award (The Shining the Light Award is only for those who use ODBD stamps).  We would love to see your creations.
Today I used the ODBD O Little Town of Bethlehem set and also the Chickadee Ornament set (for the words).
I also used a variety of dies and embossing folders from: Cheery Lynn Designs, Spellbinder, Memory Box and Cuttlebug.

Saturday, November 2, 2013

Pear cards/ glittered and masked


Here are a couple of Pear cards.  The top one is for a glitter challenge.  I used glue and glass glitter on the word BG and used Score Tape (double sided tape, clear) for half the pear with Elizabeth Craft Designs glitter- transparent.
The bottom card was done for a mask challenge. First I embossed the pear with clear and then masked it and ran it through my printer with the Scripture I had chosen (Gal. 5:22 Fruit of the Spirit). I then left the mask on and proceeded to sponge color on the words.  I then made a reverse mask and colored with Copics on the part of the pear not covered in embossing (mostly the small script). Then I ironed the image between newsprint to remove the embossing and sponged color on the pear not previously colored.
I added the green sheer bow to top it off.
The top card images are from Stampers Anonymous, Stamp in the Hand, Stampendous.
The bottom card is from Stampers Anonymous.

Flip down Christmas card

This is such an ingenious little card...those panels close up and there is a magnet closure at the top.
To see a tutorial for this card I will give you a link right here.   It is not as hard as it might appear.  Go into your craft room and get started!!
The main image (shown here is from Stamps Happen.  The image on the background (both green and white) is from Magenta.
The image seen when closed is from Northwoods.
I might add another sentiment somewhere in the middle so that you can read it when closed as it would come in the mail.  Probably Merry Christmas or Joy to the World.