Pages

Comments are welcome and very much appreciated!

Tuesday, May 31, 2022

I'm Thinking of You

 Good morning!


Material list HERE

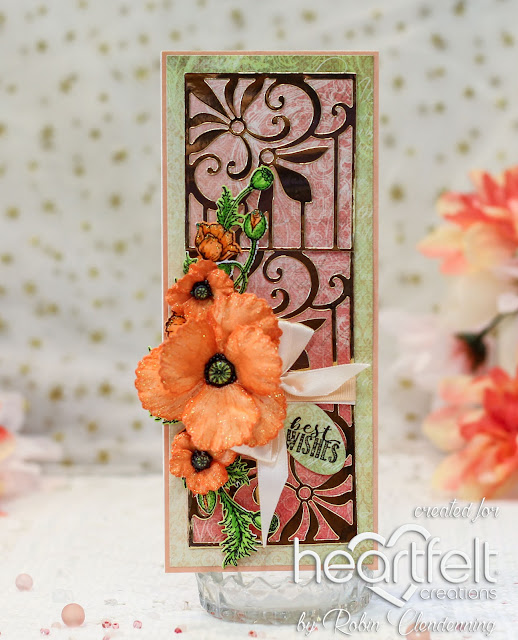
Card size:  4 3/4" X 6 3/4".

Make a shaped card (see video) with the Decorative Circles Frame outer die on a folded card (folded measures 5 X 7” with fold at the top).  Lay the die over the edge of fold about 1/4" so that most of fold stays intact. Cut another card front with the full outer die from white cardstock and also from pink decorative paper.  Glue the 2 whole front pieces together but do not glue to card.

Cut a circle about 3 5/8” from front 2 pieces that are glued. Cut a piece of foam sheet the size of front then cut a circle from it to match the circle in the front piece, glue it under the front.  Find a piece of decorative paper that has a large circle design to cut out that will show through the cutout circle on card front (it should be cut out a little larger 3 3/4" would be good).  Stamp the sentiment on the decorative circle using Mulberry Archival Ink.  Glue the circle to the center of the card base (make sure that edges will be covered when you glue the card front on top of it).  Now glue the card front on the card base making sure to match edges and make sure circle with sentiment shows nicely).

To give the card even more dimension, cut the decorative Circle Frame from gold and from foam sheet to pop up.  Cut the circle from center again on both then glue together then glue to card front.  Now make a nice circle frame with 2 circle dies to finish circle opening.  Cut from pink, add foam strips underneath then attach to the circle opening.  All these popped up elements gives the card faux window extra dimension for the viewer.

Stamp poppies using the Wild Poppy Bouquet, die cut and color.  Stamp the Wild Poppy blossoms using Coastal Coral on some and Mulberry on others, stamp enough for 2 blossom each.  Sponge the blossoms, die cut then shape in the Shaping Mold.  Stamp several extra centers, color then hole punch (about 1/4"), shape from the back to make like a dome shape then add hot glue dot under each dome to help it keep it’s shape.  Glue flower blossoms together in sets of 2, add the punched centers then add a line of liquid glue around the center and sprinkle with Blackish color Prills.  Glue each flower to a stem of the EZ Stem Floral Wires (there will be 7 flowers).

Glue the stamped image of poppies and the stem onto card at left side of the circle opening (cut image as needed to glue poppies under stem but leaves on top of stem).  Add glitter to the flowers also add lacquer to the leaves.

Thanks for visiting today!
Robin

10 Love one another with brotherly affection. Outdo one another in showing honor.

Flower Stem tutorial at Heartfelt

 See this tutorial at Heartfelt Creations Blog here 


Robin

Monday, May 30, 2022

Sending Hugs!

 Good morning!


Today I've used the Sweet Leaf Mini Slimline die and added the tiny flowers that come with it. 
This makes the perfect easy card to send to your friends and family to let them know you are 
thinking of them.

I just cut the Sweet Leaf from green, backed it with lavender and added little white flowers with yellow/orange centers.
The sentiment was stamped with Wilted Violet Distress Ink and added lavender rhinestones.

Thanks for visiting today!
Robin
But the steadfast love of the Lord is from everlasting to everlasting on those who fear him, and his righteousness to children's children, to those who keep his covenant and remember to do his commandments.

Tuesday, May 24, 2022

God Arms Me with Strength

 Good morning!

I really love the shape and look of this decorative die from Heartfelt Creations and it goes so well with the decorative frames from Heartfelt Creations as well.


The new poppies are such a beautiful addition to these gorgeous dies and paper.
I just love the total look!!


Material list HERE

 Card size:  5 X 7”

This card is vertical and has a top-fold so the first step is to cut 2 pieces of white cardstock, one 5 1/2 X 7 1/2" and one 5 1/2 X 7 1/4". On the first 5 1/2 X 7 1/2", score at 1/2" then fold in. Place the outer die of the Flourish Companion over the folded edge about 1/4" then run through the die cutting machine.  Place the die on the second piece and run through machine.  Glue the 2 together matching sides and bottom (top piece will overhand fold about 1/4").  Cut another front from the black decorative paper.   Glue to card front.

Place the next size (decorative die) from the Flourish Companion set on gold and on pink decorative paper then cut through both.  Use the gold on the black and use the inner pink on the inside of the gold die cut.

Stamp the Curvy Floral Frame using embossing ink on the black decorative paper then emboss with gold powder and die cut.  Stamp the sentiment using black on light pink decorative paper then die cut with the Curvy Floral Frame, use just the inside stamped portion of the die cut. (Tape them together on the back in a few places).

Cut a piece of Fun Foam to fit under the sentiment, glue it to the bottom of sentiment/frame then glue to center of card.

Stamp poppies using Rose Matter and using Carnation, sponge with Rose Madder, die cut, sponge edges, some with Rose Matter and some with Carnation then shape in the mold.  Glue 2 flowers per poppy (except bud, it is 1).  Stamp centers only of the small and medium poppies, sponge with green, punch out with hole punches or fussy cut then glue to the centers of poppies after shaping in a bowl shape. (it helps to dab some hot glue under the bowls to help them keep their shape).  Make a line of liquid glue around poppy centers then fill with blackish Prills, remove any Prills covering the centers. For the bud: stamp side out, form to close.  Punch a small green flower from decorative paper then glue under bud.

Arrange 2 poppies on top left corner of frame and 3 on the bottom right of frame.  Use sponge with glue to glitter flowers and card around sentiment.

Optional: inside, cut another outer die cut of the Flourish Companion from dark pink then glue.  Sponge edges with black

Thanks so much for visiting today!
Robin
Galatians 6:9-10 
And let us not grow weary of doing good, for in due season we will reap, if we do not give up. 10 So then, as we have opportunity, let us do good to everyone, and especially to those who are of the household of faith.

Monday, May 23, 2022

Best Wishes!

Good morning!

Today I've done a "Mini Slimline". Cute isn't it!?  This seems to
be one of the new things trending on Facebook and Instagram.
Amazing Paper Grace has created a beautiful leafy "mini" Slim
for card making and I just LOVE it.
It's the Sweet Leaf Mini Slimline (S5-508) from the 
Layered Fleur Bouquet Slimline Collection.


This card also features The Layered Daisy (S4-1193) from the Layered Fleur Collection as well.


The sentiment is from Sentiments One (S2-082)
on a die cut oval from Spellbinders (Nesting Ovals).


I used Mustard Seed Distress Ink to sponge the daisies and a little Archival Leaf Green to sponge on the green cardstock leaves and the green parts of the flower.  Little dots of Yellow Nuvo were added to
the yellow cardstock flower center and finally, a multi-loop bow made from dyed seam binding graced the stem of the pretty daisies.

That about wraps it up, thanks for visiting today!
Robin
Galatians 5:22-23, 25-26 
 22 But the fruit of the Spirit is love, joy, peace, patience, kindness, goodness, faithfulness, 23 gentleness, self-control; against such things there is no law. 25 If we live by the Spirit, let us also keep in step with the Spirit. 26 Let us not become conceited, provoking one another, envying one another. 


Tuesday, May 17, 2022

Slimline Best Wishes

 Good morning Heartfelt friends!

Today I have a true slimline size card to show you.  

It took a bit of creative die cutting to get the extra length needed but this time I wanted to show a full sized slimline instead of a mini slim for those who want to make a business envelope size card to send.

Materials list HERE

Card size:  3 1/2 X 8 1/2"

Cut white cardstock to 7 X 8 1/2" score at 3 1/2” to make 3 1/2 X 8 1/2".  Cut an apricot color cardstock panel 3 1/2 X 8 1/2" then glue to card front.  Cut green decorative paper panel 3 3/8 X 8 3/8”, glue to card centering.  Cut pinkish Apricot decorative paper to 2 3/4 X 7 7/8” set aside.

From gold, die cut French Gate plus 1 extra section.  Trim as needed to fit all 3 sections onto pinkish paper. Wrap gold and pink paper layer with ribbon two thirds down then glue to card, centering.

Stamp Poppies using Bright Tangelo, sponge, die cut then shape in the mold (see video).  Use hot glue to glue flower sets together.  Stamp centers using black, sponge with Leaf Green, punch or fussy cut centers out.  Glue centers to center of flowers then surround with Prills. Glitter with the Nuvo Drops.

Stamp corner stamp from the Wild Poppy Accents using black, color, die cut then cut apart at center. Stamp sentiment using black, die cut with the Ticket and Tags die set.

Glue the 2 sides of the corner (after cutting apart) one going up the left side from ribbon and one going down left side from ribbon.  Glue large Poppy to center of stamped images then glue one small Poppy on each side of the large Poppy. 

Make a bow with Satin ribbon then hot glue to card under large Poppy.

Thanks for visiting today!
Robin

Romans 12:2
Do not be conformed to this world, but be transformed by the renewal of your mind, that by testing you may discern what is the will of God, what is good and acceptable and perfect.

Sunday, May 15, 2022

Tuesday, May 10, 2022

Special as You!

 Good morning!

I LOVE plaid so any time we have plaid paper in the collection I try to use it.  This card is so fun with the plaid and the poppies, I just love it!!


Material List HERE

 Card size:  5 X 7”

Make a shaped card base using the Flourish Companion Die, outer die by placing the die about 1/4" off the folded edge.  Cut another front from white and from plaid decorative paper using the same die then glue to the folded card matching edges and bottom. Cut the decorative outer die from Gold then glue to card.  Cut the outer die from white using the Filigree Companion Die, cut another one from plaid decorative paper and one from Fun Foam then glue the 3 together matching edges.  Glue the Filigree Companion Die stack to the card base, centering. Cut the decorative part of Filigree out die from gold then glue to card.

Die cut the center section of the Filigree Companion Die from cardstock, decorative pink paper and from Fun Foam, glue together then glue to the center of card. Cut the decorative part from gold then glue to card.

Stamp sentiment using Worn Lipstick (or similar like Rose Madder) onto lighter pink decorative paper then cut with a circle die also cut from Fun Foam.  Cut a circle mat from gold then glue stack together.  Glue to card but more like 1/3 of the way over from right side instead of centered (leave space for a medium size Poppy).

Stamp Poppies using Worn Lipstick, sponge, die cut then shape in the mold.  Stamp the leaf part of Wild Poppies Accents using Fern Green, sponge with Leaf Green, die cut then use the Deluxe Shaping Kit to form slightly from the back, glaze leaves.  Cut leaves apart.  Stamp several poppy centers on a separate piece of white using Black, sponge with Leaf Green, glaze with Lacquer.  Punch out or fussy cut. 

Use hot glue to glue 2 poppies together for each flower, glue centers to flower centers then add a ring of glue around centers and add Prills or Black Gala Glitz, whatever you have.  Add Nuvo White Blizzard glitter glue to flower petals. Glue flowers and leaves to both sides of the sentiment.

Color pearls with R43 Copic Markers then add to card front as embellishments.


Thanks so much for visiting today!

Robin

Be kind to one another, tenderhearted, forgiving one another, as God in Christ forgave you.

Monday, May 9, 2022

My Beautiful Friend!

 Good morning friends!

I have a new slimline card to show, made using Amazing Paper Grace new Half Slimline dies.  This die is called Half Slimline Oval #S4-1198 and comes with the word dies "Beautiful" and
"Friend".  I also used #S5-436 Grand Cinch and Go Flowers and #S3-420 Petite Floral Potpourri flowers.


I used some white stamen inserted into the larger flowers and some yellow Prills
for the centers of the small filler flowers.


The cardstock I used was some pink shimmer and also some white for the base and flowers and a scrap of light sage green for the leaves.
The flowers were sponged with Pink Peony and Buttercup Archival Inks from Ranger.
The embossing folder used for this slimline comes from Divinity Designs.
I finished up by adhering pearl halves to each corner of the card.

My dies were provided by Amazing Paper Grace.
You can find these dies at Spellbinders.

Thanks for visiting today!  For all you moms out there I hope you had a lovely 
Mother's Day yesterday.
Robin


Philippians 4: 6-8

do not be anxious about anything, but in everything by prayer and supplication with thanksgiving let your requests be made known to God. And the peace of God, which surpasses all understanding, will guard your hearts and your minds in Christ Jesus.

Finally, brothers, whatever is true, whatever is honorable, whatever is just, whatever is pure, whatever is lovely, whatever is commendable, if there is any excellence, if there is anything worthy of praise, think about these things. 


Wednesday, May 4, 2022

What's Bakin'


I knew right away that I wanted to go for the retro look on this cook oven.  The old look is the new thing, right?
Our grandmother's or mother's oven is what we want with those great, fun colors they were never afraid to use in the kitchen.
I went for pink today but my other favorite is aqua, that would be so cute!
 
My creations were created today with dies provided by Amazing Paper Grace.

There are 14 dies included in the Pop Up 3D Vignette What's Bakin' Oven.


Supplies:
Amazing Paper Grace May 2022 Die of the Month – Pop Up 3D Vignette What's Bakin' Oven.
S4-1164 Filigree Marquis and S3-420 Petite Floral Potpourri
Glossy white cardstock, Alcohol Inks, Alcohol Ink applicator, silver paper, Prills, Stickles, black paper.

For more Pop Up 3D Vignette What's Bakin' Oven Inspiration
Visit each Creative Team blog linked below for their take on creative paper crafting ideas with  Pop Up 3D Vignette What's Bakin' Oven, the Amazing Paper Grace May 2022 Die of the Month!
View this month’s Amazing Paper Grace Die of the Month! 
Video https://youtu.be/zAmeKqBE3KQ

Follow me on Facebook!
Follow me on Instagram!


Tuesday, May 3, 2022

Gatefold Dragonfly-Amazing Day

 Good morning Heartfelt friends!


Gatefold card


Opened

Materials list HERE

Card size:  6” X 6”.

Make a card base with white 12 X 6” cardstock.  Score at 3” and 9” then use a bone folder to get a nice fold.  Cut purple and turquoise blended decorative paper as follows: Two-6 X 3” (for the front), two-5 3/4"X 2 3/4" for the inside, one-5 3/4"X 5 3/4" purple gingham and one-5 X 5” square for the inside center.  Glue all panels onto card base, the inside has a slight white border around each decorative layer.

Finish the inside of card by cutting a 3” gingham circle for the center, stamp Amazing Day using Deep Purple on white then cut with a 2 3/8” circle.  Also stamp, die cut and color the smallest dragonfly to embellish sentiment.  Randomly glitter the inside of card and dragonfly.

For the outside “gate”: Cut decorative gate with the French Gate die twice from silver (there are 2 different outer dies so be sure to use the same size for both halves of front).  Also cut from silver a circle 2 1/2" and a circle 2 3/8” from gingham.  Glue the two gate fronts onto card, glue the 2 circles together but do not glue to card, pop it up attaching to left side only.

Stamp a small size dragonfly, once on white cardstock and once on vellum.  Color the dragonflies with the Zig markers (vellum from underneath).  Glue together then glue onto center outside circle (leave wings free).

Stamp Magnolias using Cactus Flower, Deep Purple and Paradise Teal, die cut, sponge edges then shape in the mold (see video).  Stamp Wild Rose flowers with the same colors following the same instructions for Magnolias.  Stamp the leaves using Garden Patina and Leaf Green, die cut, sponge with like colors then shape in the Leafy Accents mold.

Use 2 blossoms for each flower, finish shaping (centers mostly) with the Deluxe Flower Shaping Kit, glue flowers together with hot glue, pierce centers of Magnolias and insert stamen.  Add glue to the centers of Wild Roses and sprinkle with Prills to fill centers.  Cut leaves apart in 1’s, 2’s and 3 leaf sections.

Close the front and use something to weight it down to stay closed while arranging flowers and leaves.  You want some to over-hang right side of circle just a bit so that it keeps the card closed.  Be careful not to overhang too much making it hard to open and close. (Each time you close the card just untuck those flower petals so that they are on top of the circle). 

Finish decorating the front with leaves and flowers, make sure you can open and close again without too much difficulty then glitter all the flowers, try to avoid glue on the silver paper.

Thanks for visiting today!

Robin

if my people who are called by my name humble themselves, and pray and seek my face and turn from their wicked ways, then I will hear from heaven and will forgive their sin and heal their land.