Pages

Comments are welcome and very much appreciated!

Monday, January 31, 2022

Altered Flourished Sonata Die


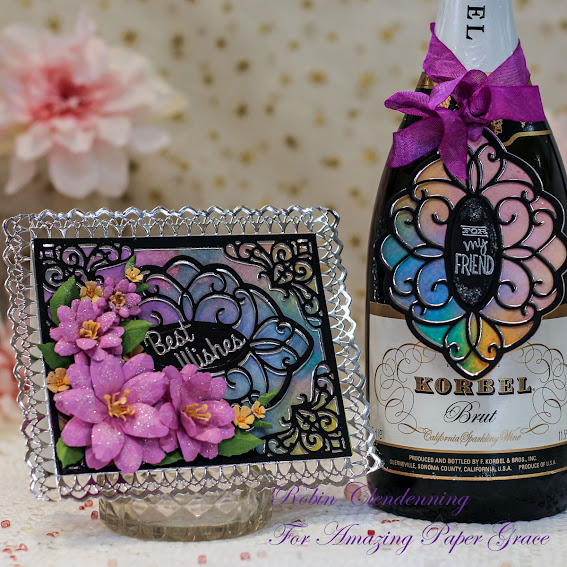
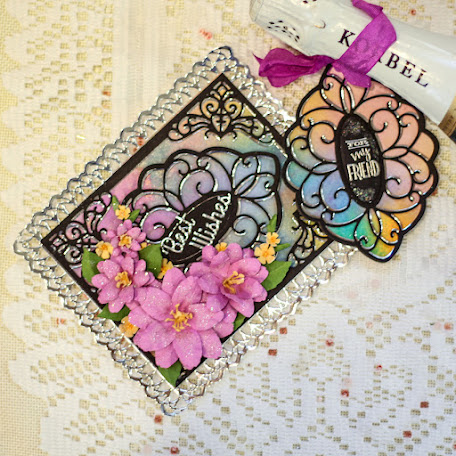
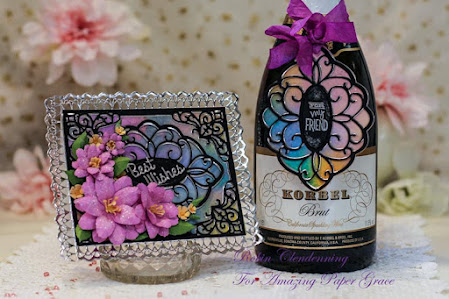
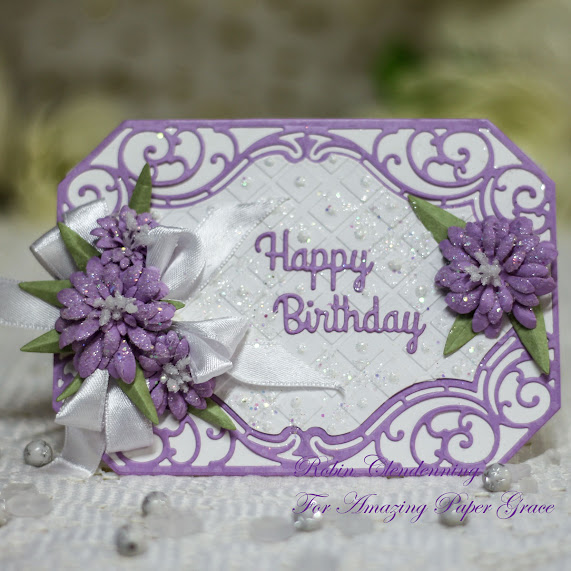
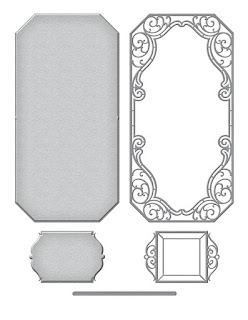
Good morning friends!  Today I have a card made with the Flourished Sonata but in this case I have altered the die to shorten it.
I place the die on lavender cardstock, large enough to make the
full 5 1/2" width. I place the top plate at the 2 3/4" mark so that the die will not cut any further than that.  Turn the paper around and place the die on matching cut lines in order to cut the other half.  Put the plate only to the first cut mark (should be 2 3/4") then cut.
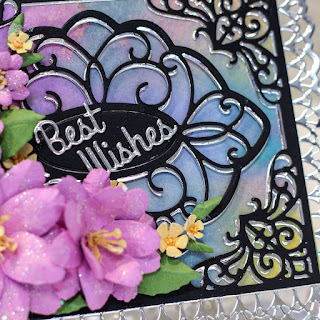
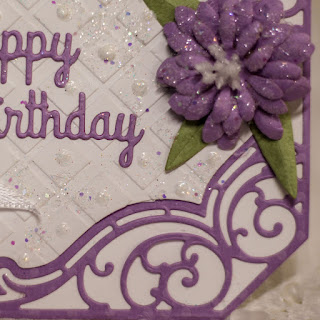
Do the same with the middle section (white cardstock) then run through the die cutting machine with an embossing folder to dress it up.  I used Nuvo glossy white drops to embellish each tiny diamond in the patter I chose instead of pearls.
Die cut the sentiment from lavender using Sentiments One.
Now die cut several flowers from lavender using some Cinch and Go Flowers from Amazing Paper Grace.
Insert white stamen (Rock Candy used here).
Lastly, I used glue and loose glitter on the card and on the flowers
and added white satin ribbon bows.

Flourished Sonata

All dies provided by Amazing Paper Grace


Hope you enjoyed this card and will try it yourself!
Thanks for visiting today!

Robin
Ephesians 4:1-3
I therefore, a prisoner for the Lord, urge you to walk in a manner worthy of the calling to which you have been called, with all humility and gentleness, with patience, bearing with one another in love, eager to maintain the unity of the Spirit in the bond of peace.

We are all humans traveling through this thing called life.  There is no time for hating
and destroying others with your words.  

Tuesday, January 25, 2022

Congratulations!

 Good morning!!

Today I've used some peachy colors for this fun frame!

The gold trim vellum sentiment really sets this card off.


Find the material list HERE

Card size:  5 X 6 7/8”

Because this is a tall tent fold use 2 pieces of white cardstock, cut 1 7 3/8” then score 1/2” at the top to create a tab then fold down, use the outer die of the Flourish Companion Die, make sure to let die hang over fold by about 1/4" so that fold stays intact.  Cut the other piece of cardstock to 5 1/4"X 7” then use the outer die again making a full die cut of the shape.   Glue the front onto your tab matching edges of front with the back of card.  Cut peach color cardstock using the same die then glue the die cut to the front.

Out of Luxe Gold use the large decorative die in the Flourish Companion set to cut, cut out decorative paper to coordinate with peach as well.  Glue the decorative gold die to front as well as the inside of the die cut, cut out of decorative peachy paper.

Stamp the Curvy Floral Frame using black ink, color with Copic Markers or your favorite coloring method.  Stamp the flowers and leaves from Curvy Floral Frame and from Rectangular Floral Frame using black, color, then die cut all.  Die cut a gold Curvy Floral Frame as well.  Glue the gold Floral Frame under the colored frame off set.  Use thin foam pop ups to pop up frame onto cut out Cottage paper, trim paper where needed so that it is all inside frame (you could use the die but since it is popped up the edge can be seen).  Glue this stack onto the card front.

Shape the flowers with a pad and Gold Groove Tools, add Prills to the centers then glitter them and attach to the flower images on the card.  Glitter parts of the card base (avoiding the gold) using a sponge with glue and Crystal Clear.

On Vellum, Use Embossing ink (VersaMark use here) to stamp sentiment then cover with gold embossing powder, remove excess powder and use the heat tool to emboss until shiny.  Cut 2 strips of gold about 1/8” wide, glue them to each side of the sentiment then fishtail the ends with scissors.  Because vellum shows adhesive, put glue under gold trim only, put some thin foam strips under the gold in the center part of the card to make it even with the frame.

(Optional) Die cut decorative paper for the inside of card then glue in place, trim the top so that it does not interfere with score line.

Thanks for visiting!

Robin
Today's thought...
“Judge[a] not, that you be not judged. For with what [b]judgment you judge, you will be judged; and with the measure you use, it will be measured back to you. And why do you look at the speck in your brother’s eye, but do not consider the plank in your own eye? Or how can you say to your brother, ‘Let me remove the speck from your eye’; and look, a plank is in your own eye?

Jesus taught us not to judge another, we are only to love others, it is God who will judge.  Everyone will stand before the judgement seat of God someday, don't worry about what other people (in the world) are doing.  Every person needs grace!

Saturday, January 22, 2022

Classically Becca, 2 Piece Set


I love black and silver with bright color and what inspired me today was seeing a background piece that I had sitting around.  Isn't that always the case, you see something that just sparks ideas in your head.
I decided to add to the color by adding some beautiful brightly colored flowers.
For this collection, I made a 2-piece set to give my good friends in celebration
 of their Anniversary.
I hope you like it and it gives you ideas to celebrate with your friends or family.

 
Today's projects were created with dies provided by Amazing Paper Grace.

My Projects for Today  


Classically Becca Availability:
These dies and plates are available from Spellbinders right now! Click here: Classically Becca Collection

Spray Inks for background layer on watercolor paper, black cardstock, white cardstock for card base, Violet cardstock, green cardstock, yellow cardstock, yellow Prills, glitter, silver mirror cardstock, ribbon, silver embossing powder, embossing ink, heat gun.


For more Classically Becca Collection Inspiration
Visit each Creative Team blog linked below for their take on creative paper crafting ideas using the Classically Becca Collection!

Follow me on Facebook!
Follow me on Instagram!

Thank you for visiting today!

Robin


Tuesday, January 18, 2022

As You Recover

 Good Morning!

Another Floral frame to show you, this time the rectangle.

Find the materials list HERE

Card size:  5 1/8 X 6 1/8”

Make a folded ivory card to measure 5 1/8” X 6 1/8”.  Cut decorative small print flower paper 5 X 6” then glue it to folded card.  Cut a piece of dark green decorative paper 4 1/2" X 5 1/2" then glue it to the flower print.  Find a piece of decorative paper with the Rectangular Frame and cottage on it, cut it to 3 5/8” X 4 3/4", using foam, pop this layer up on card.

Stamp the Rectangular Floral Frame and 1 small flower using black ink, die cut then color with Copic Markers or chosen coloring system.  Pop it up onto the cottage paper layer then glue the flower onto image flower staggering petals.

Stamp the sentiment using Paradise on Ivory then use a small oval to die cut.  Die cut a slightly larger oval for a mat out of dark green decorative paper.  Pop these layers up inside of frame toward the top. 

Add Prills to the flower, glitter flower and card base with Crystal Clear.


Thanks for visiting today!


Robin

I Corinthians 13: 4-8a

Love is patient and kind; love does not envy or boast; it is not arrogant or rude. It does not insist on its own way; it is not irritable or resentful;[b] it does not rejoice at wrongdoing, but rejoices with the truth. Love bears all things, believes all things, hopes all things, endures all things.

Love never ends.

Saturday, January 15, 2022

Facebook Tutorial Easel Card

 Tutorial this morning at FaceBook, Amazing Paper Grace HERE


Materials and step by step instructions at Amazing Paper Grace  
Just click on the photo saying "Follow Me"

Thanks for visiting!
Robin

Tuesday, January 11, 2022

For My Friend

 Good morning!

Debut of the new Floral Frames from Heartfelt Creations!

I did a bit of paper distressing on this one.


Find the materials list HERE

 Card size:  

6” X 6”.

Start with white cardstock 6 X 12” folded in half to make a 6 X 6” card base (tent fold).  Cut a piece of decorative paper 5 3/4" square, distress the edges of the paper with a distress tool or even a fingernail. Use a sponge to apply dark blue ink to the distressed edges.  Also sponge the edges of the white card base.

Cut 2 decorative Simply Elegant Centerpiece die cuts, 1 silver and 1 dark blue decorative paper. Glue them together slightly off set.  Use foam to pop up this layer to the center of the card. 

Stamp the Oval Floral Frame using black, die cut then color with Copic Markers or chosen coloring system.  Die cut the Oval Floral Frame from silver as well then glue the silver under the colored frame off set.  Cut a piece of decorative paper with the cottage to fit the frame then glue it under the frame removing any paper larger than the frame.

Stamp the flowers from Rectangular Floral Frame and from Curvy Floral Frame using Rose Madder, sponge with Pink Peony, die cut then form from the back side, turn flowers over and make a well in the centers to add yellow Prills.  Glue these flowers on the Oval Floral Frame over the flower images plus more to create the look you like. 

Stamp the leaves using Bamboo, sponge with New Sprout, die cut then form from the back.  Glue these to the arrangement as needed.

Finally, stamp the sentiment in dark blue, die cut and glue to the oval frame at the top right.  Glitter the flowers and card base with Crystal Clear.

Thanks for visiting today!
Robin

                                                                                                                                                  Put away the evil of your doings from before My eyes.
Cease to do evil,
17 Learn to do good;
Seek justice,
Rebuke [a]the oppressor;
[b]Defend the fatherless,
Plead for the widow.

Read full chapter

Monday, January 10, 2022

Happy Birthday!

Good morning!


Here is another slimline card using the Sweet Serenade Collection
and Giving Occasions SDS-054 
I cut the decorative dies from ivory cardstock.
 
For the stamping I used Rose Madder Archival Ink.
The flower petals were cut from ivory and sponged with Pink Peony Archival.
Designer paper is from Graphic 45.
I used some tiny pearls to decorate the decorative dies.


Thanks for visiting today!

Robin
During this time of year I am especially thankful for my family
and friends.
I have had some pretty hard things happen at the very end of 2021,
it makes me realize how precious each day of life is.
We are not guaranteed tomorrow, make the best of today.

Do good to others, love and do not hate.  We are all God's creation.
and...

    that we may get a heart of wisdom.  Psalm 90:12


Tuesday, January 4, 2022

Must Be Love

 Good morning!  


Find the material list HERE

Card size:  5” X 7”

Start by folding White cardstock measuring 7 1/2" X 11” in half to form a 5 1/2" X 7 1/2" card.  Use the outer die of the Simply Classic Rectangle Frame to die cut card, hanging top of die over top fold by about 1/4" to retain fold.  Cut the full outer die from white cardstock, pink decorative paper, and plaid decorative paper then glue the cardstock and pink paper to the front of card, glue the plaid paper inside, trimming the top to fit (avoid score).  Use the smaller rectangular die (from the same die set) to cut out a window from card front only.

Die cut gold using the outer die and the large decorative together to create a gold frame. At the same time you can cut the inner decorative die from the inside of gold you are cutting.  So, you will have 3 dies on the gold at once.  Use the inner decorative die again on pink decorative paper.  Glue the smaller decorative die cuts together off setting slightly.  Glue the gold frame onto card front matching all edges.  Die cut plaid decorative paper with the large decorative die then glue that thin die cut to the front matching inside edges of the gold frame.

Stamp the Heart Floral Banner using gray ink, die cut then color.  Stamp the sentiment using Magenta Hue on white then use the inside die of banner to die cut. Pop it up on the heart shape.  Glue the smaller rectangle die stack and heart to the inside of card in the center.

Stamp the roses using Magenta Hue, sponge then die cut.  Stamp the leafy Accents with Fern Green, sponge with Leaf Green, die cut.  Shape the leaves and the roses in their molds, misting lightly with water first.  Let dry completely (be patient, it is important for shaping that they are COMPLETELY dry).  Use the shaping tools to further shape rose petals pushing them down hard in the centers to create a bowl shape.  Glue several layers together, (the bottom 2 should always be the same size to start the roses).  The small bud inside is made pushing down the center while petals are stamp side down so that the stamp side shows while closing tightly.  Using a hot glue gun for putting roses together helps quite a bit but it can be done with good adhesive like Dries Clear as well.

Cut leaves into groups of 2.  Decorate outside of card on bother sides of the window with roses and leaves.  Be careful to avoid getting glue on the inside, you don’t want to glue your card shut!  Open the card and add a sheer pink bow to 1 side of the heart (left bottom for this sample). 

Glitter all the flowers and card base, try to avoid the metallic gold paper.  Sponge a bit of glue on the bow and glitter it too.

Thanks for visiting today!

Robin 

We have had deaths in the family the last couple days of 2021 so when I saw this verse it spoke to me.
Make the best of each day you have, make it count!
None of us are guaranteed tomorrow.

12 So teach us to number our days,
That we may gain a heart of wisdom.

Tea For Two?


This cute cup design reminds me of my sweet mom.  She loved pretty tea cups and I know she would have filpped over this card design!  The pattern I created on the front of the cup was inspired my the Old Country Roses China cup that I gave her once as a gift.  There is always some pretty gold accents on China as well so I added an off-set layer of gold under the white.
I just love the Heart or Flower designs given in this set for stir sticks/tea spoons and the little tea bag design as well.  It comes with a coffee die as well as tea so it will be a favorite with everyone.
 
Dies for my creations today were supplied by Amazing Paper Grace.

There are 21 dies included in the Pop Up 3D Vignette Coffee, Tea or Me.


The inside of the cup has a layer of copper, just the perfect color for a cup of tea.
High Tea anyone?
I added little pearls to all the flowers for a little extra pop.


Supplies:
Amazing Paper Grace January 2022 Die of the Month – Pop Up 3D Vignette Coffee, Tea or Me, S2-082 Sentiments One, S5-455 Birthday Wishes Vignette
Gold cardstock, copper cardstock, White cardstock, pink, dark pink, yellow and green cardstock, pearls, white silk cord, Graphic 45 pattern paper,

For more Pop Up 3D Vignette Coffee, Tea or Me Inspiration
Visit each Creative Team blog linked below for their take on creative paper crafting ideas with Pop Up 3D Vignette Coffee, Tea or Me, the Amazing Paper Grace January 2022 Die of the Month!
View this month’s Amazing Paper Grace Die of the Month!  Video

Follow me on Facebook!
Follow me on Instagram!