Pages

Comments are welcome and very much appreciated!
Showing posts with label Woodland. Show all posts

Tuesday, September 22, 2020

High Sierra Happy Birthday


Good morning!
Bendi cards are so fun to make!
Today I've featured the new Stamp and die sentiment sets!


Elaborate Birthday Die

Elaborate Birthday Stamp Set

Create a ‘scape Backcountry Die

Create a ‘scape Backcountry Stamp Set

Create a ‘scape Wilderness Die

Create a ‘scape Wilderness Stamp Set

Create a ‘scape Trout Lake Die

Create a ‘scape Trout Lake Stamp Set

Create a ‘scape Nature Die

Create a ‘scape Nature Stamp Set

Wilderness Retreat Paper Collection

Woodsy Critters Die

Woodsy Critters Stamp Set

Memento Tuxedo Black Ink

Metal Tip for Adhesive Bottle

Dries Clear Adhesive

Rajni Chawla’s Crystal Clear

Crystal Ultrafine Transparent Glitter

Go Man Go Prills

I Cannot Tell A Lilac Prills

Minnie Pearl Pearls

Deluxe Flower Shaping Paper Pack of 50-White

Other products:

White cardstock, Dark green cardstock, Acrylic Shimmer additive, Brilliance Copper Ink, Copic Markers: C1, C2, C3, C5, W1, W3, W5, E53, E31, E33, E35, E97, E99, E51,E93,YR04, R43, R24, R39, G94, YG63, YG03, YG17, YG05, B91 ,93, B41, YR82

Card size: 6 X 6 3/4".  Make card base from dark green cardstock: Back is 6 X 6”, side flaps are 3 1/2 X 6” and 4 1/2 X 6”.  Score 1/2" on 1 side of both flaps, fold down and score well.  Draw a line on the other side of both at 1/4" then drawn in a tab (both flaps).  Cut away above and below each tab (to reinforce tabs glue acrylic packaging [like dies are packaged in normally] over the tab and inward about 1”, this will be covered by paper later).  Make a slot for the right flap in the back at 1 1/2"from left side by lining up the bottom of flap and back then drawing a line at the top and bottom of the tab made earlier.  Use a ruler and craft knife to cut.  Make a slot for the left flap into the right side flap at 2” from right side using the same method of lining up the bottoms then drawing lines at top and bottom of tab.  (Nothing is glued together at this point because side flaps still have to be die cut with the mountains). 

Using 2 pieces of the same paper design, cut panels for the inside back and both flaps (a continuous lake used in this sample). Save the sky for the inside mountains (die cut only because they are backwards) and for the die cut base of the large sentiment.  The outside of the flaps are stamped scenes pieced together.  Start with the mountains, you need 5 1/2" of mountains on each side so you have to stamp it once then mask the end and stamp again to lengthen mountains.  When you die cut, be careful to only cut the tops not too far down so that you keep mountains together.  You will want each mountain scape to be the width and height of the side flaps.  Die cut a piece of sky paper along with the stamped mountains so that you have mountains for the inside of flaps (add a little color to make them look more like mountain ridges).  Now place the die cut mountains on the dark green flaps then draw a line on cardstock, now cut the dark green cardstock flaps to match mountains.  Color the mountains and tree line then color the rest of the panel green to blend in with other stamped elements.  Glue the backward mountains on then glue the inside decorative paper lake on both side and the back. Now glue each flap to the back panel (in back) using the 1/2" scored tab.

To finish the inside: Stamp the ducks and 2 extra ducks, the deer set, bunny, squirrel, 2 cardinals, 2 sets of cattails and pine tree using Tuxedo Black, color with Copic markers. Glue deer over paper deer, bunny and squirrel on far left, ducks to the back right side.  Glue cattails where needed.

Die cut large sentiment base from dark green (as well as the sky colored decorative paper die cut, glue them together then glue to the back panel over hanging top of back by about 3/4".  Stamp and die cut sentiment using black then glue it to the sentiment base layer.  Sponge copper ink on the edges of the sentiment base. Now glue the cardinals top right and bottom left of sentiment base, glue 1 extra duck to the bottom right and the other extra duck on top of scene duck.  Add white and lavender Prills to the ground sections.

To finish the outside (front) of flaps: Stamp 2 sets of deer, Trout Lake, extra trees of Trout Lake, flowers, rock landscapes, die cut and color all with Copics.  For the right side, glue the Trout Lake extra trees, deer, flowers (cut apart) and rock landscapes and 1 deer piecing together to look best. For the left flap, glue more extra trees, rock landscapes, flowers and 3 deer.   Add Prills to the bottoms of both flaps.  Glitter mountain ridges and lakes inside and out, glitter Happy Birthday panel. Tuck small tabs into the slots to close card, card stands while closed because of the bowed front.


My second card uses another of the new 
sentiment stamps and dies.


Large Garden Zinnia Die

Small Garden Zinnia Die

Large Garden Zinnia Stamp Set

Small Garden Zinnia Stamp Set

Large 3D Zinnia Shaping Mold

Small 3D Zinnia Shaping Mold

Summer’s Garden Paper Collection

3D Leafy Accents Shaping Mold

Leafy Accents Die

Leafy Accents Stamp Set

Groove Golf Tool Set

Decorative Circle Frames Die

Eyelet Circle & Basics Small Die

Fancy Special Day Die

Fancy Special Day Stamp Set

Archival Ink-Majestic Violet

Archival Ink-Buttercup

Archival Ink-Cactus Flower

Archival Ink-Leaf Green

Archival Ink-Fern Green

3-D Crystal Lacquer

Metal Tip for Adhesive Bottle

Dries Clear Adhesive

Rajni Chawla’s Crystal Clear

Crystal Ultrafine Transparent Glitter

Go Man Go Prills

Deluxe Flower Shaping Paper Pack of 50-White

Other products:

White cardstock, Acrylic Shimmer additive, Fun Foam sheet

For more tips on creating with the flower shaping molds, watch the tutorial at https://youtu.be/FSdPL7nXvQE.

For more ideas on creating with the 5 x 7 Decorative Frame Dies, watch the tutorial at https://youtu.be/qdBFA5VpmSo

Card size: 4 3/4 X 6 3/4".  See video for making shaped cards then cut another front from purple decorative paper.  Cute large decorative die from white also from Fun Foam sheet.  Cut 2 eyelet circles from the die set from purple decorative paper and 1 circle in between eyelet circle sizes out of white along with another Fun Foam sheet circle to fit.  Stamp sentiment using Majestic Violet, die cut and die cut sentiment base from white.  Stack all layers together and glue. Tip, when using foam sheets for dimension, after gluing, lay a book or something with weight on top so that it dries nice and flat, if needed put a piece of wax paper on top before book so that nothing sticks).

Stamp medium and small zinnia using Majestic Violet, sponge with the same plus some Cactus flower in the centers.  Stamp smallest zinnia again using Buttercup, sponge with Buttercup, die cut all the flowers, shape in molds.  Use Groove Golf tool for shaping the tubular yellow centers of the zinnia (larger flower).  Glue 4-5 layers together for each flower and fill centers with Prills.  Stamp leaves with Fern Green, sponge with Leaf Green, die cut, shape in the leaf mold then cut apart to use as needed.  Arrange flowers and leaves on the right and left sides of the circle with sentiment.  Glitter the card front and use Rajni’s Crystal Clear to glitter the flowers.

Thanks for visiting today!

Robin

Psalms 139:23-24

23 Search me, O God, and know my heart;
Try me, and know my anxieties;
24 And see if there is any wicked way in me,
And lead me in the way everlasting.


Tuesday, August 27, 2019

HC Candy Cane Poinsettias and Carolers

Good morning!
This paper works so well with the stamps and dies
I love how they just mesh so well!
I also used the Diamond Die in a different way, 1 vertical
and 1 horizontal to make a square (sort of square).

There is a bit of torn white paper for snow under their feet.

HC PRODUCTS USED      

Other Products:
White cardstock, red Pan Pastels, White Liquid Applique, ribbon, 3M foam tape, Copic Markers: R21, R17, R29, YG05, YG17, C3, C5, C7, Y38, YR04, RV00, RV10, E51, Silver Delicata

For more tips on creating with the flower shaping molds, watch the tutorial at https://youtu.be/FSdPL7nXvQE.
Instructions:
Card size: 6 X 6”. Fold 12 X 6 white cardstock in half.  Cut a piece od red decorative paper 5 7/8 X 5 7/8” then glue it to the front of card.  Cut a piece of candy stripe red and white decorative paper 5 3/4 X 5 3/4" then glue it to the red on card. Now cut 2 white Petite Pocket Accents and 2 white Eyelet Diamonds.  Cut 2 red Diamonds one size smaller than the white Eyelet Diamonds. Glue the red Diamonds to the white Eyelet Diamonds.  Glue white Petite Pocket Accents to top and bottom with half circle facing toward the center of card.  Use foam tape or foam sheet to pop up Diamond sets.  Adhere one set of Diamonds horizontally and one set vertically to form a sort of star.

Cut the Candy Cane, With Love at Christmas Time rectangle out then mat it with more red paper 3 1/8 X 4 1/8”.  Mat again with white 3 1/4 X 4 1/4".  Glue all the layers together then pop up in the center of the “star”.  Tie a small bow with red and white ribbon then glue it to the top of the sentiment panel.

Stamp Christmas Poinsettias and Holly on white with Silver Delicata, die cut and use the mold  to form poinsettia blossoms (see video).  Once completely dry brush a tiny amount of red Pan Pastels onto the tips, keep flowers basically white.  Layer 3-4 blossoms together then glue red/green Prills in the centers then glitter with Crystal Clear.  Glue 2 blossoms to each side of sentiment panel.  

Stamp Carolers on white with Black, die cut then color, add a little Liquid Applique onto the furry parts of the hat then heat to puff up.  Add a bit of Dries White and glitter to the snow at the feet of the penguins then pop up onto sentiment panel.  It takes a few layers of foam to make penguins level with the card base.

Thanks for visiting today!
Robin

Psalm 40:2 New King James Version (NKJV)


 2 He also brought me up out of a horrible pit,
Out of the miry clay,
And set my feet upon a rock,
And established my steps.
This is what God did for me.  To paint a picture,  He took me out of a pit where I seemed to be sinking lower and lower until I found myself up to my neck in muck.  I cried out to the Lord, I asked for His forgiveness and believed that Jesus died for my sin and rose again , that He is the son of God.  He became my Lord and my savior.  Then He lifted me out of the mucky pit and washed me clean and dressed me in clean fresh clothes and set me in His wonderful, warm, loving light.  Finally I was out of darkness, I could see, I was set free.  He has blessed my life ever since and is with me always.
God loved me even while I was full of muck and sin, an enemy of God.  Do I love my Lord, you bet I do, more than anything else.  I can't imagine life without Him in it.
This is what God has done for me and much, much more!!


Tuesday, July 23, 2019

HC Tri-Fold Windows

Good morning!
This one was really fun, using the typical Z-Fold card.
It's fun to get a different top or side with the 
Heartfelt Creations border dies.


HC PRODUCTS USED      

Other Products:
White cardstock, pearls, Copic: E50, E51, E53, E21, R21, R24, R29, B21, B32, Y11, Y15, Y38, G14, YG67, YG23, foam sheet.

For more tips on creating with the flower shaping molds, watch the tutorial at https://youtu.be/FSdPL7nXvQE
Instructions:
Card size: 6 X 12”.  Score at 4” and 8” then fold and use a bone folder to get a good tight fold. Use the Delicate Border Die to cut each 4” section.  Cut 3 pieces of light blue decorative paper 3 7/8 X 6 then cut tops to match card base sections and glue to card. Cut 3 white Delicate Borders and glue one to each section matching curves cutting off excesses.   Cut 2 Starry Night half circle doilies and glue one to the back of each side. 

Cut 3 Botanic Windows, cut the center decorative part for two of them.  For the last window cut one of the sentiments from the decorative paper using the arch die from the Botanic Window. Cut a piece of foam sheet with the window die and glue foam, window and sentiment together.  Cover the top with holly and poinsettia.
Choose two scenes for the other two windows.  Cut them out with the arch part of die.  Glue foam to the frame of the windows to pop up away from the outside scene then glue scenes to the foam.  Glue each completed window to the 3 sections.

Stamp (using black), die cut and color Candles and holly.  Stamp, using black, sponge with Red and die cut poinsettias.  Shape in the 3D molds then glue 2-3 layers together for each flower.  Add Prills to the centers. Glue a candle to the window of the first 2 windows (the ones with outdoor scenes) then glue small poinsettias to each candle arrangement.  Glue holly around the tops of the windows then glue one medium size poinsettia to the first section window.

Attach pearls to windows, top outside corners of card, and bottom outside corners of card.  Randomly add glitter to the card and scenes.  Glitter all the flowers to complete. 

Now for a lovely sunset wildlife scene.  Are those wildflowers at the top? Could be since all these things are all around our house especially in the spring.


HC PRODUCTS USED      

Other Products:
Ivory cardstock, ribbon, white cardstock, foam tape, Copic Markers: YR04, Y38, Y11, Y15, RV10, RV02, B00, B02, RV55, V01, V12, V15, BV00, BV02, YG03, YG17, YG23, E53, E33, E35, E57, E42, E43, E44, C1, C3, C5

For more tips on creating with the flower shaping molds, watch the tutorial at https://youtu.be/FSdPL7nXvQE
Instructions:
Card size: 6 7/8 X 4 7/8”.  Cut Ivory cardstock 9 3/4 X 6 7/8” then fold in half.  Cut an ivory Intricate Swirl Frame outside and inside scrolly die.  Cut a piece of decorative paper with a background of trees and sky.  Color the sky a more brilliant sunset color with yellow, orange and pink.  Glue the background piece to the back of Intricate frame then glue to the card.  Glue the scrolly part on top of the background.

Stamp Birch trees, critters (bunnies, squirrels, birds, deer), the rocks x 2, and flowers using black.  Stamp the posies with Deep Purple, stamp the leaves Fern Green, sponge flowers with purple, sponge leaves with Leaf Green and Purple.  Die cut flowers and leaves then shape in the molds.  Glue 2 blossoms together for each flower, pierce then insert threaded small green stamen.  Color animals, trees, rocks and flowers with Copics or favorite coloring method.  Glue the trees to each side of the frame then glue flowers and leaves at the tops of the trees. Pop up animals, rocks and flowers, double pop some making more dimension.  Glitter the flowers.

Thanks for visiting today! Blessings!
Robin

Isaiah 41:10 New King James Version (NKJV)

10 Fear not, for I am with you;
Be not dismayed, for I am your God.
I will strengthen you,
Yes, I will help you,
I will uphold you with My righteous right hand.’

Wednesday, June 6, 2018

Heartfelt Creations Woodsy Backyard accordion Book

Good morning!

Today's project is a little different than the usual but I really love it!
Years ago Angelica Turner did a special class at our local
store and this type book was one of the projects....I saved it and made a pattern for today's project, so Angelica, thank you very much my friend!


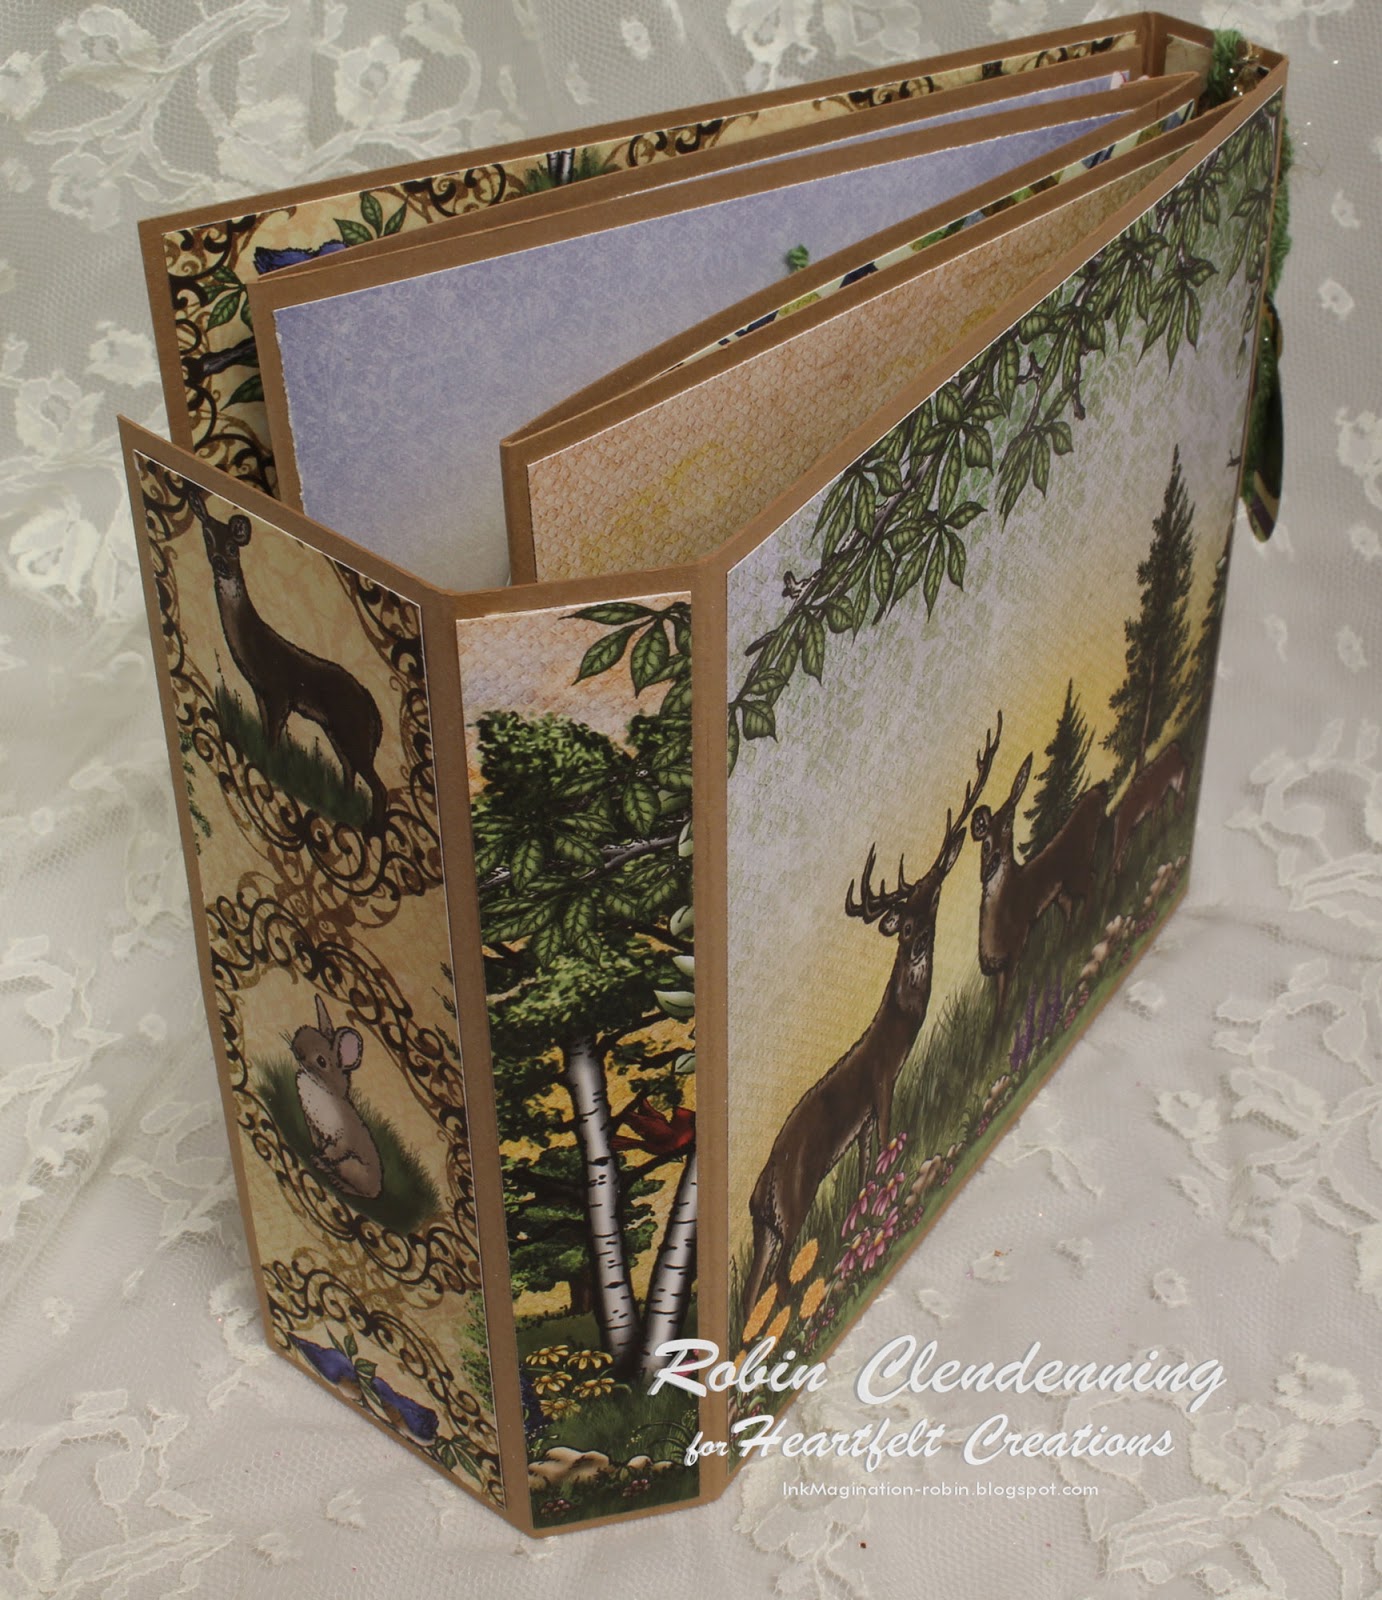
I used a magnet for the closure (under the paper so that it doesn't show).


Inside there are accordion pages that are decorated front and back.


HC PRODUCTS USED      

Other Products:
Tan shimmer card stock, green and tan fibers, Liquid Pearls, Copic Markers: Y11, Y15, Y38, V01,V12,V15,YR24,E33,E53,E50,E35,E21,E51,YG03,YG23,YG17,BOO,B01,B02,R21,R24,R29,R59,C01,C03,R81,R83 R17, Fun Foam

For the magnets this video has some helpful hints:   Album & inserts, watch the tutorial at https://youtu.be/uThSFbPtnYE.  

Instructions: 
Card size: 6” X 6” X 1”  Start by making the cover for the Accordion “Book” Cut 1 piece of tan card stock 7 ½ X 6” and 1 piece 9 X 6” tan.  Score 7 ½” piece at 6” and 7” leaving ½” as a glue tab.  Score the 9” piece at 6”and 7” leaving a 2” end.  Glue the ½” tab to the inside of the 6” part of the second piece.  Glue one half of magnet set to the 2” piece on the outside and Tape to let glue set.   Place the other magnet half on top of taped magnet and put some glue on the top of it, then close cover, open it again and use the spot of glue left behind as the place to glue the second magnet half after lifting off first half.  Tape glued magnet half and allow both to dry.  Cut Decorative paper for each cover panel leaving a 1/8” border of tan.  Make accordion pages with 2 pieces of tan card stock 11” X 5 5/8” cut one piece of tan card stock 1” X 5 5/8” then score and fold  in half to glue page sections together.  Score both 11 X 5 5/8” pieces at 5 1/2” and glue the two together using the 1” folded tab.  Cut Decorative paper to cover each side of each page.  Die cut “scene” square, using the Cut Mat Create 2A, from the front cover panel then cut a piece of Fun Foam the same size square to fit.  Glue the squares together.  Glue all decorative paper pieces onto cover and pages including the front, replacing the now popped up square in the center square opening.  Tabs will be covered and so will the magnets.
Stamp, die cut and color 1 set of deer, 2 sets of bunnies, 1 set of squirrels,  2 sets of cardinals, misc. small blossoms from Wildwood, Rain boots and Blossoms, coneflowers, The large Coneflower corner, tall Coneflower, birds on umbrella (Songs of Spring), and the Just for You banner.   Cut from tan card stock, 3 Blossom Corners, 3 small Fleur pockets and 2 large Fleur pockets, 1 Ornate Border, 1 border from the Cut Mat Create . 
Start with the inside pages, decorate with pockets and blossoms plus wildlife here and there on all pages, both sides.  Using the Luggage and Tag die, cut tags for all the pages, stamping with sentiments or leaving blank for writing.   Add fiber or ribbon to the top of each tag and insert into pockets.  Add fibers to the book binding and then add a small tag on one of the pieces of fiber hanging down the side.  This could have your book 
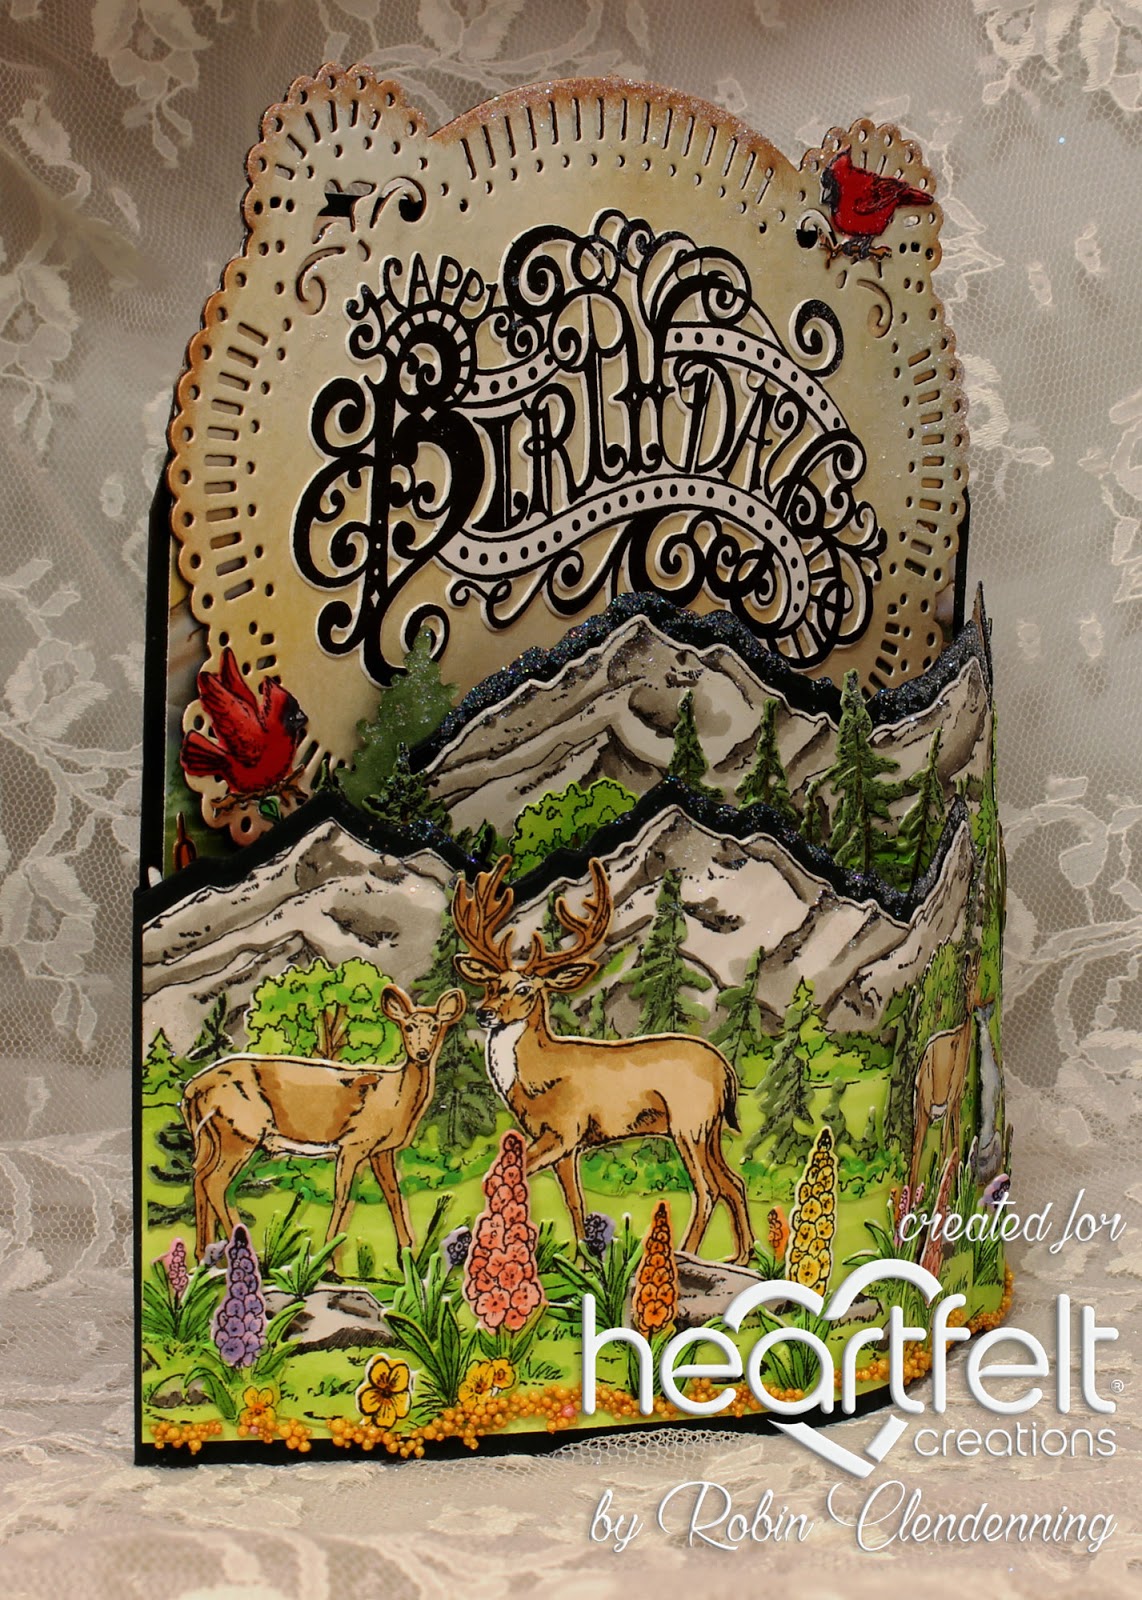
title if desired.  The final part of this project is to decorate the front.  The paper including raised center should already be glued down, now glue 2 borders top and bottom of raised center (from Cut Mat Create and Ornate Pockets and Borders).  Add all pieces of Coneflower corner and tall Coneflower to go around raised center like a big letter “U”. This border is popped up in places.   Add the Banner snuggled in one corner and then add the 2 birds from Songs of Spring, 1 on each side at the top. Add glitter to flower petals (I thinned some glue with water and brushed it onto petals then sprinkled with glitter).


Thanks for visiting today!
Robin

Yours, O Lordis the greatness,
The power and the glory,
The victory and the majesty;
For all that is in heaven and in earth is Yours;
Yours is the kingdom, O Lord,
And You are exalted as head over all.
12 
Both riches and honor come from You,

And You reign over all.
In Your hand is power and might;
In Your hand it is to make great
And to give strength to all.