Pages

Comments are welcome and very much appreciated!
Showing posts with label Scripture. Show all posts

Tuesday, August 2, 2022

Unfailing Love Slimline

Good morning crafty friends!

Material list HERE

Card size:  4 X 8 1/4"

Start with white cardstock measuring 8 1/4" X 8”, score and fold to make 4 X 8 1/4” card.  Unfold then place an oval die 2 1/2"X 4” in the center of the front half of card, run through a large die cut machine or fold bottom part of card under the cutting plate so that it doesn’t cut.  Cut a piece of blue cardstock to 3 3/4"X 8”, cut the oval from the blue then run the blue panel through the machine with an embossing folder (this folder was made for slimline cards).  Glue the embossed panel onto card front matching all edges.  Cut a white oval frame for the opening using 2 oval dies 1 size apart (this takes both sets, small and large to accomplish).  Glue the frame onto opening.

Inside card, cut a blue decorative paper panel to 3 3/4"X 8”, stamp the center with a sentiment so that it shows in the center of the closed card.  Glue it inside then set the card aside.

Stamp Leafy Accents using Fern Green, sponge with Leaf Green, die cut then shape in the Leafy Accents Mold.  Lacquer them then cut them apart.

Stamp the Wild Rose Blossoms using Cactus Flower, sponge with Magenta Hue, die cut then shape in the mold.  Glue 2 of the same size together for each flower.  Using the Deluxe Flower Shaping Kit, make a well in the center of each flower, pierce the centers.  Using one of the EZ Stems, attach each flower by inserting end of stem then fold stem over using small plyers, glue in place with hot glue.

Attach leaves all over all stems as desired using hot glue. At this point you can blend the color or the leaf stem and the EZ Stem with a green Copic Marker or other marker if you want to.

Fill the centers around the green folded stem, with adhesive then fill with Prills.  Glitter the flowers (Leaves should already be lacquered).

Add pearls to all intersections on the embossed design on card front then use hot glue to attach the stem with flowers.  Bend stems to desired look then hot glue a white multi-looped bow onto stem.

Optional: You can finish by adding glitter randomly to the inside of card.

Thank you for visiting today!

Robin

But to all who did receive him, who believed in his name, he gave the right to become children of God, who were born, not of blood nor of the will of the flesh nor of the will of man, but of God.


Monday, March 28, 2022

Amazing Paper Grace Unfailing Love


Good morning Amazing friends!


Yes, there is a lot to this one and you could certainly use what you have similar to achieve
a similar look, I would encourage you to do so.
I just used some that I had, old and new, to do what came to me at the moment.
I'm a die collector what can I say?  I used to collect stamps (and still do to some extent) but I just really like dies!!  I like mix and match!


I also used some pearls (they come in a line of self-adhesive), some thin silk cord, some white gauze (cheese cloth), some glitter and some stamen for the flower centers.
I used 2 tones of purple cardstock and white cardstock or this project.  Some Wilted Violet Distress ink for sponging the flowers and stamping the sentiment (Heartfelt Creations).
The paper I used for the green leaves was in a paper pad of papers that look like alcohol ink backgrounds from Craft Consortium.

Thank you Amazing Paper Grace for these Amazing dies!


Thanks for visiting today!  Hope you come away inspired to make a card!

Robin

On God rests my salvation and my glory; my mighty rock, my refuge is God.


Tuesday, September 17, 2019

HC Daydream Asters

Good morning!
I have another sweet Aster card today.


HC PRODUCTS USED      
HCD1-7257    Wild Aster Die
HCPC-3887    Wild Aster Stamp Set
HCD1-7258    Wild Aster Scroll & Cluster Die
HCPC-3889    Wild Aster Scroll & Cluster Stamp Set
HCD2-7192    Eyelet Lace Frames Die
HCDP1-2100  Cherry Blossom Retreat Paper Collection
HCDP1-2106   Wild Aster Paper Collection
RACP436        Leaf Green Archival Ink
RACP962        FernGreen Archival Ink
RACP494        Majestic Violet Archival Ink
PGM15015    Rajni Chawla’s Crystal Clear
ANC818         GoMan Go Prills
352854          MetalTip for Adhesive
159723          Dries Clear Adhesive
HCST1-401    DeluxeFlower Shaping Kit
HCPP1-475    Deluxe Flower Shaping Paper Pack of 50-White


Other Products:
Chipboard, white cardstock , blue cardstock

For more tips on creating with the flower shaping molds, watch the tutorial at https://youtu.be/FSdPL7nXvQE

Instructions: 
Card size: 5 1/8 X 7 1/8”.  Cut white cardstock 7 1/8 X 10 1/4 then fold in half.  Cut the Eyelet Lace Frame out of white and also a piece of chipboard.  Glue the 2 die cuts together.  Using the same die, cut the bridge scene from the Cherry Blossoms decorative paper.  Cut a piece of blue cardstock to 5 X 7” then glue it to the card base.  Cut a piece of Aster lavender paper to 4 3/4 X 6 3/4" then glue it to the blue.  Glue frame to the lavender paper then glue the bridge scene to the inside. 

Stamp asters using Majestic Violet, sponge with the same, die cut and form.  Stamp the leaves using Fern Green, sponge with Leaf Green and Majestic Violet, die cut and form.  Glue 3-4 blossoms for each flower together then add yellow Prills to the centers.    Cut sentiments from the Aster paper and then arrange them with the flowers and leaves left bottom and top right on frame.

Randomly glitter card and also glitter the flowers.

I also have another Lilac and "Frame A Card" card for you.


The Lord's Unfailing Love Lilac card.

HC PRODUCTS USED      
HCD1-7226      Diamond Basics Die
HCD1-7227       EyeletDiamond Die
HCD2-7190      Frame A Card Leafy Borders
HCD1-7170      Lush Lilac Die
HCPC-3816      Lush Lilac Stamp Set
HCPC-3817      Lush Lilac & Umbrella Spray Stamp Set
HCD1-7171      LushLilac & Umbrella Spray Die
HCDP1-287      LushLilac Paper Collection
HCFB1-466       3DLush Lilac Shaping Mold
Deluxe Flower Shaping Paper Pack of 50-White
HCPC-3763     Courage and Strength Stamp Set
RACP436         Leaf Green Archival Ink
RACP962         Fern Green Archival Ink
RACP494         Majestic Violet Archival Ink
RACP430        Deep Purple Archival Ink
TSMP900       Tuxedo Black Memento Ink
352854           Metal Tip for Adhesive Bottle
159723           Dries Clear Adhesive
ANC814           Lettuce Entertain You Prills

Other Products:
White cardstock, pearls, foam sheet, Copics: V12, V15, BV00, BV02, YG03, YG17

For more tips on creating with the flower shaping molds, watch the tutorial at https://youtu.be/FSdPL7nXvQE

Instructions: 
5 1/4 X 5 1/4".  Cut white cardstock 10 1/2 X 5 1/4", score then fold in half to make a square card.  Use the 5” frame die with insert 4 times and glue together on top of a piece of decorative paper 5 X 5” to form a square frame then glue it to the card base.

Stamp the sentiment onto white cardstock using Deep Purple then die cut it with the Basic Diamonds.  Fill in letters with a violet fine tip pen or fine paint brush and ink. Cut a smaller Diamond from a foam sheet and glue it to the back of the sentiment Diamond.  Cut a slightly larger Eyelet Diamond for a mat to sentiment then glue it to the foam Diamond then onto the card.  Add pearls to the 4 frame corners.

Stamp  Lilac spray and 2 small Lilac branch clusters using black, die cut then color with Copics.  Stamp Lilac blossoms with Deep Purple and Majestic Violet, sponge on color, die cut then shape in the mold.  Add green Prills to the center of each.

Glue a Lilac branch cluster to each side of the Diamond sentiment at the bottom and glue the spray to the top left of the Diamond.  Glue individual Lilac blossoms over branches and spray then glitter all flowers sponging glue on and then sprinkling with glitter.

Thanks for visiting today!
Robin
Matthew 25:35-40
35 for I was hungry and you gave Me food; I was thirsty and you gave Me drink; I was a stranger and you took Me in; 36 I was naked and you clothed Me; I was sick and you visited Me; I was in prison
and you came to Me.’37 “Then the righteous will answer Him, saying, ‘Lord, when did we see You hungry and feed You, or thirsty and give You drink? 38 When did we see You a stranger and take You in, or naked and clothe You? 39 Or when did we see You sick, or in prison, and come to You?’ 40 And the King will answer and say to them, ‘Assuredly, I say to you, inasmuch as you did it to one of the least of these My brethren, you did it to Me.’


Tuesday, September 10, 2019

HC Aster Debut

Good morning!


Warm summer breezes have begun to cool, and daylight hours have started to shorten…tall grasses rustle in the wind preparing to make their way to seed, and leaves slowly begin their tumble to the ground to insulate the earth for the cooler upcoming season. As summer begins to fade, and the bright hues of heat loving florals dim, it is then that the graceful aster takes the limelight and becomes the crowning glory of the autumn season, lending it one last burst of color with their blends of pretty purples, pleasing pinks, and blazing blues! Join us as we bid summer farewell and celebrate the arrival of the autumn season with the Wild Aster Collection from Heartfelt Creations! Take a walk among the last perennial wildflowers of the waning summer season as you delve into a paper collection draped in light and airy asters hued in vibrant fuchsias and pretty purples, all accented with glorious greens, precious pinks and tranquil creams. Enjoy alluring backgrounds filled with dainty lace like accents, grand vintage style stripes, and beautiful brocades, all ready to set the stage for captivating aster arrangements! A lovely assembling of cling stamp sets filled with pleasing aster illustrations unite to create pretty wildflower sprays and elegant bouquets, while a stunning collection of beautifully illustrated aster petal images, when paired with the corresponding dies, join together harmoniously to create light, airy, dimensional aster flowers perfect for creating elegant autumn inspired floral clusters! So, grab your sweater and join us for one last walk through the garden as we take in the simplicity and beauty of the glorious wild aster! 


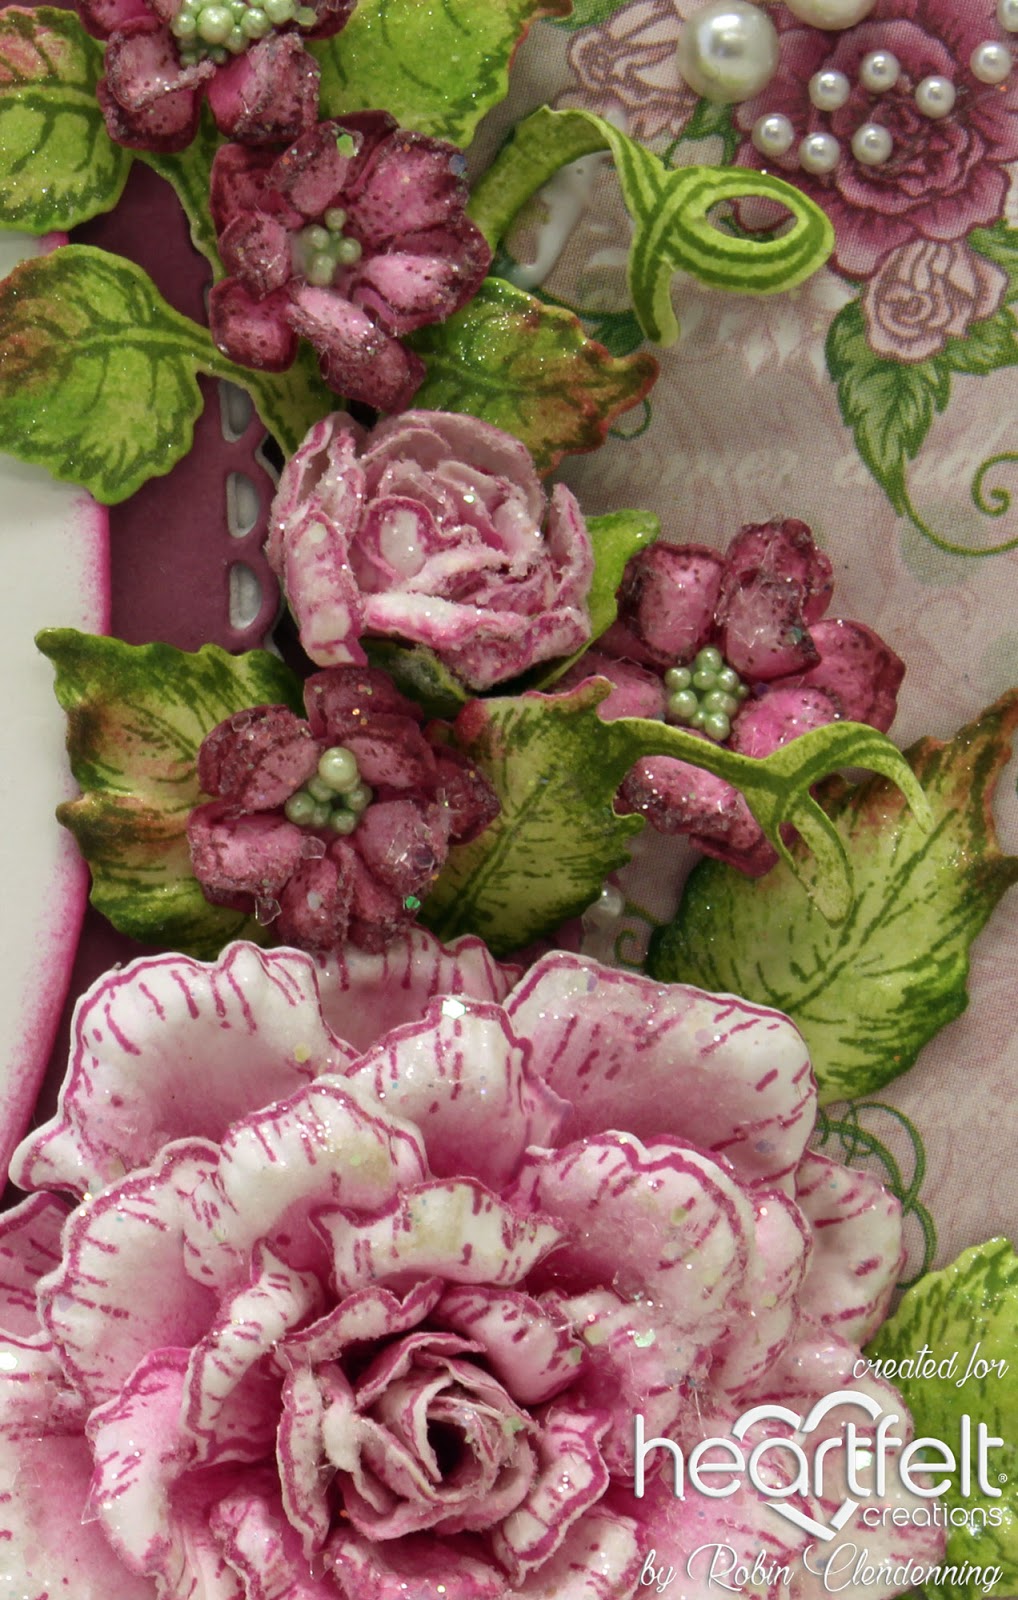
My first card is made using vellum.

The black decorative die cuts and offset with gold. I used Gold Pearl Pen (Metallic Gold Liquid Pearls) to make the little dots on the sprays. The petals have a bit of Gold Nuvo Mousse on their tips.


HC PRODUCTS USED      

Other Products:
Oxide Distress Ink- Wilted Violet and Peeled Paint, clear embossing powder, Sparkle glitter, gold cardstock, black cardstock, white cardstock, Gold Liquid Pearls,  Gold half ball, Distress Ink Wilted Violet and Peeled Paint.

Instructions:
Card size:5 1/8 X 7 1/8”.  Cut white cardstock 7 1/8 X 10 1/4" then fold in half.  Cut a piece of gold 5 1/8 X 7 1/8, glue to white card.   Cut a piece of black 4 15/16 X 6 15/16”, glue to gold panel.  Cut a piece of lavender decorative paper 4 7/8 X 6 7/8”, glue to black panel.  Cut Frame out of gold and out of black, glue together slightly offset.  Cut Decorative Oval out of black and gold, glue together slightly offset.   Cover the back of decorative oval with lavender decorative paper and trim away excess.  Glue the frame to the center of card then pop the oval up in the center of the frame.

Stamp sentiment using black, onto decorative paper then cut out with and oval die measuring 2 ¼” across.  Sponge the edge with black ink.  Cut a gold oval just slightly larger to mat the sentiment.  Pop the sentiment and mat on top of Decorative Oval die cut.

Stamp the asters using Oxide Ink onto vellum then heat emboss with clear powder.  Stamp the leaves onto vellum using Peeled Paint and emboss add more powder while heated and emboss entire leaf.  Use Distress inks to color (same name colors only die ink).  Form the flowers with the golf tools.  Glue 4 layers together to form the flowers.  Pierce centers then insert stamen.  Sponge ends of petals with gold mousse.  Stamp spray using a combination of green and violet ink them emboss.  Sponge dye ink on for color then dot with gold Liquid Pearls.  Let dry completely.  Stamp the butterfly, emboss, color then heat again and sprinkle sparkle glitter on while heated and heat again.  Add a gold ball to his head.

Use foam tape to adhere the butterfly body to the right top of Decorative Oval.  Arrange flowers, leaves and aster spray going around left side of the sentiment oval. Add Glitter to flowers.


I have a pot of fall asters in my yard that are pink and purple growing together and I just love it.
My card today shows that look...I see some yellow bellflowers in among the asters too.


HC PRODUCTS USED      
HCD1-7257   WildAster Die
HCD1-7258   WildAster Scroll & Cluster Die
HCD1-7259   WildAster Spray Die
HCPC-3887   WildAster Stamp Set
HCPC-3888   WildAster Spray Stamp Set
HCPC-3889   WildAster Scroll & Cluster Stamp Set
HCDP1-2106 Wild Aster Paper Collection
HCPC-3866   Tweet Cherry Blossoms Stamp Set
HCFB1-474   3D Cherry Blossom Shaping Mold
RACP436      LeafGreen Archival Ink
RACP962      FernGreen Archival Ink
RACP614     MagentaHue Archival Ink
RACP524     VibrantFuchsia Archival Ink
RACP494    Majestic Violet Archival Ink
RACP632    Buttercup Archival Ink
PGM15015 Rajni Chawla’s Crystal Clear
ANC803       MinniePearls Prills
ANC818       Go ManGo Prills
HCST1-401    DeluxeFlower Shaping Kit
HCPP1-475    DeluxeFlower Shaping Paper Pack of 50-White
HCD1-7149  WindowBox Fillers Die
HCPC-3795  WindowBox Fillers Stamp Set
352854        Metal Tip for Adhesive
159723       Dries Clear Adhesive

Other Products:
White cardstock, yellow cardstock, green cardstock, Foam Tape, Copic Markers: E51, E53, E33, E35, V01, V12, V15, RV02, RV55, YG61, YG82

For more tips on creating with the flower shaping molds, watch the tutorial at https://youtu.be/FSdPL7nXvQE
Instructions: 
Card size: 5 1/4 X 7 1/4".  Cut white cardstock 10 1/2 X 7 1/4", Cut White Intricate Swirl Frame then cut decorative paper with the inside part of the Intricate Swirl Frame and a 5 X 7” panel, Cut yellow cardstock panel 4 3/4 X 6 3/4".  Fold white card in half, glue the decorative paper to the card base then the yellow panel.  Glue the Frame to the yellow panel and then glue the decorative paper die insert to the center. 

Using black ink stamp the Thinking of you today scroll on white, die cut  and color.  Stamp asters using Vibrant Fuchsia on Deluxe Flower Paper also stamp some using Majestic Violet,  Sponge pink flowers with Magenta Hue sponge purple with Majestic Violet, die cut then sponge ends with deeper color, form with Deluxe Flower Shaping Kit then fill centers with yellow Prills.  Stamp leaves using Fern green, sponge with Leaf Green, die cut and form.  Stamp aster spray with a combo of Fern Green and Majestic Violet then sponge more color on and die cut.  Stamp Cherry Blooms (smallest) with Buttercup and sponge with the same then die cut and form in mold then fill centers with white Prills.  Form 3 buds (2 pink 1 purple) using the smallest asters.  Use some green paper to make stigmas and the leaves from Window box Fillers for them as well.

Pop up the scroll in the center of card then arrange flowers and leaves around the oval on the right side, ending with the spray and buds.  Place some of the yellow flowers here and there as fillers.

Glitter all the flowers (a sponge for the glue or an old brush works well).  Randomly sponge adhesive on the card and sprinkle with glitter as well.
Thank you for visiting today!!
Robin

1 Chronicles 29:11-12 New King James Version (NKJV)


11 Yours, O Lord, is the greatness,
The power and the glory,
The victory and the majesty;
For all that is in heaven and in earth is Yours;
Yours is the kingdom, O Lord,
And You are exalted as head over all.
12 Both riches and honor come from You,
And You reign over all.
In Your hand is power and might;
In Your hand it is to make great
And to give strength to all.

Wednesday, December 26, 2018

Heartfelt Creations Unfailing Love

Good morning and Merry Christmas!
Floral Fashionista flowers and pearls
what could be more feminine and don't
you just LOVE this verse??!!
((Hey, don't forget to scroll down to see my second card))


HC PRODUCTS USED      

Other Products:
Pearls, Ivory card stock, foam sheet, dark pink card stock, Nuvo Shimmer Brush

For more tips on creating with the flower shaping molds, watch the tutorial at https://youtu.be/FSdPL7nXvQE.
To see how to shape the roses, watch the video at https://youtu.be/Z8P070kC3oo.
Instructions:
Card size: 5 1/4 X 6”.  Cut Ivory card base then cover with dark pink card stock.  Cut another ivory piece 5 1/8 X 5 7/8” and glue it to the pink.   Cut a piece of decorative paper (rose pattern shown here) about 2  1/2" X 5 3/4" for right side of card.  Cut a piece of dark pink 4 X 6” cut the right side with the plain edge Fleur border and cut the scalloped edge from another piece of dark pink.  Run the dark pink panel (not the border) through the die cutting machine with an embossing folder.  Trim the height to match rose paper and then glue border onto the right side.  The embossing folder used here has lines that cross so there is a pearl at each cross section.  Add a pearl flourish to the right side on the rose panel.
To decorate: Stamp Unfailing Love scripture on a piece of ivory and die cut with the oval die set.  Die cut the smaller eyelet oval from dark pink for a mat.  Cut an oval 1 size down from the sentiment oval out of foam sheet.  Cut the eyelet oval out of foam sheet (keep little scalloped hole piece in).  Layer the dark pink eyelet to the foam eyelet and the small oval with the sentiment oval then glue them all together, stacking.  Glue the stack to the left side of card, centering vertically.  Stamp, sponge and die cut roses and tiny blossoms.  Place both flower types in their own shaping mold and run through die cutting machine. Stamp, sponge and die cut leaves using Fern Green.  Run Leafy Accent leaves through the machine in the mold.  Form rose buds for centers of roses (see video) and just poke the belly of all the larger petals, glue them together staggering petals.  2 large, 2 medium, 1 each of the next 2 sizes down and then your buds in the centers.  (The smaller rose is still 2, 2 and 1 then the bud, just smaller sizes).   The tiny blossoms are 2 layers each and have Prills in the centers. All flowers are glittered leaves are brushed with shimmer.   Glue leaves and flowers to the card right and bottom of oval.

Second card, Classic Sunflower in lavender...These definitely look like a different kind of flower, amazing. Might want to get your Classic Sunflowers out, eh?


HC PRODUCTS USED      

Other Products:
Pink card stock, dark pink card stock, silver card stock, white card stock, Liquid Pearls-white

For more tips on creating with the flower shaping molds, watch the tutorial at https://youtu.be/FSdPL7nXvQE.
Instructions:
Card Size: 6 X 6”.  Cut dark pink panel to 5 1/2 X 5 1/2" then cut a silver mat about 1/32” larger on all sides.  Glue these to the white folded card.  Cut a panel from decorative pink paper measuring 5 1/2 X 6” and die cut frame of Ornate Pocket Accent on top and on the bottom (cut only 1/2 way down the die frame).  Cut 2 Ornate Pocket Accents dies out of white.  Cut 1 large circle out of white and 1 out of silver and then 1 size down out of pink.  Glue pink and white together and offset silver to the right so that it shows like another circle mat then glue to the center of die cut pink decorative paper.  Now glue white Ornate Pocket Accents die cuts to top and bottom to match edges.  Glue the die cut panel to card and randomly add glitter to card before decorating with flowers.  Stamp sentiment on white card stock and die cut with the eyelet heart.  Pop up heart on the right side of circle.

Stamp several sets of Classic Sunflowers using Magenta Hue and then die cut.  Sponge a bit of Magenta Hue just in the centers of each blossom.  Form flowers with the pad and stylist found in the Deluxe Flower Shaping Kit.  Glue together 5-6 blossoms per flower and pierce centers (make a large hole for several stamens to go into).
Take about 5-6 stamens and fold them in half around a small wire that can be used like a needle and thread stamen through the hole.  Dab glue around bade of stamen and let dry before cutting off the excess.  Run the leaves through the die cutting machine in the Leafy Accents Shaping Mold after misting.  Let leaves dry.

Arrange flowers around circle and when you like the arrangement, start gluing the flowers to the card.  Insert leaves and glue in place.  Add glitter to flower petals.  Use some white Liquid Pearls or Nuvo to make little dots around flowers.

Thanks for visiting!!
Robin
John 1
1 "In the beginning was the Word, and the Word was with God, and the Word was God. He was in the beginning with God.
14 And the Word became flesh and dwelt among us, and we beheld His glory, the glory as of the only begotten of the Father, full of grace and truth".

The Word is Jesus and He became flesh on Christmas Day when God sent Him to deliver us from our sin and give us life.