Pages

Comments are welcome and very much appreciated!

Tuesday, March 29, 2022

Happy Mother's Day Sweet Pea

 Good morning!

My mother and mother-in-law are both gone now but I still love the thought of giving a beautiful Mother's Day card.  If your mother or mother-in-law are still with you, be thankful, when they are gone there are a million reasons why you wish they were here even if it is to ask a simple question about a recipe!  Just hug them and tell them you love them... take time to listen to them talk about their life or the good old days and store that information up, someday you may wish you knew more!
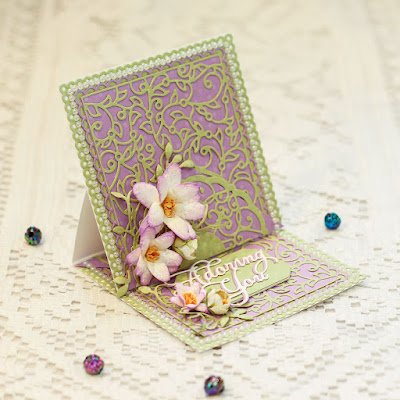

Material List HERE

Card size:   5 X 7”

Die Cut the card base using Fancy Classic Oval Frame outer die (See video). Die cut another front from white cardstock (because when making shaped cards you cannot make full shape in order to keep the fold). Cut another front from decorative paper. Cut the next size in with another decorative paper that coordinates. Cut the inner oval from first color decorative paper also cut a piece of foam sheet to fit oval. Glue the first 2 layers onto card.

From Silver cut all the decorative dies in the Fancy Classic Oval Frames set. Glue the thin silver frame where the lavender meets the aqua, glue the next silver die cut centered on front. The oval decorative die goes on the lavender oval, also glue the foam sheet to fit under the paper, now glue the oval stack onto center on card.

Stamp the sentiment using Majestic Violet on white, die cut with a small oval then sponge the edges with LuLu Lavender (or other light lavender). Cut a mat from silver 1/8” larger using large oval set then cut a foam sheet to fit. Glue oval sentiment stack together then glue to the center of card.

Stamp smaller Sweet Pea using Majestic Violet, sponge with violet and Magenta Hue. Stamp leaves, sepals and vine using Fern Green, sponge with flower colors and Leaf Green. Shape in the Flower Mold (See video). Shape vines with groove tools or Deluxe Flower Shaping Kit from the back, curl the spindly vines around a stylist or Groove Tool. Flowers are 2-part, glue the 2 parts together in the center and fold upward with fingers, add a dot of Nuvo Crushed Grape to the center of each. Glue the sepals to the bottoms. Make buds using 1 part of flower by rolling petals then gluing sepal onto bottom. Make several spindly vines using green wire wrapped around a stylist or Groove Tool.

Use hot glue to glue arrangement onto card front around sentiment. Add wire vines as desired to finish arrangement. Glitter all the flowers and buds. Mix shimmer and lacquer together then paint onto leaves with an old flat paintbrush. Stipple glue onto card front then add glitter (Try to avoid silver). Your card is finished.


Thanks for visiting today!

Robin


Honor your father and your mother, that your days may be long in the land that

 the Lord your God is giving you. 

In case you thought this was just Old Testament...

Ephesians 6:2

“Honor your father and mother” (this is the first commandment with a promise),

Monday, March 28, 2022

Amazing Paper Grace Unfailing Love


Good morning Amazing friends!


Yes, there is a lot to this one and you could certainly use what you have similar to achieve
a similar look, I would encourage you to do so.
I just used some that I had, old and new, to do what came to me at the moment.
I'm a die collector what can I say?  I used to collect stamps (and still do to some extent) but I just really like dies!!  I like mix and match!


I also used some pearls (they come in a line of self-adhesive), some thin silk cord, some white gauze (cheese cloth), some glitter and some stamen for the flower centers.
I used 2 tones of purple cardstock and white cardstock or this project.  Some Wilted Violet Distress ink for sponging the flowers and stamping the sentiment (Heartfelt Creations).
The paper I used for the green leaves was in a paper pad of papers that look like alcohol ink backgrounds from Craft Consortium.

Thank you Amazing Paper Grace for these Amazing dies!


Thanks for visiting today!  Hope you come away inspired to make a card!

Robin

On God rests my salvation and my glory; my mighty rock, my refuge is God.


Tuesday, March 22, 2022

Have A Sweet Day Gold Vase Sweet Pea

Good morning my friends!
I bring you more Sweet Peas today using Heartfelt's
gorgeous Centerpiece dies as a card base.
 
Material list HERE

Card size:  6 X 6”

Cut a shaped Centerpiece card base using largest Simple Centerpiece die (see Video for simple how to). Using the same die, cut a decorative paper panel from a pink piece then glue it to card base. Using 2 Simple Centerpiece dies together, cut a frame to go inside from white and from gold (it should fit right on top of the line going through the decorative hearts (use the Elegant Hearts die to check).

Cut the Elegant Hearts Centerpiece from white and from gold cardstocks, glue them together off-set a bit. Glue the inner frame together off-set a bit then add foam strips under the frame. Glue the decorative pieces to the card front of card then adhere the inner frame on top of hearts as described above.

Stamp the wide vase using embossing ink (VersaMark used for sample) then heat emboss with gold embossing powder. Sponge gold pigment ink onto edges, wipe off excess with soft rag. Glitter the vase, add foam to the back. Stamp sentiment using embossing ink, heat emboss with gold as with vase, die cut with small circle. Die cut the decorative vase center from gold then glue it to the vase, glue the sentiment to decorative gold piece on vase, set aside.

Stamp Sweet Peas using Cactus Flower and using Deep Purple, sponge with like colors, stamp sepals, and leaves using Leaf Green sponge with the same, die cut all, shape flowers, sepals and leaves in shaping mold. Stamp vines with embossing ink, emboss with gold then ink with green. Shape the vines from the back using the Deluxe Flower Shaping Kit and Golf Groove Tools as well as finish shaping flowers and buds.

For flowers, glue 2-piece flower together and use fingers to pull upward and together. For buds, use 1 part of flower (either part will do) roll with Golf Groove Tools, glue to sepals pulling sepal up, glue 1 sepal under each flower as well.

Glue vines to vase then adhere vase to card center. Hot glue flowers and buds to the vines, add in some leaves.

For finishing touches, glitter all flowers and card front avoiding gold cardstock if possible. Mix shimmer and lacquer together then paint it on the leaves. Add a thin white triple bow to upper left side (white silk cord used in this sample). Your card in finished!

Optional, cut cardstock or decorative paper to fit inside of card.

Thanks for visiting today!

Robin


19 The heavens declare the glory of God,
    and the sky above[a] proclaims his handiwork.


Monday, March 21, 2022

Amazing Paper Grace With Love

 Good morning my friends!

I love these slimline card designs!!  I remember when I wasn't into them at all and just didn't see what the big deal was, I've changed my mind.  I think it happened over time little by little, but now working with all these gorgeous dies from Amazing Paper Grace, I LOVE them!

This card is full of beauty with lots of details, I've used beautiful APG flower dies to add to the beauty as well (see the list of dies below). 


You will see, if you look closely, that I've added sheer ribbon and wired stamen to this little bouquet as well as some beautiful (alcohol ink look) designer paper.


All dies provided by Amazing Paper Grace

Designer paper from Craft Consortium 12 X 12 paper pad.
The Fluted slimline frame was popped up using a Fun Foam black sheet cut in 1/4" strips
then glued onto the back.
Green ribbon from my stash as well as the wired stamen.  Some wires were cut short then the left over curled to look like tendrils.  I usually curl them around 1 of my Groove Golf Tools.
I used white, green, yellow, black and turquoise cardstocks mostly from my scrap drawer.

Thanks for visiting today! I hope you are inspired to go create something!!

Robin thank you!


32 Be kind to one another, tenderhearted, forgiving one another, as God in Christ forgave you.


Tuesday, March 15, 2022

Let's Celebrate Tall Vase Sweet Pea

 Good morning friends! 

I have another Sweet Pea card to show today, this one uses the tall vase with sweet Peas cascading down the side with their tendrils going everywhere.


List of materials HERE

Card size:  5 X 7”.

Start by making a shaped card base with the Flourish Companion Outer Die (see video for easy how to).  Cut another front from white cardstock and from decorative paper with the same die. Cut from silver: the first decorative die in from outside and the decorative die inside the inner rectangle shape. Cut the inner rectangle shape from decorative paper to coordinate with card front. Cut a foam sheet rectangle to fit inner rectangle shape.

Glue the cardstock to card base then follow with the decorative paper card front and then the larger silver decorative frame. Next glue the foam to the small rectangle shape then glue it to the card.  Glue the smaller silver frame onto card next then glitter (try to keep glue off of silver cardstock).

Stamp the sentiment with embossing ink (VersaMark used here) on vellum then emboss with silver powder and die cut with the narrow banner die, shortening it to fir words. Glue 1/8” strips of silver to each side of vellum being careful to get glue on edge only. Cut silver ends to match die cut. Set aside.

Stamp taller vase using embossing ink then emboss with silver. Die cut and sponge edges with Cactus Flower and with Deep Purple then glitter. Adhere foam strips to back of vase, set aside.

Stamp small Sweet Peas using Cactus Flower the sepals in Leaf Green, die cut, sponge with the same inks then shape in the mold, finish with Golf Groove Tools and Deluxe Flower Shaping Kit (use Deluxe Flower Shaping cardstock for best results). Stamp Vining Sweet Pea using Leaf Green sponge with the same plus some Cactus Flower on flower portions of vine, die cut and shape from the back with Deluxe Flower Shaping Kit.

Glue 2-part flowers together, for buds just use 1 section of 2-part flower (Use Golf Groove Tools to roll petals). Glue the green sepals to the bottom of all flowers including the buds. Glitter all flowers and buds.

Glue the vines onto the vase and adhere vase to the card at left side. Glue all the flowers and buds onto vine now glue the left end of sentiment tucked under leaves on vine. Your card is finished!

Thanks for visiting today! 

Robin


15 but in your hearts honor Christ the Lord as holy, always being prepared to make a defense to anyone who asks you for a reason for the hope that is in you; yet do it with gentleness and respect,


March Facebook Tutorial

 This tutorial is exclusively on Facebook today HERE

Tuesday, March 8, 2022

Have A Sweet Day Purple Vase Sweet Pea

 Good morning! 


Material list for this card HERE

 Card size:  6 1/4" X 7 1/4".

Cut white card base using outer die of the Filigree Companion Frame (see video for decorative shaped cards). Cut another full front using outer die of the Filigree Companion Frame then cut one out of decorative paper. Cut the next die in from filigree set out of silver. Glue all these to the card base in order.

Cut a silver, a decorative paper and a foam sheet rectanglish shape using the filigree set, then cut the next die in from silver.  Stack these then glue them to the card front.

Stamp the short vase and the sentiment using Embossing ink then emboss with silver powder. Die cut the vase also die cut the vase shape from foam sheet. Die cut the sentiment using smallest circle you can then die cut the next size up from silver for a mat. Die cut the vase decorative embellishment from silver.

Sponge the edges of the vase with purple then glue silver embellishment on.  Glue these to the foam then glue to card front slightly hanging off the edge (about 3/8” from farthest point of card frame).  Glue the circles to the right of vase, centering vertically in the rectangle shape.

Stamp small Sweet Peas using Deep Purple and also using Cactus Flower, stamp leaves using Leaf Green, sponge leaves and flowers in their own colors, die cut then shape all in the mold, finish shaping with Golf Groove Tool Set and Deluxe Flower Shaping set. Make some into buds using 1 part of the flower or the other (both will make beautiful buds). Put flowers parts together using hot glue. Stamp Vining Sweet Peas with Leaf Green, sponge then die cut. Shape slightly from behind.

Glue the Vine on first then work from there to glue leaves and flowers onto vines.  Glitter all flowers and card base as desired.  Use mix of lacquer and shimmer to paint on leaves.

Thanks for visiting today!

Robin

Blessed be the God and Father of our Lord Jesus Christ, the Father of mercies and God of all comfort, who comforts us in all our affliction, so that we may be able to comfort those who are in any affliction, with the comfort with which we ourselves are comforted by God.
Right now we may know people who need comfort, lets be the ones who show mercy and comfort to those who need it.  Everyone who Jesus came in contact with was shown compassion, lets be more like Him each day.  People need to see love from someone, lets be that someone.  What we do in this short life matters.


Monday, March 7, 2022

Amazing Paper Grace Adoring You


This card, when laid out flat, is a slimline card but I've turned it into a sweet little easel just for a little variety.  I picked these colors because my mom always liked these colors together so I was thinking of her and that made me happy...It's the little things you remember that often count the most...
One time she even painted her kitchen with these colors!
This makes a darling little note card of 4 X 4".
S5-426 Splendid Trilliant and S6-177 Scalloped Symphony I started with a 4 X 8" piece of
Heavy weight white cardstock, scored it at 4" and 6" and made two valley folds.  I cut another piece of white 4 X 4" then glued it to the bottom 2" of the 4 X 8" from the score line down 
creating the easel base.  From there it was a matter of die cutting the other pieces from green and lavender.  My flowers are cut from white then sponged with color.
The sentiment is popped up creating a stop for the front to rest against while open for display.


Thanks for visiting today,
Robin


24  And see if there be any grievous way in me,
    and lead me in the way everlasting!
When I pray this prayer I often sit and wonder what God might show me about myself that I didn't even realize, do you do that?  It has surprised me at this age how much a person can not know themselves.  Often we find out while under pressure don't we?
I do want God to show me and help me to be a better person even when it hurts!


Friday, March 4, 2022

AMAZING PAPER GRACE DIE OF THE MONTH -MARCH


This new die is perfect for a shaped card and I love making shaped cards. A lot of times I like lining white die cuts with silver or gold because it gives just a bit of glitz to any card.  The Bella Ovalette is also perfect for using just  parts of to decorate a 3D projects like the box I've made here.  Gift boxes are fun to give little trinkets to your friends and family and they are easy to make.  The Bella Ovalette is the perfect die set to decorate with.
 
My creations were created today with dies provided by Amazing Paper Grace.

There are 12 dies included in the Bella Ovalette.


I used The Bella Ovalette cut from white cardstock and also from silver cardstock over some multi-color watercolor looking decorative paper.

My second project also uses the Bella Ovalette cut from white.
I made a box then used the Bella Ovalette on each side.
  
        I used the center portion on the box lid along with the pretty flowers.


Supplies:
Amazing Paper Grace March 2022 Die of the Month – Bella Ovalette
and SDS-054 Giving Occasions
White cardstock, decorative paper, silver cardstock, white satin ribbon, silver embossing powder, green Prills.


For more Bella Ovalette Inspiration
Visit each Creative Team blog linked below for their take on creative paper crafting ideas with Bella Ovalette, the Amazing Paper Grace March 2022 Die of the Month!
View this month’s Amazing Paper Grace Die of the Month! https://youtu.be/kptJ1TAQxrY

Follow me on Facebook!
Follow me on Instagram!

Thanks for visiting today!

Robin


Tuesday, March 1, 2022

On Your Special Day Mosaic


Good morning!
This card is full of pearls and Nuvo drops to make it very dimensional.  Almost like a piece of jewelry with small stones.

Material List HERE

Card size:  6 X 6”

Use 6 X 12” white cardstock to make a card base, fold in half. Cut a purple panel 6” square from decorative paper, cut a pattern piece 5 3/8” square, glue these to the card front then cut a blue piece 4 1/4” square from the Mosaic decorative paper as well. From purple cardstock cut a square 4 3/8” and 2 Simple Centerpiece frames measuring 5 1/2" wide outside and 5” wide inside then cut 1 measuring 4 1/2" wide outside 4” inside. Cut foam sheet for under the blue panel to pop it up after gluing the blue to the purple layer. Glue this stack to the card front.

Stamp the Elegant Mosaic 3 times using black and die cut with the dies from Elegant Mosaic.  Color with Copics or other coloring system. Add foam to each layer of Mosaic. Glue Mosaic pieces together but instead of gluing the second layer right on top of the first matching pattern, stagger so that petals are alternating making twice as many petals. Glue all 3 popped up pieces to the center of blue panel. Glue the smaller Simple Centerpiece frame to the blue panel around the Mosaic. Use glue and pop ups to attach the other 2 purple Simple Centerpiece frames (frames are staggered, 1 point on top, 1 flat side on top). Color white pearls reddish to match coloring on Mosaic then glue to points of top frame. Glue small pearl line of colored pearls to the outer edge of card.

Stamp Wild Rose with Worn Lipstick, sponge with the same, die cut then sponge edges with Festive Berries. Shape in the mold and finish shaping using the Deluxe Flower Shaping Kit. Glue 3 layers together then add Prills to the centers.  Glue the flowers to each corner of card.

Add Liquid Pearls and Nuvo Drops to the Mosaic to make dots wherever there are dots in the Mosaic pattern.

Stamp sentiment on vellum using Deep Purple. Use the Arrows and Banner Die set to die cut and shorten. Add a strip of blue decorative paper to each side of the vellum banner. Attach to card at the top. Glitter card.


Thanks for visiting today!

Robin