Pages

Comments are welcome and very much appreciated!
Showing posts with label BOX. Show all posts

Wednesday, June 26, 2024

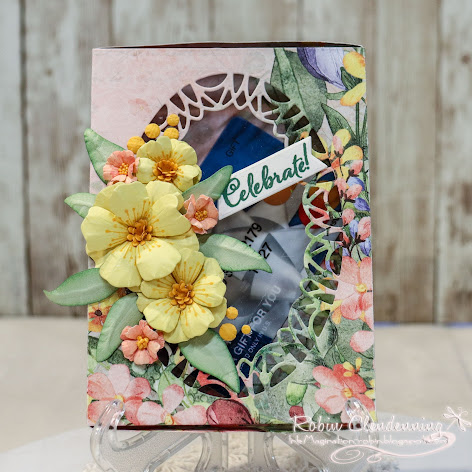
ECRAFT Gift Card Box

Hello crafty friends!
This box die is so amazing, I just love it!
It has 3 different insert cut outs that you can use (or not).
It makes a perfect box to put a card and cash/credit card in as a wonderful gift for someone special.

I am partial to ovals inside of rectangles so I used the oval inset to remove part of the top
then used acetate to keep the top solid for the safty of the gift inside.


I used some of the flower centers as dots for the bouquet.


Elizabeth Craft Designs products:

Thanks for visiting today!
Robin


Wednesday, September 14, 2022

Joy


I love making Christmas cards! 
I love the colors, the festive season and the general beauty!
Today I've made an easel card and a treat box.
Treat boxes are always fun to receive or to make and give
for table settings as favors.  Table favors is what I intend to do for my Christmas Tea. 
 
Today's projects created were used with dies provided by Amazing Paper Grace.

My Projects for Today 
uses:


The treat box


Easel Card


One tip I can give is to die cut the card first before embossing because if you emboss first it tends to really flatten out when put back through the machine with the die cutting.  You really defeat the purpose of embossing if you then flatten the card panel.


The Christmas Flourishes Availability:
These dies and plates are available from Spellbinders right now! Click here: The Christmas Flourishes Collection.

Other supplies:
Gold mirror cardstock, Ivory cardstock, red cardstock, green cardstock, Diamond Stickles, Crystal Stickles, gold stamen

For more The Christmas Flourishes Collection Inspiration

Visit each Creative Team blog linked below for their take on creative paper crafting ideas using The Christmas Flourishes Collection.


Follow me on Facebook!
Follow me on Instagram!

Thanks for visiting today!

Robin

Friday, March 4, 2022

AMAZING PAPER GRACE DIE OF THE MONTH -MARCH


This new die is perfect for a shaped card and I love making shaped cards. A lot of times I like lining white die cuts with silver or gold because it gives just a bit of glitz to any card.  The Bella Ovalette is also perfect for using just  parts of to decorate a 3D projects like the box I've made here.  Gift boxes are fun to give little trinkets to your friends and family and they are easy to make.  The Bella Ovalette is the perfect die set to decorate with.
 
My creations were created today with dies provided by Amazing Paper Grace.

There are 12 dies included in the Bella Ovalette.


I used The Bella Ovalette cut from white cardstock and also from silver cardstock over some multi-color watercolor looking decorative paper.

My second project also uses the Bella Ovalette cut from white.
I made a box then used the Bella Ovalette on each side.
  
        I used the center portion on the box lid along with the pretty flowers.


Supplies:
Amazing Paper Grace March 2022 Die of the Month – Bella Ovalette
and SDS-054 Giving Occasions
White cardstock, decorative paper, silver cardstock, white satin ribbon, silver embossing powder, green Prills.


For more Bella Ovalette Inspiration
Visit each Creative Team blog linked below for their take on creative paper crafting ideas with Bella Ovalette, the Amazing Paper Grace March 2022 Die of the Month!
View this month’s Amazing Paper Grace Die of the Month! https://youtu.be/kptJ1TAQxrY

Follow me on Facebook!
Follow me on Instagram!

Thanks for visiting today!

Robin


Friday, October 22, 2021

Amazing Paper grace Sweet Serenade Blog Hop


The Sweet Serenade Notecard Collection is simply to extend a sweet thought or warm greeting to let them know you’re thinking of them through a heartwarming notecard. The inspiration behind this collection is the ability to create beautiful notecards. Everything in this collection coordinates together from the card base to the embellishments to the stamps to make wonderful notecard creations! Notecards also make a wonderful gift as a boxed set! Swoon your family and friends with a special handmade gift! Make it seasonal for fall or for the holidays. Maybe a specific style such as soft vintage, clean and simple, or even a mixed media twist!

Today's projects were created with dies provided by Becca Feeken of Amazing Paper Grace.

My Projects for Today


Today I've made 4 note cards 4" X 4" with coordinating envelopes and
a matching box to store them in or give them as a gift which
is my intent with these cards.


Designers Tip: 
#1 The dies fit so nicely together try making the inside a different color or use pattern paper.
#2 Make the envelopes before making the box to make sure everything fits nicely.

Sweet Serenade Notecards Availability:
These dies and plates are available from Spellbinders right now! Click here: Sweet Serenade Notecards Collection.


Supplies:
Purple cardstock, lavender cardstock, white cardstock, Nuvo Drops-Lavender, light yellow cardstock, two tone purple ribbon, rhinestone brad,  Dries Clear Adhesive,  foam sheet, envelope maker 
Accessories: 

Perfect Harmony Notecard Embellishments SKU: S4-1149,  Sweet Sayings Notecard Sentiments Etched Dies SKU: S4-1148, S3-420 Petite Floral Potpourri flowers

Ink: New Sprout Memento (leaves).

For more Sweet Serenade Notecards Collection Inspiration
Visit each Creative Team blog linked below for their take on creative paper crafting ideas using the Sweet Serenade Notecards Collection!
Visit Patricia Manhire

Please comment: Which Sweet Serenade Notecards set speaks to you?
Follow me on Facebook!
Follow me on Instagram

Robin
The friendship of the Lord is for those who fear him, and he makes known to them his covenant. My eyes are ever toward the Lord, for he will pluck my feet out of the net.


Saturday, September 19, 2020

Christmas book and gift bag-Memory Box

                   Christmas book Tutorial Basics


 #1 Book front and back: 5 ½ X 10” white.  Score at 4 ½ and 5 ½ (1” in the center for book binding)

Die cut front with the first, (largest) oval tree frame die and set aside.  

#2 Each page is 4 ½ X 5 ½”, center each progressively smaller oval tree frame die onto each page.

#3 This is the harder more confusing part…The page/binding tabs: Start with a 3 ¼ X 5 ½” piece of white then score at ¼”, 5/8”, 1”, 1 ¼”, 1 5/8”, 2”, 2 ¼”, 2 5/8”, and 3”.  Valley fold ¼” score then mtn fold the 5/8”, valley fold the 1” and 1 ¼” then mtn fold the 1 5/8”, Valley fold the 2” and 2 ¼” then mtn fold the 2 5/8” finally valley fold the 3” this will leave a ¼” tab at the end.  Now glue together the 5/8 to the 1”, glue the 1 5/8 to the 2” and glue the 2 5/8 to the 3” to make 3 page tabs with ¼” between each page tab and ¼” at the start and end.  This should fit perfectly into the 1” space on the book base in the center for binding.  If it doesn’t fit perfectly without interference with scores then trim the two ¼” ends to fit…it should be flat when glued down with tabs sticking up.

#4 Glue pages on with tab behind each.  The last page (back cover) is a piece of white cut 4 ¼ X 5 ¼” then letter pressed with an embossing folder.  I used Tumbled Glass Distress for mine, it turns out better when you roller (brayer) the color onto the embossing folder.   Glue this onto the back avoiding the score line.

#5 Glue the bunny and birds onto which ever pages you prefer.  Glue Merry Christmas onto the front bottom.


Gift Bag

#1 Front and back are 3 X 4”.   Side is 1 ¾” scored on both long sides at ¼”, turn then score at 4” and 7”.

#2 Where score lines intersect on side piece, cut triangle out up to long score line so the side folds around front and back easily.

#3 Cut 2 pieces of acetate or vellum for the inside of front and back 2 78 X 3 7/8” to avoid all corners.

#4 Die cut front and back with small enough oval tree frame die to fit.  Glue the acetate to the inside.

#5 Starting with one side at a time, glue the side on with tabs inside box.  When both sides are on glue border around the top then glue deer and star on.

#6 Punch a hole at the top of each side top then thread some ribbon through, knot each side on the inside.


Dies used for these projects:
Memory Box 30042
Memory Box 98167
Memory Box 94503; 94502; 94501; 94500
I.O. DIE079-U (birds)
I.O. DIE117-C (deer)
Spellbinders S4-1008 (bunny)
Memory Box embossing folder: EF1010 Snowy Forest 3D

I hope this helped answer any questions you may have.  Thanks for visiting!
Robin


Saturday, April 4, 2020

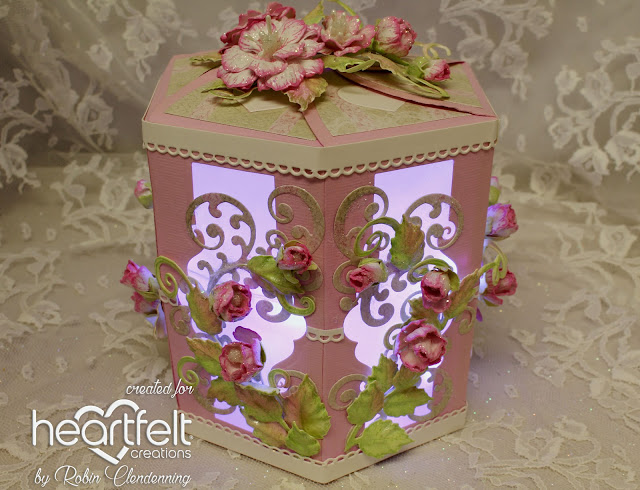
Double High Luminary/Gift Box

Double High Box/Luminary Tutorial


Directions: 
Step 1: Cut out 12 of the Treasured Heart Gift Box pieces. (This is a six sided box). This sample uses a light pink, but any color would be fine.  
Step 2: Cut the half oval top off of 6 box pieces. Making sure to have gluing tabs all on the left side, glue 2 box pieces together vertically (line up score line carefully for a straight box). Now there should be 6 double high box pieces.
Step 3: Use the inner die from the Ornamental Tags die set to create a tall narrow “hole” on each side. (Do this before gluing sides together).  
Step 4: Cut 6 pieces of vellum measuring 2 1/8” x 4 1/4" each, then glue to the inside of each box panel.
Step 5: Glue box sides together matching score lines at the bottom and cut lines at the top until all sides are glued but wait on gluing last sides together forming the box.
Step 6: Cut out accessory pieces; 6 curl hearts, strips of straight eyelet (made with the long eyelet die in the Tickets and Tags Die Set), 12 inner box tops with the heart cut out (6 in one direction and 6 in the opposite direction as far as the heart placement) and 6 white plain hearts (these will go inside and outside the box for the closed box and for the open box as a lantern).
Set pieces aside in one place until needed.
Step 7: Use the eyelet pieces between box panels at the center seam. Glue the inside box tops on with hearts upside down and then glue the curly hearts into the heart openings.  Glue the box top outsides with heart cut out being right side up. 
Then glue the solid white hearts into the heart openings. When box is closed with top half ovals tucked, hearts should look right side up. When box is left open for the fairy lantern, hearts will appear right side up as well, if glued on correctly.  
Step 8: Stamp using Magenta Hue, sponge both sides, die cut and form Wild Roses in Small Wild Rose 3D Shaping Mold. Make 18 of the smallest Wild Roses, 3 for each of 6 sides. Roses should be pressed in the centers of the back side so that petals come up with stamped side showing. Glue some tight and some a bit looser with a beaded wired stamen in the center of each.
Stamp using Leaf Green, sponge both sides using New Sprout, die cut and form Leafy Accents leaves in 3D Leafy Accents Shaping Mold. Give leaves a bit more color by adding some flower color to the edges of some.
Step 9: Stamp, sponge (using green) and die cut Lilac Blossoms for the Sepals at the bottom of each rose bud. Glue some tight and some loose.
Step 10:  Cut 6 Swirly Border Accents, 1 for each side, out of light green decorative paper (Wild Rose Collection). Then glue 1 to each side having every 2 sides facing each other.
Step 11: To make it a little easier for arranging buds, twist wires together spacing buds and curve wires to match Swirly Border Accents. Use heavy duty glue (like Tacky Glue) to glue wired flowers on to each side then cut leaves apart and add them to the buds as desired.
Step 12:  Glue final sides together to form box and use clamps or just hold with your fingers until firmly set and dry. Then, cut 2 bottom pieces from light pink and glue one of the bottoms inside the box, wait till totally dry then glue the other bottom on the outside. (This last step is not necessary but will give the box/lantern a finished look.)
Step 13: Die cut white straight edge eyelet again, measure 1/4" from edges and cut to make small top and bottom borders for box. 
Step 14: Stamp, sponge, die cut and form more roses for the top of box. Use a set of leaves as a base (place on waxed paper or scrap decorative paper to be cut away later). Glue flowers and more leaves on top and leave to dry (this would also be a good time to add a small tag as a gift card).
When flowers are completely dry and hard, glitter them and gloss the leaves (do the same to the flowers and leaves on the box itself), peel the waxed paper away (or cut scrap paper close) and use a glue dot or other temporary adhesion to add flowers to the top of closed box.
 TOP TIP: Learn more creative ideas with the Treasured Gift Box die, watch this video here: https://www.heartfeltcreations.us/video/how-to-create-elegant-flowers-gift-boxes-the-ez-way