Pages

Comments are welcome and very much appreciated!

Tuesday, August 30, 2022

Sharing Your Grief

 Good morning crafty friends!


Sharing another sympathy card today.
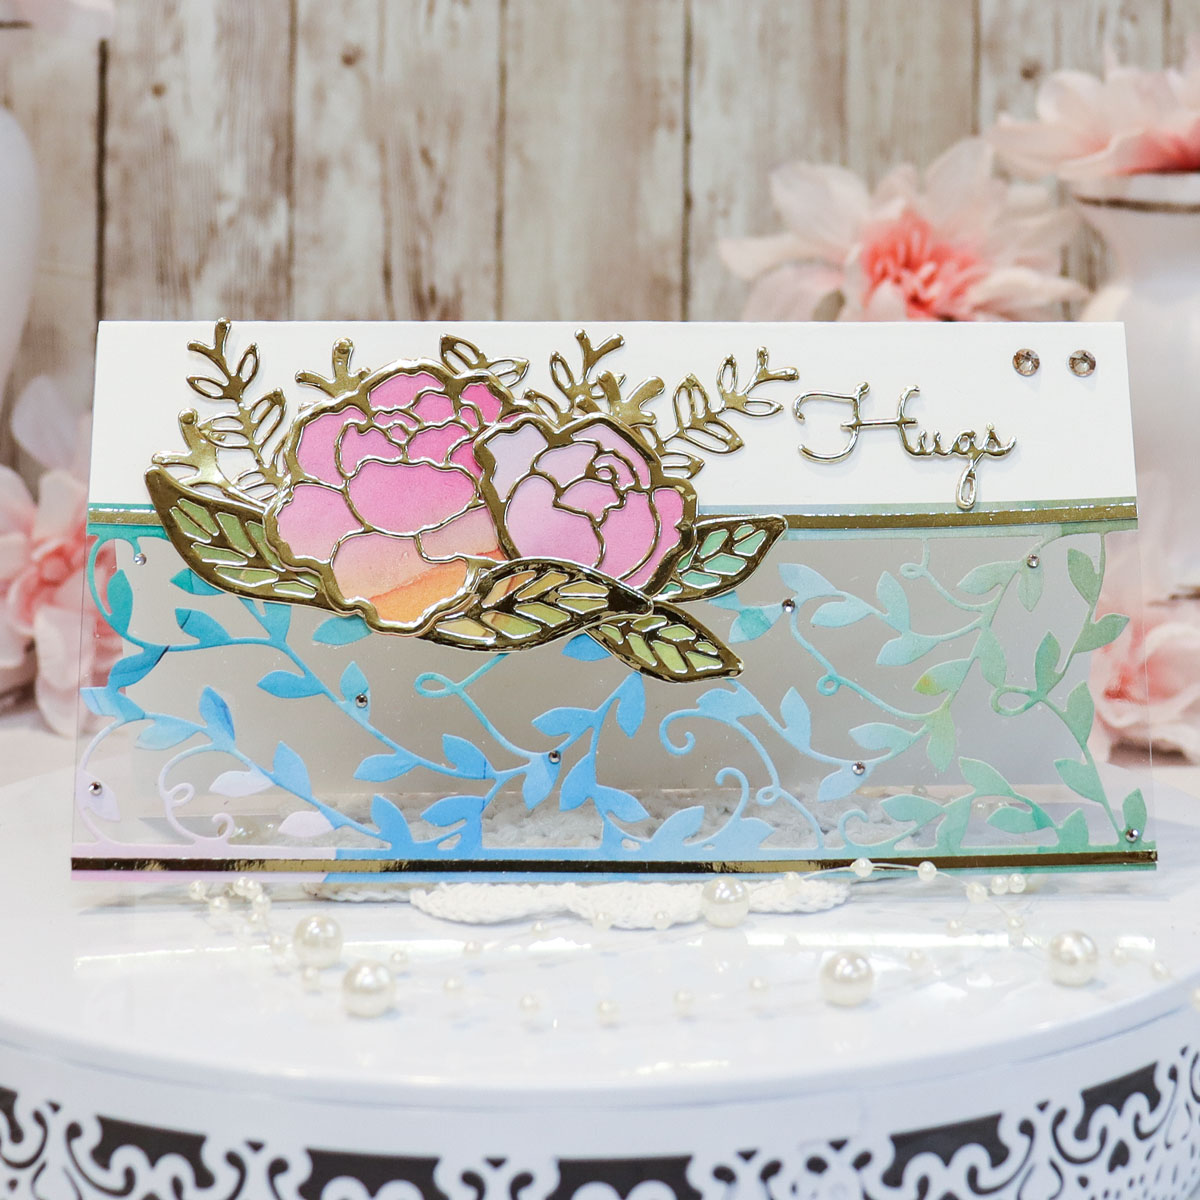

Material list HERE

 Card size:  4 5/8” X 5 15/16”

Make a shaped card (see video) using the outer die of the Royal Gateway on white cardstock 6 X 8” folded to 4 X 6.  Over-hang the fold by about 3/4”.  Cut another white front and a blue decorative paper front using the same outer die.  Glue the blue to the white then glue to the card front matching sides and bottom edges.

Cut the decorative die of the Royal Gateway from white and from gold cardstocks, glue them together off-setting slightly.  Glue the set to the card front.

Stamp and gold emboss the sentiment onto vellum, trim then edge with thin strips of gold cardstock.  Glue it to top left at an angle.

Stamp and gold emboss the angel on white and on vellum, stamp and gold emboss harp on white, die cut all.  Slightly thin gold metallic paint with water then paint it on the harp frame, the angel wings in decorative parts and on the vellum dress on the edges.  Cut the dress part of the vellum from the head then glue the vellum dress onto the white angel at the waist and sleeves.  Glue the harp to the angel. (if you mist the vellum dress it will curl up as it dries (if you like that look).

Stamp and gold emboss the little flowers, 2 per flower and the leaves on vellum, die cut then shape on the back slightly (I did not use the mold for this, sometimes embossing will stick to the molds).  The mold for the leaves was used, but wax paper was applied first just in case.

Pop up angel and harp in approximate center of card, be careful not to cover up sentiment.  Arrange flowers and leaves at right and left of angel going up the sides of gateway.  Brush leaves with thinned gold paint, fill flower centers with Gold Prills. 

Attach pearls to the top of the gateway.


Robin

Matthew 6: 19-21

19 “Do not lay up for yourselves treasures on earth, where moth and rust[e] destroy and where thieves break in and steal, 20 but lay up for yourselves treasures in heaven, where neither moth nor rust destroys and where thieves do not break in and steal. 21 For where your treasure is, there your heart will be also.


Monday, August 29, 2022

Sweet Spring

 Good morning!

Look at this cute bunny!! I love bunnies and I always see them (this kind anyway) with a wreath around the neck.  So today that is what I have done!


The top is cut with the Romantic Slimline Borders.


S6-165 Make A Scene Card Base (label)

I used a sweet embossing folder for the background and used the 
flowers in the Spring Label Motif.

Thanks for visiting today and now, go get crafty!

Robin
John 6:68
68 Simon Peter answered him, “Lord, to whom shall we go? You have the words of eternal life, 69 and we have believed, and have come to know, that you are the Holy One of God.” 


Tuesday, August 23, 2022

Heartfelt Sympathy

 Good morning!

Today I've made a card that is actually very unusual for me, it is a sympathy card.  I made a couple of these recently and I hope that it brightens someone's day even a little bit.


Material list HERE

Card size:  4 5/8” X 6 5/8”

Make a shaped card by placing the outer die of the Decorative Circle Frames over the fold of white 12 X 5 piece folded in half at the top, (it will hang over the edge about 5/8” in this case, see video for further instruction).  On the top half of card only, score at the center (from the fold it should be about 2 9/16”, it will be 3 3/8” if measuring from the outside edge of top (you can plainly see the center of the decorative die when it is being scored, don’t worry that it is not even on both halves.  Fold the top down toward center fold.

Cut another white front of card with the same outer die then glue it to the front of card on the half that is folded in.  When the card is closed all edges should match up.  Cut 2 panels with this same outer die from yellow decorative paper, glue one to the front and one to the inside trimming the top as necessary to fit (do not glue over scored fold as this makes it hard to close).

Cut 2 white decorative die cuts and 2 yellow eyelet circles from the Decorative Circle Frames set.  Glue one inside trimming at the top and glue one on the front popping up the yellow circle on the front.

Stamp the angel with bird and Magnolia arch with memento, die cut, color with Copics, shape slightly from the back and pop up both on the card front.

Stamp Magnolia blossoms (medium and small) 2 times each using Pink Oxide Ink, sponge with pink on the edges then sponge with yellow on the insides, form in the mold then glue 2 together for each flower.  Pierce the centers, insert light yellow stamen, secure with hot glue then snip the wires in the back.

Stamp the leaves using Fern Green, sponge with Leaf Green and Magenta Hue, die cut, mold then cut apart.

Stamp the sentiment using pink Oxide, die cut with the small oval from the ovals large set, pop up on the yellow circle inside of card.  This will be the stop to keep card open to display.

Glitter flowers and lacquer leaves then glue to front and inside as desired.  Add small pearls to the decorative white die cuts.

Thanks for visiting today!

Robin

I have set the Lord always before me;
Because He is at my right hand I shall not be moved.

Monday, August 22, 2022

Sweet Summertime

Good morning crafty friends!

There is not a lot I like about summer (they are hot, dry and full of fire dangers where I live) but I do like seeing flowers and butterflies, don't you?  I love going to the high country of the Sierra as well, to see spring in July, hiking through meadows that are just beautiful with flowers and little butterflies in abundance along with the forest and granite all around me.

I've done a card today using the Summer Label Motif.  This could be a picture of those high-country meadows or even my back patio flower pots. 

I used vellum for the wings, colored from behind with Wilted Violet Distress ink.


I did modify the Sweet Leaf Mini Slimline on this card to create an A2 size card. 


Thanks for visiting today, it's your turn, go get crafty!

Robin


Tuesday, August 16, 2022

Hark The Herold Angels!

 Good morning Crafty friends!


Material List HERE

 Card size:  4 5/8” X 6 7/8”

Cut white cardstock 9 1/8” X 6 7/8” then score at 3 3/16” and 7 ¾” (There should be approximately 4 5/8” in the middle.  Be sure when closed edges meet). Cut decorative panels for the 3 inside sections and for the 2 outer sections that make up the front of card.  Before gluing any paper on, glue half the magnet to the top 1 3/8” section in the center, add tape over the top so that magnet does not move while glue is wet.  Put the other half of magnet onto glued magnet from the other side, add a drop of glue then close flap down, this will mark where the other half of magnet will go.  Glue the half magnet down where glue spot is and add a piece of tape. (The tape will not affect the magnets pull).  Glue decorative paper over the two magnet halves, one on outside short flap and one on inside middle section toward the top.  Now finish gluing the rest of the decorative paper panels on to matching card sections.

Cut both decorative dies from lavender cardstock and from silver cardstock.  Glue matching die cuts together, lavender to silver off-setting slightly.

Glue larger bottom die cuts to the bottom section of card front, close the top flap and glue the top decorative die so that it just overlaps bottom die slightly on the sides (make sure to put glue ONLY where the top flap is, you don’t want to glue the card shut! 

Stamp and emboss using VersaMark and silver embossing powder, the stars and snowflakes X 2, Heralding angel, angel with bird, and Noel.  Die cut all pieces. 

On the inside center panel, glue the angel with bird, Noel and some of the small stars and snowflakes, be careful not to cover where you know the magnet is.

On the top flap, glue the large star and some smaller stars to the 2 sides, glue the 2 large snowflakes and a star to the bottom 2 corners.

Die cut another Heralding angel from lavender as a back for the embossed angel (it will show when open, this will also strengthen the angel.  Now pop up the angel to top flap only so that card can open.

Attach silver pearls as desired.

Thanks for visiting today!

Robin

Micah 6:8

He has told you, O man, what is good; and what does the Lord require of you but to do justice, and to love kindness, and to walk humbly with your God?

Sunday, August 14, 2022

Seasonal Motif Spring


I used to Tole paint years ago and I remember one of the whimsical patterns I found in a 
book was of a bunny similar to this one, with a wreath of flowers around its neck,
so how could I resist?
The blue card was inspired by the beautiful word dies recently released.  I just knew
the baby boy would be perfect with this gorgeous lattice background and 
that large SWEET!


Projects created today were used with dies provided by Amazing Paper Grace.

My Projects for Today


The Seasonal Label Motifs Availability:
These dies and plates are available from Spellbinders right now! Click here: The Seasonal Label Motifs Collection.

1"white satin ribbon, pearl halves, Stickles, foam sheet (like Fun Foam), decorative white with glitter dot paper, white cardstock, pink cardstock, blue cardstock, beaded flower stamen, blue ink, pink ink, Prills, Light green cardstock

For more The Seasonal Label Motifs Collection Inspiration

Visit each Creative Team blog linked below for their take on creative paper crafting ideas using The Seasonal Label Motifs Collection.

Follow me on Facebook!
Follow me on Instagram!

Thanks for visiting today!
Robin


Tuesday, August 9, 2022

Noel

 Good morning Heartfelt friends!


Material list HERE

Card size:  6 1/8”X6 7/8”

Card Base: Cut white cardstock 5 X 6, Cut Gold cardstock 5 3/16” X6 1/8”, glue white to gold then make a folded white card to fit and glue it on the back.  Cut the Noel Decorative die from white then cut just the top border (using outer die and decorative die together) from gold.  Tape the gold border to the decorative white die cut from the back with permanent tape.  Glue the sides and bottom to the card front at the bottom to form a pocket (harp ends will be loose.

Cut a piece of white cardstock 4 1/2” X 5 3/4", stamp it with the Joyous Noel Background Stamp using clear embossing ink or VersaMark Ink then heat emboss with clear embossing powder.  Sponge various colors distress inks onto clear embossing starting with the lightest colors in the center and working outward.  Wipe off excess with a baby wipe or other soft cloth.  Put glue on the back then slide it down into pocket (make sure no glue bubbles out, this would hamper the pocket.

Stamp poinsettias and holly using VersaMark, heat emboss with white.  Glitter the edges of the poinsettia with gold glitter.  Place a piece of waxed paper under pocket then glue the flower and leaves to the left corner of pocket.  When glue is dry pull waxed paper out.

Tag: On white cardstock scrap, stamp and emboss angel and harp with gold powder, die cut then glue harp to angel.  On another piece of white cardstock, stamp and emboss Noel in gold, color leaves light green.  Die cut tag with Noel at the top using the Album Tags, large inner tag die.  Use the large Outer tag die to cut a gold frame for the tag.  Glue then together then punch a hole at the top or use provided hole die.  Glue angel with harp to the tag.  Add color where desired and add shimmer to the wings and dress.  Insert a ribbon at the top of the tag then insert tag into pocket.

You can write on the back of the tag or inside card.


Thank you for visiting today! Now go get crafty!

Robin

Philippians 4:6-8

 do not be anxious about anything, but in everything by prayer and supplication with thanksgiving let your requests be made known to God. And the peace of God, which surpasses all understanding, will guard your hearts and your minds in Christ Jesus.

Finally, brothers, whatever is true, whatever is honorable, whatever is just, whatever is pure, whatever is lovely, whatever is commendable, if there is any excellence, if there is anything worthy of praise, think about these things. 

These verses mean especially a lot to me right now as I am facing something that could be frightening.  As always, my life is in God's powerful hands, and I will praise Him to matter the outcome!  For those of you who pray, thank you for your prayers right now...Robin

Monday, August 8, 2022

August Amazing Paper Grace Die of the Month


I love window type cards using acetate, so I made one vertical and one horizontal 
using each trellis in the Amazing Paper Grace Die of The Month for August set.
I think these would also make beautiful shaker cards, don't you?
I embellished the trellis on both cards with beautiful gems from Spellbinders.

Today's creations were created with the dies supplied by Amazing Paper Grace.

There are 13 cutting dies included in the Peekaboo Trellis Panels.


Here are more photos of each card individually.


Supplies:
Amazing Paper Grace August 2022 Die of the Month – Peekaboo Trellis Panels.
SCS-142 Gold Essential Gems, SCS-129 Pink Essential Gems
Gold mirror paper, white cardstock, pink cardstock, decorative paper
Acetate, white acrylic paint

The Amazing Paper Grace Die of the Month is available exclusively at Spellbinders Paper Arts during August 2022, Peekaboo Trellis Panels along with other membership perks.

View this month’s Amazing Paper Grace Die of the Month video

Follow me on Facebook!
Follow me on Instagram!

Tuesday, August 2, 2022

Unfailing Love Slimline

Good morning crafty friends!

Material list HERE

Card size:  4 X 8 1/4"

Start with white cardstock measuring 8 1/4" X 8”, score and fold to make 4 X 8 1/4” card.  Unfold then place an oval die 2 1/2"X 4” in the center of the front half of card, run through a large die cut machine or fold bottom part of card under the cutting plate so that it doesn’t cut.  Cut a piece of blue cardstock to 3 3/4"X 8”, cut the oval from the blue then run the blue panel through the machine with an embossing folder (this folder was made for slimline cards).  Glue the embossed panel onto card front matching all edges.  Cut a white oval frame for the opening using 2 oval dies 1 size apart (this takes both sets, small and large to accomplish).  Glue the frame onto opening.

Inside card, cut a blue decorative paper panel to 3 3/4"X 8”, stamp the center with a sentiment so that it shows in the center of the closed card.  Glue it inside then set the card aside.

Stamp Leafy Accents using Fern Green, sponge with Leaf Green, die cut then shape in the Leafy Accents Mold.  Lacquer them then cut them apart.

Stamp the Wild Rose Blossoms using Cactus Flower, sponge with Magenta Hue, die cut then shape in the mold.  Glue 2 of the same size together for each flower.  Using the Deluxe Flower Shaping Kit, make a well in the center of each flower, pierce the centers.  Using one of the EZ Stems, attach each flower by inserting end of stem then fold stem over using small plyers, glue in place with hot glue.

Attach leaves all over all stems as desired using hot glue. At this point you can blend the color or the leaf stem and the EZ Stem with a green Copic Marker or other marker if you want to.

Fill the centers around the green folded stem, with adhesive then fill with Prills.  Glitter the flowers (Leaves should already be lacquered).

Add pearls to all intersections on the embossed design on card front then use hot glue to attach the stem with flowers.  Bend stems to desired look then hot glue a white multi-looped bow onto stem.

Optional: You can finish by adding glitter randomly to the inside of card.

Thank you for visiting today!

Robin

But to all who did receive him, who believed in his name, he gave the right to become children of God, who were born, not of blood nor of the will of the flesh nor of the will of man, but of God.


Monday, August 1, 2022

Happy Everything

 Good morning crafty friends!


I saw something like this on either Facebook or Pinterest But, when I went back to 
find it so that I could give someone credit, I could not find it anywhere!
Here is my representation of what I saw.
I made 3 left halves of the Half Slimline Oval (outer die only) with 2 of those layers having foam under layers for more dimension. 
The 3rd and final layer has the inside decorative part of the Half Slimline Oval die as well as the outer die.  I staggered each layer to make like stair steps.  The card base uses the largest Fluted Slimline die from that set, I then used a smaller straight edge die in the set to cut the light green decorative paper.
I glued the staggered Half Slimline Ovals onto the Fluted Slimline base.
For the sentiment I cut a white layer and a lavender layer "Happy Everything" from the Happy Occasion Words.  I also cut 2 foam layers and another white cardstock layer to build up the right side
of the words so that they would lay fairly straight on the card.
After adhering words, I added small pearls to the Half Slimline left side.
I cut out the layered Tulips and leaves from white, sponged lavender on the flower edges and greens on the leaves.  I put them together to fit the space I left for them, gluing some parts and popping up some parts.  To finish my card, I made a bow from seam binding that I dyed to match and then glued a white pearl brad to the top after clipping the brad legs off.


Thank you Amazing Paper Grace for these beautiful dies: 

Thank you for visiting today!

Robin

James 1:17
Every good gift and every perfect gift is from above, coming down from the Father of lights, with whom there is no variation or shadow due to change.