Pages

Comments are welcome and very much appreciated!

Monday, October 31, 2022

Amazing You!

 Good morning crafty friends!

Amazingly, my daughter's birthday is today so in case she looks in on my blog post today, Happy Birthday Kelly!

I've created this slimline card today with my daughter in mind.  It isn't a birthday card, but it is an encouragement card just for her because she IS amazing!

Some special details include white and silver lace, white ribbon and pretty white pearls in 
stiff line.

I don't know if you can see it but I splattered white paint on the blue wood background paper to start.
The words and decorative die are cut from white and silver.
The leaves are just silver.
Flowers are white and edged with silver Foundry Wax.  I added silver stamen to the centers. 


Other products:
Foundry Wax-Statue, silver stamen, silver Paper, white cardstock, pearls on acrylic line, lace with silver, silver shimmer spray, decorative paper from Elizabeth Craft, white cord, foam sheet.

Thanks for visiting today!
Robin

Tuesday, October 25, 2022

Thinking of You

Good morning!
Material list HERE

 Card size:  4 1/4 X 5 1/2"

Make an A2 size card base, tent fold (fold at the top).  Cut a piece of yellow decorative paper 4 X 5 1/4" then glue it to the card base for the front of card.

Stamp the Stylish Rose frame from white using black, die cut and color, Copics used here.  Pop it up with foam strips onto the card front. 

Stamp the sentiment using black ink on white cardstock, die cut then color.  Pop it up to match the frame and adhere to center of card.

Add rhinestones to each corner of the card.

This is a really simple card to make!

Robin

 Psalms 51: 10-12

Create in me a clean heart, O God,
    and renew a right[b] spirit within me.
11 Cast me not away from your presence,
    and take not your Holy Spirit from me.
12 Restore to me the joy of your salvation,
    and uphold me with a willing spirit.

Monday, October 24, 2022

Retro Camera Pocket Card


Good morning crafty friends!


Instead of the 3D Vignette I've made a card with a "camera" pocket.  I could include any number of photos in my pocket, I can think of a lot of reasons to give a card like this.
A thank you for a wonderful time, A wish you were here, after a family reunion with family photos,
after a wedding with photos of the bride and groom, you name it!


I used Amazing Paper Grace dies: 3D Vignette Twin Lens Camera S6-196


This card will be used for encouragement, that is why I used the "Focus On The Positive" words cut out on the first pull-out card.

I hope you like this variation of the 3D Vignette Die set.
Thanks for visiting today!
Robin


Tuesday, October 18, 2022

Happy Anniversary!

 Good morning crafty friends!


Material list here

 Card size:  5 X 6 3/4"

Make a shaped card base using the Fancy Classic Rectangle Frame outer die, (see video).  Cut another front from the Elegant Rose Frames Paper then glue it to the card base.  Cut the largest decorative die from the Fancy Classic Rectangle set from gold and from light pink coordinating paper.  Tip: Glue the light pink and the gold border on at the same time by lightly taping together first with removable tape (the border is so thin that it easily stretches out of shape if not taped to a sturdy panel first).

Stamp the Elegant Rose Frame on white using black Memento (if using alcohol inks to color images). If using water-based markers or paint to color your images, then use Archival black or VersaFine Claire black to stamp.  Use the gold painty Pen or Gold Leaf Pen to color border sections and color the rest with chosen coloring system.

Use foam strips to pop the frame up onto card front, centering.  Stamp sentiment using embossing ink or VersaMark Ink (used here) then emboss with gold powder and a heat gun.   Die cut with oval then sponge edges with green.  Glue it in the center of the popped-up frame.  Glitter card randomly if desired.

Thanks for visiting today!

Robin

Ephesians 5: 18b-21

 ...be filled with the Spirit,
 19 addressing one another in psalms and hymns and spiritual songs, singing and making melody to the Lord with your heart, 20 giving thanks always and for everything to God the Father in the name of our Lord Jesus Christ, 21 submitting to one another out of reverence for Christ.

Monday, October 17, 2022

Pet House

Hello my crafty friends!
Isn't this the cutest? I love the little dog and this adorable house which can also be a 3D Vignette folding flat for an envelope as well. Check out the blog hop from yesterday to see more ideas
for this pet house. (I've included a list of blogs below).


I used Amazing Paper Grace dies: S6-199 3D Vignette Pet House and S6-171 Wistful Window
My card today uses a combo of white, ivory and dark red along with various other colors for the accessories.
I did a splatter background on the light blue "sky".


Here is the list of Designer blogs:

Hope you love this card, I sure do!!
Robin


Sunday, October 16, 2022

Introducing 3D Vignette Balloon


I love hot air balloons, they are so pretty floating through the air 
so, when I received these dies, I was so excited to make a 3D card and also 
to make a cute Slimline card making the balloon beautiful with 
decorative paper as I imagined the fabric for a hot air balloon to be.


Dies provided by Amazing Paper Grace were used in today's creations.

My Projects for Today


The 3D Vignette Availability:
These dies and plates are available from Spellbinders right now! Click here: The 3D Vignette Collection.

Supplies:
Other supplies: Decorative paper, gold cardstock, corrugated stock, white cardstock, gold half balls, Stickles, Foam sheet for pop ups.


For more 3D Vignette Collection Inspiration

Visit each Creative Team blog linked below for their take on creative paper crafting ideas using The 3D Vignette Collection.


Follow me on Facebook!
Follow me on Instagram!


Tuesday, October 11, 2022

Wonderful Day

 Good morning crafty friends!


Material List Here

Card size:  5 X 6 7/8”

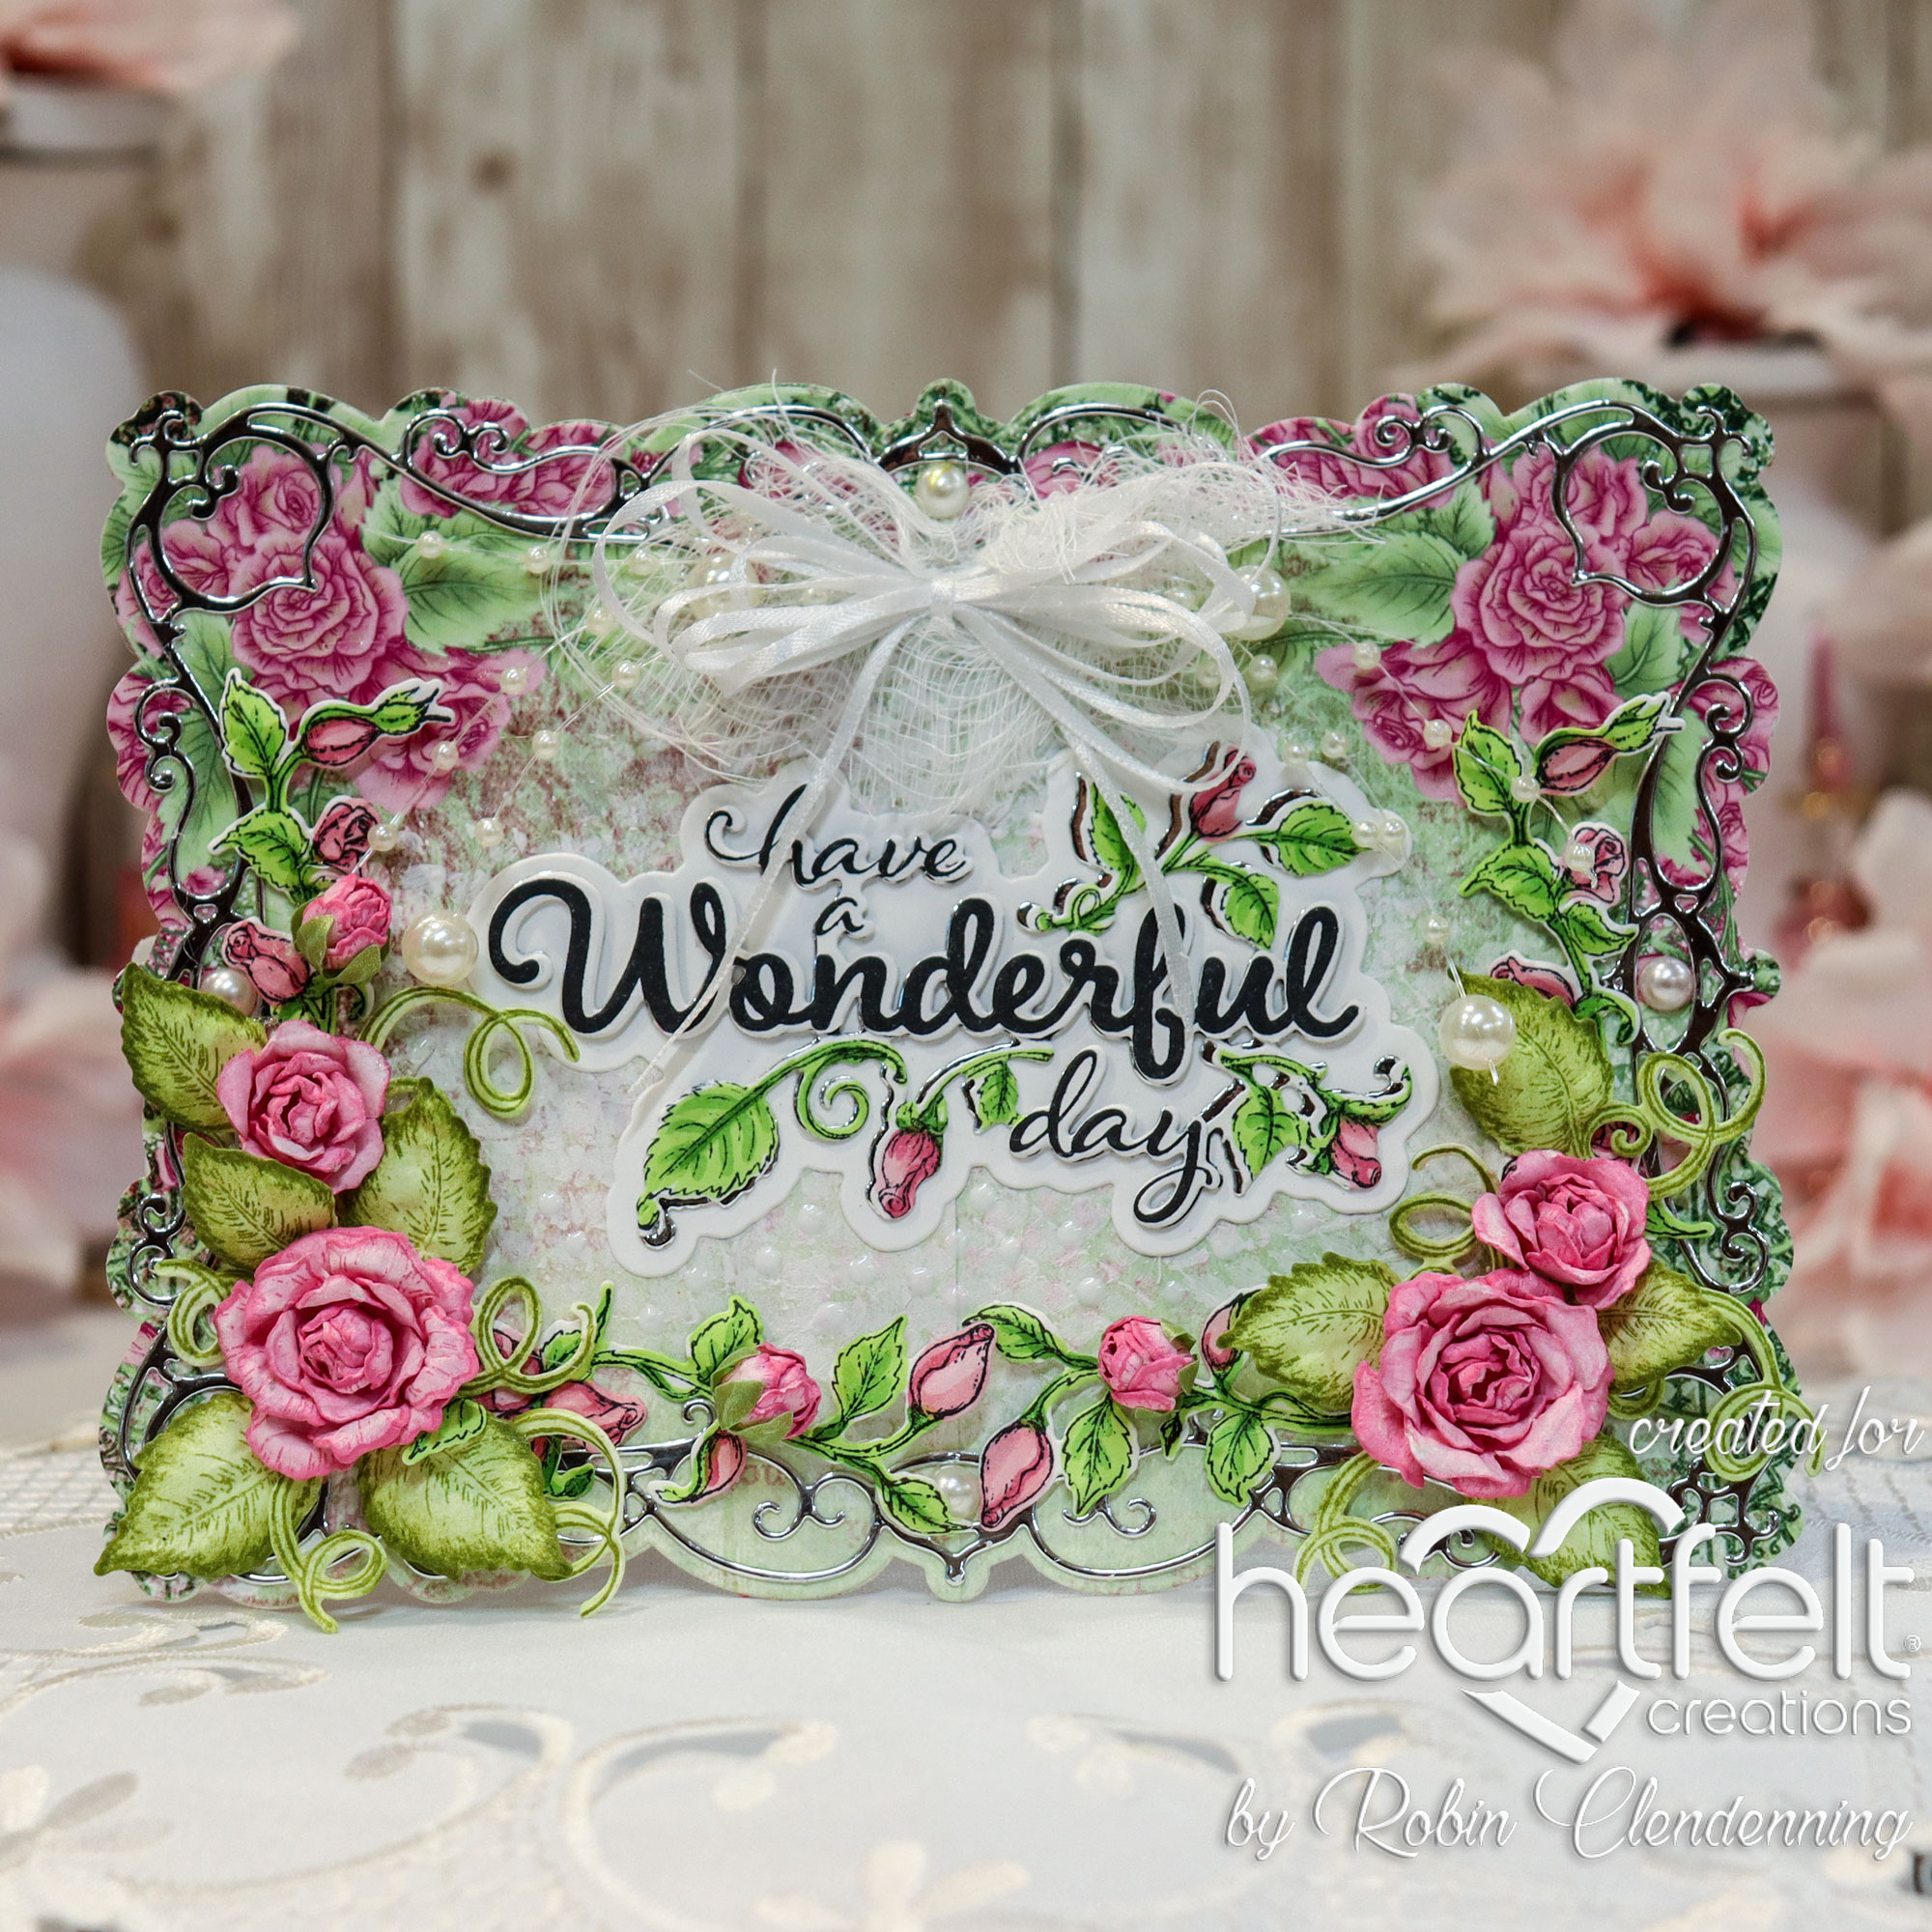
Use white cardstock to make a shaped card (see video) using the outer die of the Flourish Companion Frame die.  Cut another from using the Elegant Rose Frame Paper, glue it to the card base matching bottom and sides.

Cut the first large decorative die of the Flourish Companion Frame set from silver then glue it to the card front.

Stamp the Wonderful Day sentiment using Versafine Claire Black then cut it out using the matching die.  Cut it again using the same die from silver.  Adhere the 2 together, popping up the stamping, slightly offset.  Cut out the background for the sentiment from white then glue the sentiment on to its background piece. Now glue it to the center of the card front. Add dots of white Nuvo under the sentiment only.

Stamp the rose border from the Stylish Rose Frame die set 2 times, die cut them and color. Cut each into approximately half. Glue bottom sections so that they meet at the halfway point of card front, (wait to glue the halves that go along the sides for card.

On Deluxe Flower Shaping Paper, stamp Classic Rose (smallest and next to smallest sizes) several times to make a few roses and buds using Vibrant Fuchsia then sponge with Magenta Hue.  Stamp several leaves using Fern Green, sponge with Leaf Green, die cut all then use the Shaping Mold to shape.  Use the Deluxe Flower Shaping Kit to finish shaping roses, especially the buds. For the buds, It is recommended to NOT using hot glue as it will probably burn your fingers because they are so small. Use a small flower punch to make sepals for the buds then glue them to the bud bottoms.  Once the roses are all finished It is a good time to glitter them if you want glitter.

Glue leaves and flowers at each bottom corner and at this time add the other halves of the rose borders so that they go up along the sides.

Add some gauze and string pearls to the top then make a multi-loop bow from white cord or 1/16th ribbon, glue it to the top over the gauze and pearls.  Add half pearls as desired around the bordered edge of card.


Thanks for visiting today!


Robin


Psalms 63:1-3

O God, you are my God; earnestly I seek you;
    my soul thirsts for you;
my flesh faints for you,
    as in a dry and weary land where there is no water.
So I have looked upon you in the sanctuary,
    beholding your power and glory.
Because your steadfast love is better than life,
    my lips will praise you.

Monday, October 10, 2022

Santa's Coming!


Good morning friends!

Today I've used the new All Hearts Come Home (S5-534) from the Christmas Flourish Collection.
I decided to make the top shaped then made the top from white and inserted to finish the top.


I cut the front a couple times from white then cut pieces from gold for the packages
and to insert into hearts and house frame pieces.  For the windows I just added yellow 
paper to the back of the die cut house.
I used a corner rounder for the bottom corners.


To finish, I die cut the Christmas from gold and from white.

Thanks for visiting today!

Robin

Tuesday, October 4, 2022

Happy Birthday!

 Good morning crafting friends!


Material list HERE

 Card size:  4 3/4 X 6 3/4”

Cut a card front with the outer die of the Royal Elegance Frame die set from white and from pink decorative paper then place the border die from Filigree Borders and Accents die set onto the top of white cut out about 1/2" down (or your desired place to make white border as deep or shallow as you want it).  Cut the border then do the same at the bottom to create the bottom border. 

Use the Royal Elegance Frame outer die to cut the card base (See video).  Glue the pink decorative paper panel to card base then glue white borders top and bottom.

Cut the smallest decorative oval from the Royal Elegance Frame set from white then glue it to the center of card.

Stamp the sentiment with Fuchsia then die cut it with the small oval die to fit inside the decorative oval that you just glued to the center, pop it up.

Stamp all sizes of the Hollyhock blossoms in Sunflower and some Magenta Hue, sponge them with like colors then sponge the centers of each blossom with Fuchsia or another darker pink.  Die cut all the blossoms, sponge the backs with their flower color then sponge the edges as well.  Use the mold to form each blossom then push down in the center of each to finish forming.  Glue 2 together of each size to form flowers. Add glue to the centers then push some yellow FlowerSoft into the centers.  Glitter the flowers.

Stamp the leaves large and small using Fern Green then sponge with Leaf Green, die cut then sponge the back sides and edges with Fern Green.  Form in the mold.  Paint on lacquer mixed with shimmer additive.

Randomly glitter the card with ultrafine glitter then arrange flowers and leaves onto each side of the sentiment.  (Best to use hot glue for this so that everything stays where you want it when squishing small flowers in).

To finish, add a dark pink half pearl to each corner.

Thanks for visiting today!

Robin

Monday, October 3, 2022

October Die of the Month


I made 3 projects today, a 3D card, a tag and a gift box all with these new Amazing Paper Grace dies.
Christmas is such a fun time for giving and so I was inspired to make these as part of a gift for my sister who loves all things Christmas!
 
Today's projects were created with the dies supplied by Amazing Paper Grace.

There are 22 cutting dies included in the 3D Poinsettia Surprise Envelope.


Supplies:
Amazing Paper Grace October 2022 Die of the Month – 3D Poinsettia Surprise Envelope.
S-5 308 Nestabilities Hemstitch Rectangles
Red cardstock, Ivory cardstock, Green cardstock, Gold cardstock, Rhinestones, Diamond Stickles, ribbon

The Amazing Paper Grace Die of the Month is available exclusively at Spellbinders Paper Arts during October 2022, 3D Poinsettia Surprise Envelope along with other membership perks.

View this month’s Amazing Paper Grace Die of the Month!  https://youtu.be/ETnfTwMuPDw

Follow me on Facebook!
Follow me on Instagram!