Pages

Comments are welcome and very much appreciated!
Showing posts with label Tunnel Card. Show all posts

Wednesday, February 21, 2018

Heartfelt- Peaceful Lilac Layered Circles

Good morning!
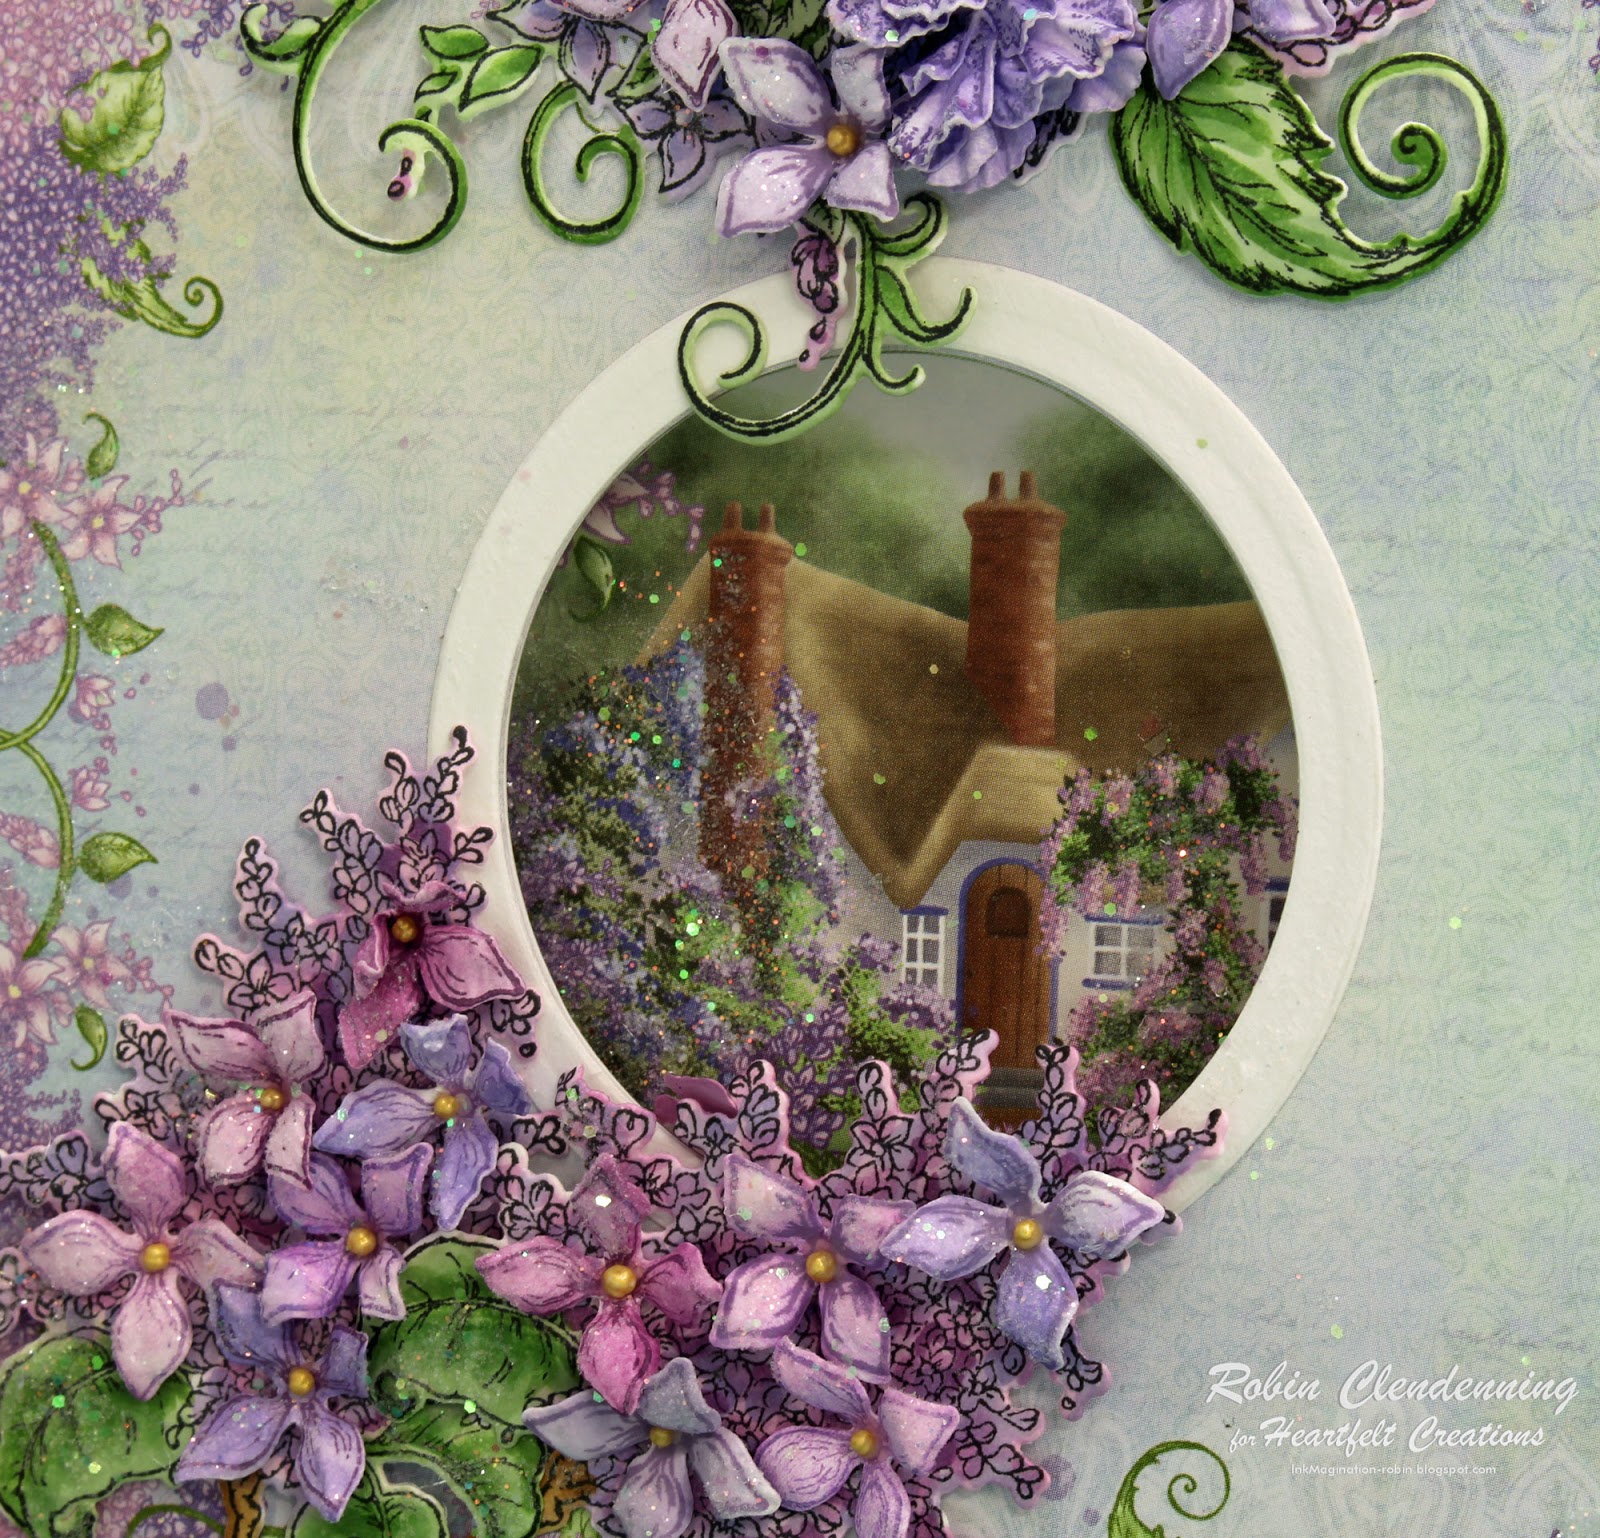
I have used the gorgeous umbrella today on the cover
of this circle layered card.
I so love the Lilac collection and this upside down umbrella 
is one of my favorite images!!
And there's that sweet cottage...LOVE it don't you?


OMGosh this paper is so gorgeous as well!

The large Lilac stem with all the little single 
blossoms on it.


HC PRODUCTS USED       

Other Products:
White card stock, Pearls, Foam Tape, Copic Markers-BV000,BV00, BV01, BV02, BV13, V01, V12, V15, V99, V25, Y11, Y17, G82, G21, YG61, R20, R22, B21, B45, B34, B00, E51, E53, E31, E33, E35, Pretty Petunia VersaMagic, Grape Jelly Memento, purple rhinestones, ribbon

For more tips on creating with the Camelia Carnation collection, watch the tutorial at https://youtu.be/rhk76SAIgWQ.
For more tips on creating with the flower shaping molds, watch the tutorial at https://youtu.be/FSdPL7nXvQE.
For more tips on creating with the Lush Lilac collection, watch the tutorial at https://youtu.be/KDbdzC0MnAI.

Instructions:
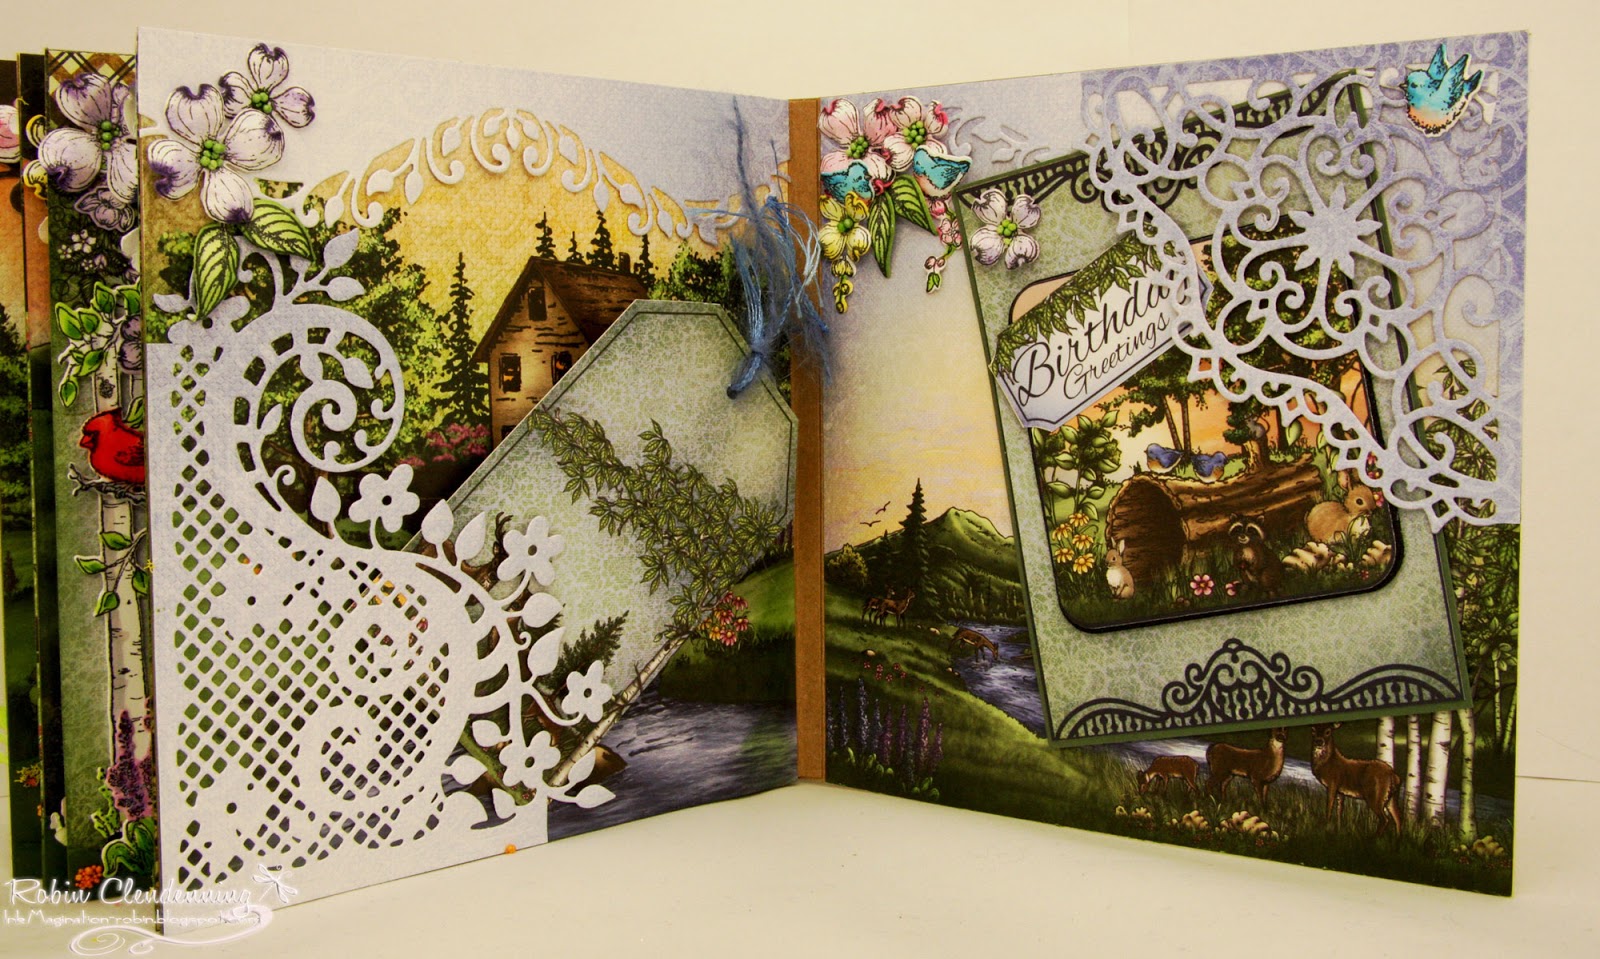
Card size: 6 X 6” Using the circles in each page as a template, cut 2 pieces of decorative paper for each page with the appropriate sized circle opening.  Glue tunnel book together and glue each panel to the front and back matching circle openings.  Make a white circle frame for each page, each side of the page.  Starting at the front, glue Decorative Medallion (die cut from white) onto the top lavender frame (it fits perfectly) and add a string of pearls to the top edge of die.  Decorate bottom with a stamped, die cut and colored umbrella and blossoms (stamped in black) plus extra blossoms (stamped with Grape Jelly Memento).  Next page is decorated with large Lush Lilac and butterflies (stamped n black) along with extra blossoms (stamped in Grape Jelly). The back of page 2 is decorated with white fence and Delicate Border die cut, the scroll and Woodsy Critter birds.  Page 3 is decorated with long and short Lilac Sprays and white fence.  The back of page 3 is decorated with 2 small tags.  Page 4 is decorated with 2 small lilac branch clusters and the Lush Lilac and Umbrella spray (stamped in black) and extra blossoms stamped with Grape Jelly, I used the carnation in place of the other flower in that spray.  The back of page 4 is decorated with blossoms from Rain Boots and Blossoms and a large butterfly.  Page 5 is decorated with another white Decorative Medallion and pearls plus a large and small Lilac spray with extra blossoms at the bottom right.
Sponge glue randomly on paper where flowers are on each page front and back and glitter as you go.  Sponge glue on all blossoms and glitter then add a gold Prill to each blossom center.  Add purple rhinestones to butterfly heads on purple butterflies.  Edge both Decorative Medallion dies with pearls.  Add dyed ribbon to tags.

Thanks for visiting today!!
Robin

Romans 8:35, 37 New Living Translation (NLT)

35 Can anything ever separate us from Christ’s love? Does it mean he no longer loves us if we have trouble or calamity, or are persecuted, or hungry, or destitute, or in danger, or threatened with death?  37 No, despite all these things, overwhelming victory is ours through Christ, who loved us.
Nothing can take us from God's hand no matter what we go through.  He is with us, seeing us through and working on our behalf.  He may not take us out of a situation but He provides a way through it (sometimes we make our own situation, don't we?) He doesn't always take us out of it because we must learn something and we come out the other side shining like gold.  Sometimes the lesson is just to learn to lean on Him for our everything!
No matter what happens, I will trust Him.

Wednesday, October 11, 2017

Heartfelt -A Tropical Road Trip

Good morning!

This week we are debuting the new Young at Heart Collection...It is so cute with cars, trucks and planes.
I decided to go the tropical "route" for my travel card today.  The piece of paper I used on the last page with the truck under the Palm tree was my inspiration for the entire card.


Brown Fun Foam used to raise the Journey letters.


Heartfelt-A Tropical Road Trip

Heartfelt Creations Products:
HCD1-7158  Young At Heart Die
HCD1-7159  Simply Classic Die
HCPC-3800  Young At Heart Stamp Set
HCPC-3801  Simply Classic Stamp Set
HCPC-3802  Good Times Sentiment Stamp Set
HCDP1-283  Young At Heart Paper Collection
HCD1-7137  Tropical Paradise Die
HCD1-7136  Tropical Cockatoo Die
HCD1-7135  Tropical Plumeria Die
HCPC-3783  Tropical Paradise Stamp Set
HCPC-3782  Tropical Plumeria Stamp Set
HCPC-3781  Tropical Cockatoo Stamp Set
HCD1-7132  Palm tree & Monkeys Die
HCPC-3777  Palm tree & Monkeys Stamp Set
HCD1-7150  Window Box Elements Die
HCD1-796   Tropical Hibiscus Die
HCPC-3736  Tropical Hibiscus Stamp Set
HCD1-7125  Wildwood Florals Die
HCPC-3769  Wildwood Florals Stamp Set
HCD1-778   Fleur Borders and Pockets Die
HCD2-752   Cut Mat Create 2B Die
HCD1-7120  Fleur Border Basics Die
HCLC1-454-1 6X6 Layered Circle Card-Black
HCD1-754   Eyelet Circle and Basic Small Dies
HCD1-755   Circle Basics Large Dies
HCD1-757   Eyelet Oval and Basic Large Dies
PGM15015   Rajni Chawla's Crystal Clear
HCDA1-449  Stack and Store Daubers
NU666      Nuvo  Carnation Pink
NU673      Nuvo  Dandelion Yellow
ANC818     Go Man Go Prills
352854     Metal Tip
TSMP707    Memento    Bamboo Leaves
TSMP602    Memento Teal Zeal
TSMP900    Memento Tuxedo Black
HCST1-401  Deluxe Flower Shaping Kit
31510      Funnel Tray


Instructions- Other products:Memento Cantaloupe, Distress Inks: Picked Raspberries, Dried Mandarin, Mowed Lawn,Shabby Shutters. Citron, Peacock, Lemonade, Copic Colors: Y32, Y17, YG11, YG41, B00, B02, BV10, BV02 R21, C02, C03, C05, G2, YG63, YR65, YR01, E97, Y11, Y15, E43, E44, E87, Nuvo light green, Flower Soft Yellow, Pearls, acrylic dots, gold half balls, Fun Foam-brown and white, sheer green ribbon.

Instructions:  6" X 6" Tunnel Card.  I decided to get my tropical supplies out for this card because of the panel I used for the last page, a truck under a palm Tree. Sometimes a piece of paper is the inspiration that gets me going and that was definitely the case with this card.  I started out by putting the tunnel card together and then finding, measuring and cutting paper for each side of each page. I cut my paper to size and then place the right size circle in the hole and draw a line with pencil, take the paper out, line up the die and cut.  I will cut both panels needing the same size hole at one time.   Sponge the edges of each panel with Distress Inks (in this case I sponged each page a little darker shade of the paper color). Cut the circle frames for each hole with a coordinating card stock using the circle dies large and small sets.  Sponged a darker shade on the inside of the circle frame.  I then started stamping and die cutting all the embellishments I wanted to use, either sponged color on or used my Copics to color, formed all the flowers and put them together to have everything ready for building my "book" tunnel card.  For the front and back of my book, I glued ribbon on before adding my paper so that there would be a little tie to hold the book closed.  To decorate I always start with the cover and work my way down.  I thought the beautiful birds would be perfect for my theme, so placed them with foam tape and added greenery and flowers around them.  My "Journey" was stamped and die cut twice so that I could raise the letters. I used brown Fun Foam between the layers to elevate.   My next page has the fun classic truck colored in a light coral.  I added the "best wishes" banner to the back of the truck, some decorative corners, and Hibiscus as well as land for the truck to travel over.  Page 2 features the classic convertible, a palm tree, flamingo, plumeria and decorative pockets.  Page 3 features the VW Bug, palm tree, flamingo, hibiscus, plumeria, and decorative window topper (from Winter's eve) and the last page features my inspiration panel with the truck and palm tree (the center circle is popped up with white Fun Foam),  it also has the decorative pockets, plumeria, and decorative window topper.  All the small flowers, I used throughout the little book as fillers, are from the Wildwood Florals.

 Thanks for visiting today!
Robin

        Psalm 8:3-4

When I consider Your heavens, the work of Your fingers,
The moon and the stars, which You have ordained, 

What is man that You are mindful of him...

Psalm 139:13-16
13 For You formed my inward parts;
You covered me in my mother’s womb.
14 I will praise You, for I am fearfully and wonderfully made;[b]
Marvelous are Your works,
And that my soul knows very well.
15 My frame was not hidden from You,
When I was made in secret,
And skillfully wrought in the lowest parts of the earth.
16 Your eyes saw my substance, being yet unformed.
And in Your book they all were written,
The days fashioned for me,
When as yet there were none of them.

Wednesday, October 4, 2017

Heartfelt-Coral Reef Tunnel Card

Good morning!
Breaking away from fall this week I have a nice cool underwater tunnel card book to share.  I LOVE these tropical colors, tropical flowers and beautiful serene fish just swimming around in their little underwater paradise.


Some of the seaweed on the cover was made with dyed gauze. 


Each page has a different scene to take in like a children's quite book.

On this page I've used some real shells on the bottom


There is an actual real seahorse on the cover along with real shells.

Heartfelt- Coral Reef Tunnel Card

Products: 

Instructions: Other Products: Distress Inks: Mowed Lawn, Twisted Citron, Picked Raspberries, Wilted Violet, Peacock Feathers, Carved Pumpkin, Squeezed Lemonade, Copic Markers: R21, R14, R22, R20, R00, Y11, Y15, Y38, BG11, BG32, BG15, V12, V15, YR04, C01, C02, C03, C05, C07, E00, Gauze, knotted twine, eyelash trim, ribbon, 3-M foam tape, Pearls, real shells, real seahorse

Instructions:  Card size is 6 X 6.  Put the layered circle card together.  Choose papers and cut each 6 X 6 paper to fit leaving a small border then cut circle out of the center of each to match the page it is going on.  Make circle frames from coordinating paper for each opening except the smallest circle page (you will use the port hole for the frame on this page.  Stamp, color (sponged with Distress Inks) and die cut all the flowers for the 
front of card (before gluing front cover on to the top, secure a piece of ribbon to make a tie for keeping card closed, same for the back cover). Form flowers and glue together then add white Prills to stamen and centers.  Stamp, color and die cut fish, porthole, coral reef and shells and arrange on desired pages. Tear pieces of tan paper for bottom of pages with that have no sand at the bottom already. Stick some eyelash trim under some of the glued on sand.  Decorate each page with coral reef, shells, and twine.  Die cut several scrolly leafy die cuts (from Cut Mat Create) from a green paper out of the Blazing poppy collection and die cut pockets from a piece of coral paper, glue pockets to tops of pages 3 & 4, cut up and glue pieces of scrolly leafy die cuts throughout card.  Finish with pearls and white Prills at the bottoms of each page.  Die and add gauze to some areas at the bottom of pages.  Add pearls throughout card top and bottom (these work well for spacers).  Some of the fish and seahorse is popped up with foam tape as well. 

Thanks so much for visiting today!
Robin


Your righteousness is like the mighty mountains, your justice like the ocean depths. You care for people and animals alike, O Lord.

Wednesday, September 6, 2017

Heartfelt-Woodsy Tunnel Card

Good morning!

I  have to admit, this Woodsy Wonderland release is one of my favorites.
How could it not be when I live in the mountains of the Sierra National Forest.  This is like my backyard (including the skunks!).


I love these curved borders, they work wonderfully as toppers.


I chose different papers for each page.


This one is bright and happy and look at those cardinals, I love cardinals!


This last page I reserved for journaling and/or writing a note to the recipient.


Heartfelt Creations-Woodsy Tunnel card

Products:

Instructions: Other Products: Flower Soft, 3M Foam Tape, Fun Foam-black

Instructions: Put the Kraft Layered Circle Card together and then cut designer paper for each page inside and out.  Die cut circles in the center of each sheet using the new Circle Basic dies (both large and small sets) to fit each circle on the layered circle card.  Pick coordinating designer paper for each page and die cut circle frames for each opening and also a border for the top of each page.  Since this is a masculine card I used the plaids, browns and dark greens with small print designs for this part.  Stamp, die cut and color all Woodsy pieces (several of the Landscape and Wonderland sets).  I used a combination of sponging with Memento dye inks (Bamboo eaves, New Sprout) and Copic Markers (E53, E33, E35, E97, E11, E42, E43, E44,R21, R24, R29,W01, W03, W05, C02, C03, C05, BOO, BO2, Y11, Y15, Y35, Y38, YG03, YG23, YG17, RV10, RV02, BV000, BV01, V01, V12, V15) Stamp, die cut and sponge color on Dogwood pieces (Memento: Grape Jelly, Lulu Lavender, Angel Pink, Rose Bud, Dandelion).  Form all flowers with the Deluxe Flower Shaping Kit (See Emma Lou's video for more instruction on flower shaping).  Glue each cut designer paper to each page front and back matching edges and circles then glue each border and coordinating circle frame to each page. Tear a strip of dark green "ground" for the bottom of each page (except back two pages) and sponge edges with Bamboo Leaves Memento then glue in place.  Fill pages with little animals and trees.  I purposely went beyond the inner circles to give more dimension to my tunnel.  I sometimes used to paper to dictate where to place certain animals.  I finished the bottom of each page (the ground) with Flower Soft and different colors of Prills like flowers.  The tops of all pages are decorated with the multi-colored Dogwood and leaves. Special instruction for the back two pages: the next to last page has a picture of a deer (from designer paper) glued to the last, small circle before gluing the designer paper over the page (like a sandwich). This makes the last two pages solid for adding pockets and journaling tags or more small cards.  I decorated the tops with the die cut border in blue and then die cut my pockets from the same blue designer paper.  I cut tags from the designer paper and added fiber to 1 and raise the middle square section of the other with black Fun Foam for dimension.  The pages are finished with Dogwood on top and a small Dogwood flower on the Card/tag. 
See all the cards for this week HERE.
Thanks for visiting!
Robin

Wednesday, August 30, 2017

Heartfelt-Winter's Cozy Fire Tunnel Card

Good morning!
We have exciting news for today...a special release!
Along with these new fantastic tunnel cards and shadow box cards 
are sets of wonderful Oval dies and Circle dies to match.
They are just what we've needed and now they are here for all of us to play with!
There are 2 sets of each the circles and the ovals so that you can make really nice layers.
My card features the Oval Tunnel Card, The Winter's Eve Collection and the Festive Holly Collection.

This top page is actually an oval opening as well but the window stamp and die set covers it.
I fussy cut the angel girl and the tree so that I could use them on separate pages.


For this little book card I covered the last, smallest oval with my image so that I could use the last page as a place for tags and a personal message from me.

Heartfelt Creations- Winter's Cozy Fire Tunnel Card

Products:

Instructions: Other Products: Pearls, Copic Markers (YG03, YG23, YG15, R21, R24, R29, E00, E01, E53, E33, E35, E50, E93, Y21, Y24, Y31, Y11, Y15, Y38, BV20, B00, B02, RV10, RV02, W02, W03, C02, C03), Memento Inks (Rose Bud, Angel Pink-for stamping and sponging color on Poinsettisa), Spellbinders Rectangles Nestabilities.

Instructions: Construct 5 X 7 layered card then cut designer paper for each side of each page (sponge edges of all pages).  The first page is the largest oval and they get smaller as you go.  For the first page, in order for the window frame to fit, you need to cut the designer paper with a rectangle (large enough for the window) a bit smaller than the opening.  Before gluing front piece of designer paper, glue a piece of ribbon about 8 or 9" hanging over the edge, then glue your "cover" page on. Stamp and die cut the window from white card stock, die cut Window Box Elements (decorative pieces) and cut the larger decorative piece in half lengthwise (these will be the shutters). Glue window, shutters and topper onto the front cover. Stamp, die cut and color holly and cardinal (several pieces are used throughout), form slightly then add the Crystal Clear glitter. Stamp, die cut and color the sled, add some bakers twine as a pull rope. Pop the sled up against the "wall" next to the window. Add the holly and cardinal to the left side of the cover.  On the inside, glue the window to the opening, add a holly garland and double pocket at the bottom.  Page 2, cut the oval from designer paper and glue to page.  Add a holly garland and the little girl (she is looking at the tree!) add another double pocket at the bottom and stamp "Twas the night before Christmas", die cut with Spellbinders A2 Rectangles. The back of the 2nd page is just designer paper and Poinsettias (stamp, die cut and sponge poinsettias with Angle Pink then form flowers and add Prills). The third page has the Christmas tree in the oval and poinsettias also a little sentiment "ticket". The back of page 3 has one of the Regal borders and some holly.  Page 4 has one of the Regal borders and more holly, also the fireplace glued to the oval opening.  The back of page 4 has a double Blossom Corner and the last page has a single Blossom corner. Both the double and single are pockets.  Cut tags from designer paper.  Add a poinsettia to the top right.  The back cover has another piece of ribbon glued between layers.  Tie little "book" closed.

Thanks for visiting!
Robin
See all the designer samples HERE.

Jeremiah 29:11New Living Translation

11 For I know the plans I have for you,” says the Lord. “They are plans for good and not for disaster, to give you a future and a hope.