Pages

Comments are welcome and very much appreciated!

Tuesday, April 25, 2023

Grateful for You

 Good morning crafty friends!

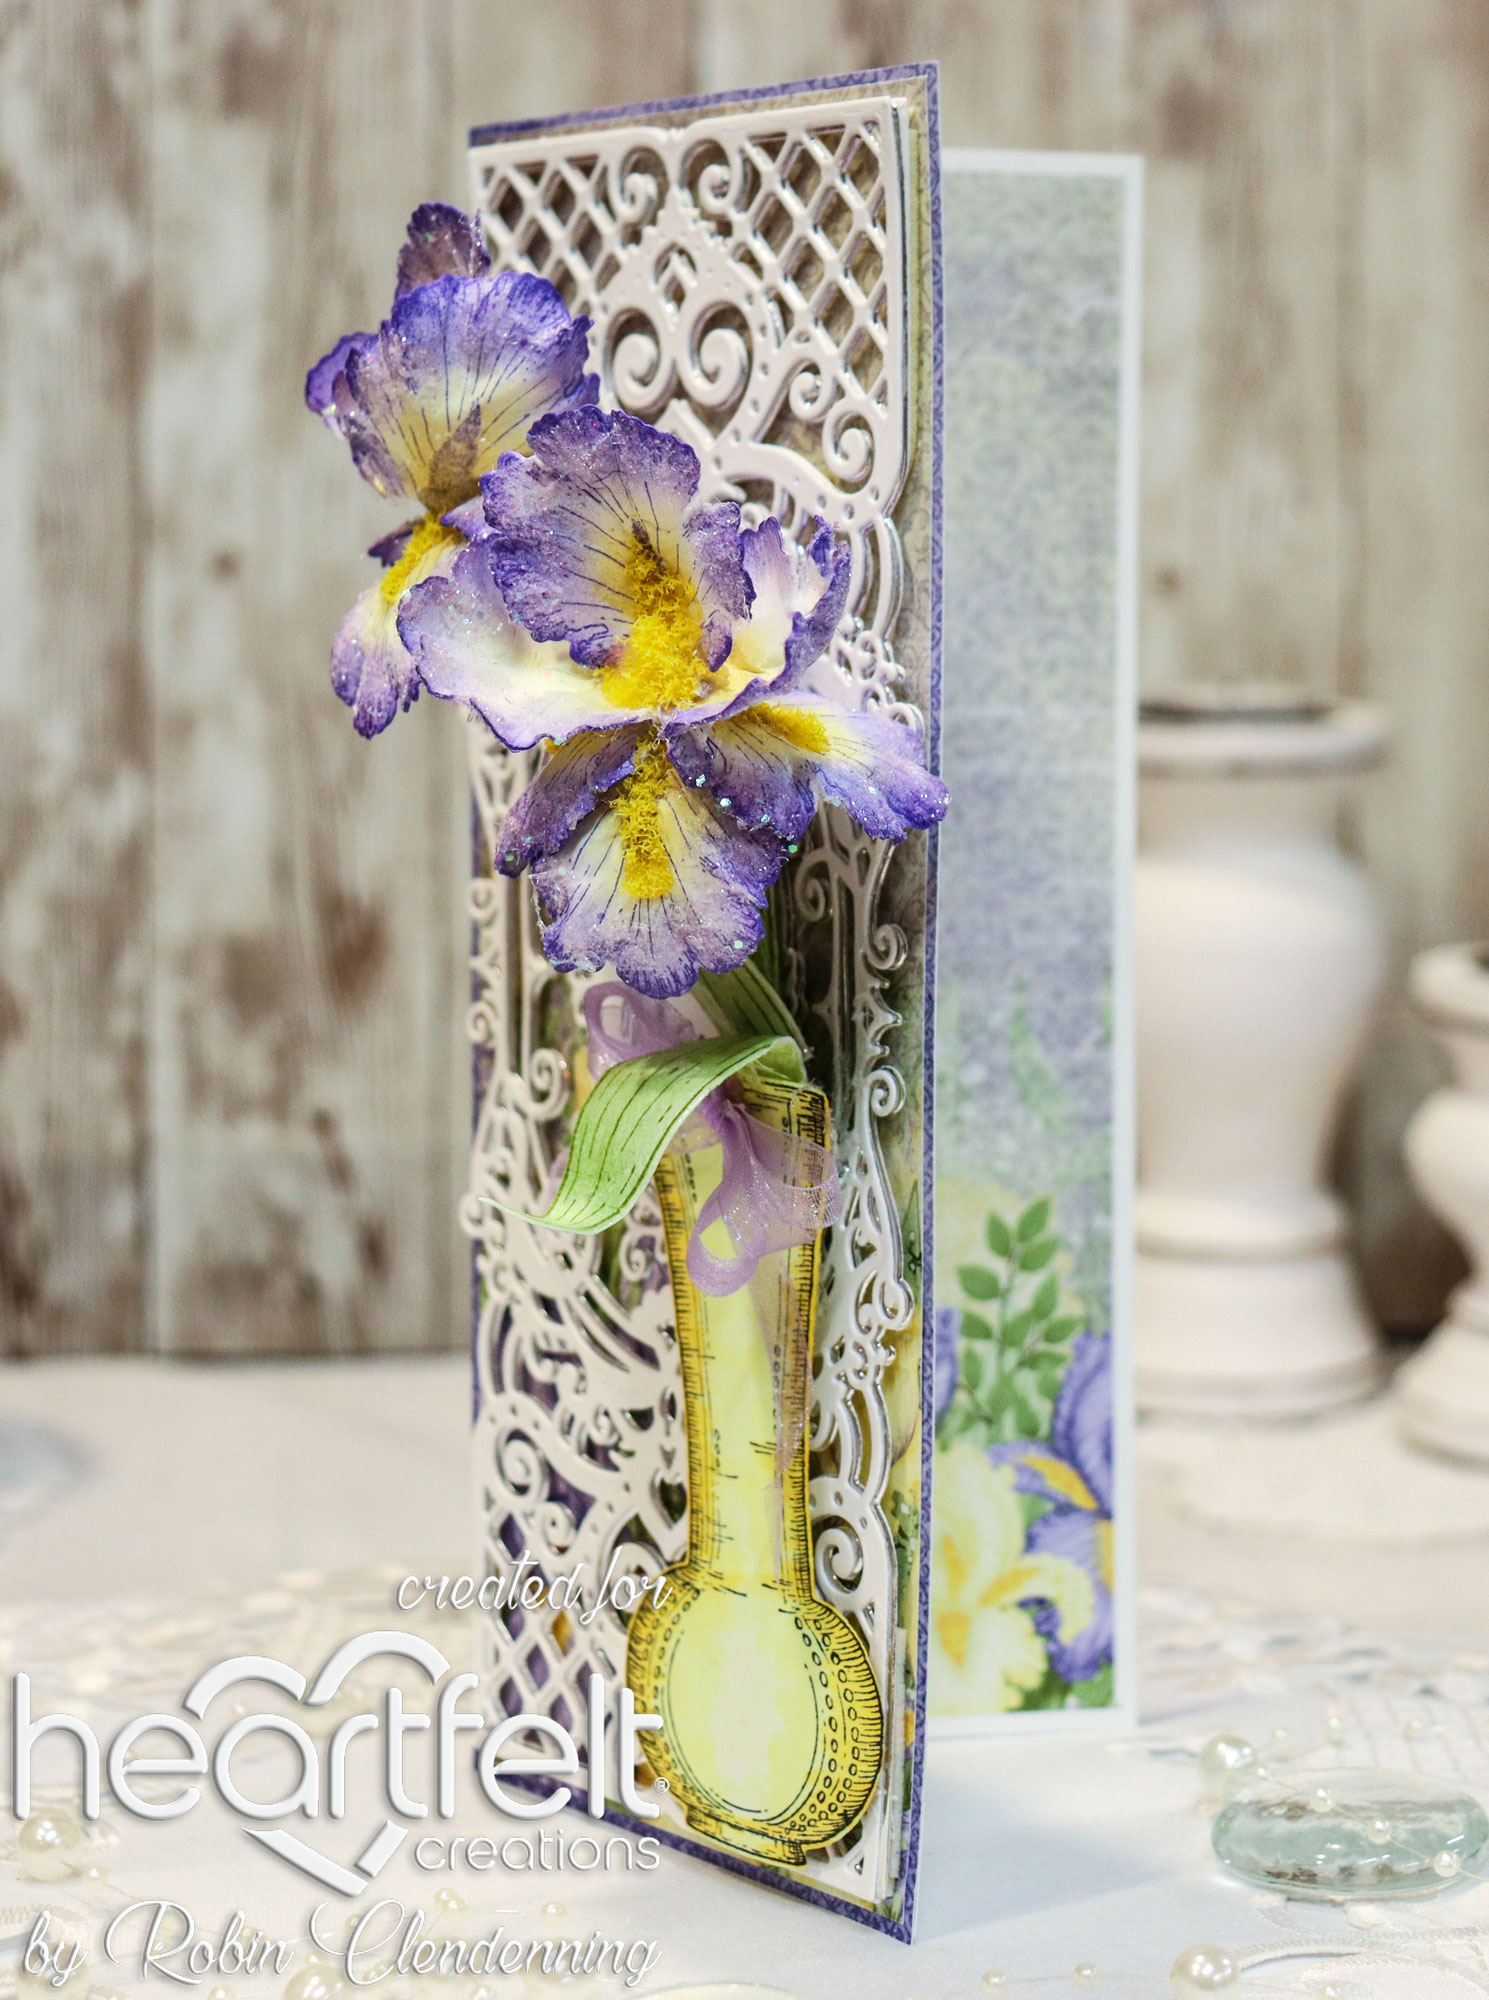
Isn't it fun to combine new designs with the old ones?  How about this rusty old pail with some beautiful Irises in it? I love it, hope you do too.

This card is a window card actually, the sentiment is inside.


It makes me happy to see a bright sunny yellow card,
What do you think?

Card size:  4 3/4 X 6 3/4"

Make a shaped card with the outer die of Decorative Circle Frames from white cardstock (see video). Using the largest circle die, cut out center of card, front only.  Cut out yellow decorative paper with the same Decorative Circle die, use a slightly smaller circle to cut away center then glue to card front.

Cut out largest Decorative Circle Frame “decorative” die from white, cut out center with the largest circle die then glue or pop up on card front. 

Using the eyelet circles in the large circle die set and the eyelet circles in the Decorative Circle Frames die set, cut alternating eyelet layers from white and yellow ending with white.

Stamp sentiment using Cactus Flower on the last white eyelet circle, glue stack of eyelet circles together.  Cut another yellow decorative paper layer for the inside of card using the outer die of Decorative Circle Frames, glue it to the inside of card (you will have to trim a little off the top to avoid the score/fold of card) then glue the stack of eyelet circles centering to inside so that it shows as center when card is closed.

Stamp the Bucket using black, die cut then color and set aside.  Stamp Irises using London Fog on some and Cactus Flower on some to create 3 flowers (3 1/2 flowers per flower used here), sponge with like colors, die cut.  Stamp leaves using Fern Green then sponge with Leaf Green, die cut. Shape flowers and leaves in the shaping mold (see video).  Finish shaping using the Deluxe Flower Shaping Kit. (Deluxe Flower Shaping Paper used for flowers and leaves).

Make a slit at top of bucket rim, using hot glue, glue 2 flowers and 3-4 leaves to look like they are inside the bucket.  Pop up onto right bottom of card front, bend stems to go around circle opening.

Glue last flower to stem piece then glue leaf on top of stem and insert under bucket bottom then glue down to card bottom using hot glue, (Hot glue is best to make sure these 3D flowers stay glued to the card where you want them.

Glitter the flowers around all edges, glue the Flower Soft to Iris beards and then glaze leaves with lacquer.  Randomly glitter card base.


Thanks for visiting today!

Robin

1 Peter 1: 3-4

Blessed be the God and Father of our Lord Jesus Christ! According to his great mercy, he has caused us to be born again to a living hope through the resurrection of Jesus Christ from the dead, to an inheritance that is imperishable, undefiled, and unfading, kept in heaven for you, 


Tuesday, April 18, 2023

Iris for You


Hello there!


Card size:  8 1/4 X 3 1/2"

Cut card from 8 1/4 X 7” white, score and fold to 8 1/4 X 3 1/2". Cut purple decorative paper panel to fit card front then glue to card.  Cut a decorative piece with flowers size 3 5/16 X 8 1/8” then glue to purple.

Cut the Slim Lattice from white and from silver, glue slightly off-set then pop up Slim Lattice part onto card.

Stamp sentiment using Deep Purple onto white center oval piece, glue entire center oval part to card.

Stamp Vase using black, die cut and color

Stamp flowers using Deep Purple, sponge outer edges with Deep Purple, use Fern Green for leaves, die cut then form in mold. Glue flowers to stems then glue leaves to stems.

Glue stems and leaves to back of the vase.  Pop up onto card.

Tie a bow with lavender ribbon and glue to top of vase.  Glue Flower Soft onto Iris beards and glitter around edges of petals. Gloss leaves with lacquer.

Optional, cut decorative paper for the inside of card.


Thanks for visiting!

Robin


Tuesday, April 11, 2023

Just for You!

 Good morning crafty friends and Happy Easter!

Today Heartfelt Creation is releasing the Garden Iris Collection!  What a beautiful flower right?

I have two cards to share this morning.

First is this slimline Z-fold card.


Card size:  8 /4 X 10 1/2" Opened

Cut a piece of white cardstock 8 1/2 X 10 1/2" then score at 3 1/2" and again at 7”. At the right side measure down from top to 5” then use the plain edge Curvy Accent die from the first 3 1/2" score down to the 5” mark. Cut decorative paper to match each panel of card, then glue to card except front piece, set aside until after the next step.

Use the lattice Curvy Accent die to cut the right (short) side. Cut the lattice Curvy Accent from silver as well then glue the silver behind the white lattice.  Take the decorative paper for the front and using the plain edge Curvy Accent die, cut to match curved white edge of card in front of lattice cut, (see sample).

Cut the Slim Lattice and decorative piece from Classic Floral Vase from white and from silver, then glue each piece to its mate slightly off-set.  Glue Slim Lattice to the inside and the decorative piece from vase set in front.

Stamp tall vase using black on lavender decorative paper, die cut then cut off top (tall part).  Shade with pens.

Stamp iris and small leaf several times using London Fog Memento.ink.  Die cut, sponge with Deep Purple, Sunflower and London Fog, form in mold and attach to stem pieces.  Glue leaves to stems. Attach stems behind vase then hot glue to card front.

Tie a multi-loop purple bow and glue to top of vase. 


Second is this Mother's Day card with a beautiful Iris image.


Card size:  5 1/2 X 7 1/4”

Cut a card to 5 1/2 X 7 1/4" folded, from white cardstock. Cut a panel of silver 5 5/16 X 7 1/8, glue to card.  Cut a plaid panel from decorative paper then glue it to the silver.

Cut the Oval Filigree Frame outer die from silver and from white, glue together slightly off-set then pop up onto card.

Cut the inner oval from green decorative paper and from silver. Use the Curvy Accent lattice die to make a design in silver and in green then glue together off-set. Pop up onto white Oval Filigree.

Stamp Happy Mother’s Day using Deep Purple onto white then cut with circle die.  Cut a silver mat with a slightly larger circle.  Glue together then pop up on right top of green oval.

Stamp the large Iris image 2 times and just the largest iris 1 more time using black then color with Copic Markers or favorite coloring method. Die cut extra flowers and pop up on top of each other.  Glue to the left bottom section of green oval.

Add yellow Flower Soft or other yellow to iris beards then add Glitter to flowers.


Thanks so much for visiting!

Robin

For while we were still weak, at the right time Christ died for the ungodly. For one will scarcely die for a righteous person—though perhaps for a good person one would dare even to die— but God shows his love for us in that while we were still sinners, Christ died for us.


Tuesday, April 4, 2023

Your Birthday!


Card size:  4 X 8 3/4"

Make a shaped slim line card (see video) using the Eyelet Slim Line Heart Rectangle outer die then make another front using the same die from ivory cardstock, glue to front of card base.

From Luxe Gold, cut the large decorative frame, the largest eyelet rectangle plus the words.  Pop the large decorative frame up on card front.  Glue the eyelet rectangle to card center.  Cut words again from peach, glue gold words and peach words together slightly off-set.  Glue words to left side centering vertically. Glitter card around words.

Stamp leaves with Shabby Shutters onto light green cardstock, die cut then sponge edges.  Stamp Lilies with Sunflower on yellow cardstock and Tea Rose on peach cardstock, die cut all and sponge edges, sponge centers with Sunflower.  Form in the Shaping Mold. Glue 2 together for each flower, pierce centers, and finish shaping with Golf Groove Tools (curling some petals under). Insert Pollen Stamen.

Hot glue 2 peach color and 1 yellow Lily onto right side of card, glitter flowers. Glue leaves as needed.

Thanks for visiting today!

Robin


We just experienced Palm Sunday, next week is Easter already.
He is Risen, He is risen indeed!

And as Jesus was going up to Jerusalem, he took the twelve disciples aside, and on the way he said to them, “See, we are going up to Jerusalem. And the Son of Man will be delivered over to the chief priests and scribes, and they will condemn him to death and deliver him over to the Gentiles to be mocked and flogged and crucified, and he will be raised on the third day.”