Pages

Comments are welcome and very much appreciated!
Showing posts with label Lace. Show all posts

Wednesday, January 2, 2019

Heartfelt Creations Lacy Tag Card

Good morning!
Get out your pearls and lace girls.

Be sure to scroll down for my second card.


HC PRODUCTS USED      

Other Products:
Pearls, ivory card stock, lace, ribbon, Copic Markers: RV52, RV55, YG61, G82, E33, E35 E39 E50, E51, E21

To see how to shape the roses, watch the video at https://youtu.be/Z8P070kC3oo.
For more tips on creating with the flower shaping molds, watch the tutorial at https://youtu.be/FSdPL7nXvQE.                                                                
Instructions:
Card size: 6 X 6” Ivory.  Cut  Pink decorative paper 5 3/4 X 5 3/4” Before gluing to card, determine where Decorative Pocket Accent will go and cut the slit for the pocket with slit die then glue pink to card leaving bottom of slit open for tag to insert.  Cut the decorative Pocket Accent from ivory and glue it where the slit is, also gluing lace under accent at the same time.  Die cut Ornate Pocket from ivory and glue it to the top part of card.  Cut large tag from Ivory and inside large from decorative paper.  Glue them together and then die cut opening.  Add glitter and pearl flourishes to tag on left side and ribbon through opening.
Stamp, sponge and die cut roses enough for 1 medium and 2 small plus 2 rose buds.  Use the shaping mold for the roses, glitter roses.  Stamp Sponge and die cut leaves and shape with their mold.  Stamp, die cut and color the form and the lace color with Copic Markers.  Cut a foam sheet form and collar then glue to the backs of the colored form and collar and then glue to the tag (tag will still fit into pocket).  Take another piece of lace and gather it at the top.  Glue the gathered lace to the right waist of form.  Add a large pearl to the top.  Tie a small pink bow for the top of the collar and glue in place.  
Put roses together, 2 of each layer to start and then 1 before the bud made (see Emma Lou’s video on making Roses, link above).  Add small leaves to the bottoms rose buds to finish.  Glue leaves and roses to left side of card (keeping tag free), buds will be close to the top part of arrangement.  Add pearl flourishes to bottom and top of rose arrangement.  To finish card, cut a narrow sentiment from decorative paper and curl it slightly then glue to card.


Second card, this is the Sun Kissed Fleur blossoms. I squeezed the ends with a small pleat making it look like a new different flower.

HC PRODUCTS USED      

Other Products:
White card stock, Foam tape

For more tips on creating with the flower shaping molds, watch the tutorial at https://youtu.be/FSdPL7nXvQE.

Instructions:
Card size: 5 X 7”.  Cut coral color decorative paper to 4 3/4 X 6 3/4" and glue to white folded card.  Cut Intricate Swirl Frame from white.   The outside frame is popped up and the other parts are glue to the decorative paper.  Before gluing center piece, stamp it with As You Recover.
Stamp leaves with Library Green and sponge with Leaf Green and Rose Madder then die cut and shape with 3D shaping mold.  Stamp flowers with Rose Madder and sponge with Pink Peony then die cut and shape in Floral Basics shaping mold after misting.  Before they dry squeeze ends of petal in a pleating fashion.  Layer 6 layers together and pierce the centers then insert stamen.  Make some buds with the smaller blossoms.  Arrange flowers and leaves around bottom and left side.  Glitter all the flowers.

Thanks for visiting today!
Robin
My prayer for all who are followers of Christ for this new year.
Colossians 1:9b-11
 ...to ask that you may be filled with the knowledge of His will in all wisdom and spiritual understanding; 10 that you may walk worthy of the Lord, fully pleasing Him, being fruitful in every good work and increasing in the knowledge of God; 11 strengthened with all might, according to His glorious power, for all patience and longsuffering with joy; 
and the rest of of those verses to finish the thought...
12 giving thanks to the Father who has qualified us to be partakers of the inheritance of the saints in the light. 13 He has delivered us from the power of darkness and [c]conveyed us into the kingdom of the Son of His love, 14 in whom we have redemption [d]through His blood, the forgiveness of sins.

Wednesday, December 12, 2018

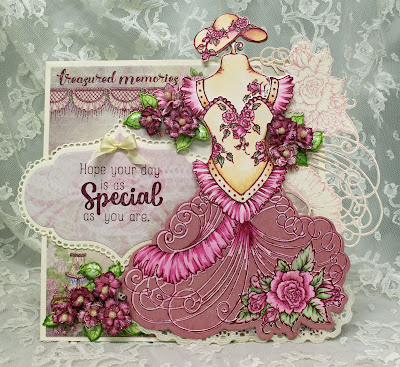
Heartfelt Creations Fashionista Debut

Good morning!
Bring out your inner fashion diva with the new Floral Fashionista Collection from Heartfelt Creations! Whether you’ve dreamed of putting together your very own fashion collection, are a seamstress at heart, or simply enjoy elegant vintage fashion images from days gone by, this exquisite collection is sure to appeal to you! Beautiful images of dress forms, elaborate corsets, wide brim hats, and sweeping skirts, are stitched together in a pretty assortment of cling stamps sets, along with coordinating dies which will have you assembling your very own fashion creations with ease! Mix and match detailed die cut embellishments to create a new ensemble for handmade cards and scrapbook layouts time and time again! A striking assemblage of petite flowers have been sized to perfectly accessorize your one of a kind fashion creations and work well as single or layered blossoms, and have also been tailored to coordinate with the 3D Petite Florals Shaping Mold for quick and easy shaping. These delightful and airy florals are the perfect way to add a touch of dimension and flair to your vogue designs! A vintage style paper collection is ready to set the stage and pull your haute couture embellishment designs together! Brimming with lace like accents, petite polka dots, beautiful brocades and striking florals in soft hues of pleasing pinks, lush lavenders, and gorgeous greens, these designer pages are the perfect blending of patterns for charming old world styles! So, join us as we head into the sewing…ahem, craft room and set our creativity loose with the new Floral Fashionista Collection!


HC PRODUCTS USED      

Other Products:
Foam Sheet,  Ivory card stock, dark pink card stock,  Nuvo Shimmer brush, ribbon, lace, chip board, Copic Markers:  RV52, RV55, YG61, G82, E50, E51, E21, E11,

For more tips on creating with the flower shaping molds, watch the tutorial at https://youtu.be/FSdPL7nXvQE.
Instructions:

Card size: 6 1/8 X 6 1/8” Card base is made with 2 pieces of Ivory card stock, 6 1/8” X 6 1/8 and 6 5/8 X 6 1/8”. Score the 6 5/8 side 1/2" so that it measures 6 1/8 X 6 1/8 after folding then glue 1/2” tab to back of card front.  Cut a piece of decorative paper 6 X 6 (Treasured Memories was chosen for this card) and glue it to the card front.
Stamp blossoms with Plum and sponge some with Magenta Hue and others with Pink Peony then die cut and run through machine in the mold to form flowers.  Glue sets of 2 together then pierce centers and insert single medium stamen in each (flowers are very small).  Using Plum Ink stamp skirt, corset, hat, and form then die cut and color with Copics. Die cut skirt base out of dark pink card stock.  Stamp extra skirt (inside only) with Pink Peony on ivory card stock and die cut.  Use the shimmer brush on the Pink Peony skirt, the flower on the skirt and the leaves.  Leaves are stamped with Fern Green and colored with Leaf Green.  Die cut a form out of a foam sheet and let it rest to settle back to its shape.  Cut a form from chip board and another from Ivory card stock for extra strength since it extends off of the card.  Stack colored form, foam, chip board then plain ivory form all together, gluing each layer.  Glue corset to foam, hat to the top of form and dark pink shirt with colored skirt flowing down below form (under corset at the bottom).  Glue lace to bottom of skirt. 
Stamp sentiment using Plum ink onto decorative paper and die cut.  Die cut matching mat from ivory then glue to card centering vertically and extending off left side of card about 1”.  Glue extra skirt stamped in Pink Peony to the right upper portion of card extending off card about and 1 1/4".  Glue dress with form onto card off center to the right.  Glue clusters of tiny flowers bottom left of skirt, top left of corset and the right side of the waist line [corset].  Add leaves and then add pink Prills like baby’s breath.  Make a small bow from silk ivory 1/4" ribbon and glue to the top of the sentiment.

Thanks for visiting!
Robin
Proverbs 31:10-12
Who can find a virtuous and capable wife?
    She is more precious than rubies.
11 Her husband can trust her,
    and she will greatly enrich his life.
12 She brings him good, not harm,
    all the days of her life.

Wednesday, July 5, 2017

Heartfelt-Two Hearts

Good morning!

Today I've gone totally peach/Apricot with the wedding colors (doesn't that make you want a piece of toast with jam? Peach/Apricot was always my favorite!)
I love the Decorative Medallion die and I think it looks wonderful paired with the lace.
The tiny flowers are embellished with pearls (I colored white pearls with Copic Marker E95) and silk ribbon bows are tucked in between here and there for a Bridal Bouquet look.


The designer paper comes with sentiment "tickets", tags, and more to use on your cards.  I chose this "ticket" because I love the sentiment and it is easy to tuck in.


Heartfelt-Two hearts

Products:
Sunrise Lilies Stamp Set HCPS-3720
Sunrise Lilies die HCD1-787
Classic Wedding Bells Stamp Set HCPC-3789
Classic Wedding Bells die HCD1-7143
Wildwood Florals Stamp Set HCPC-3769
Wildwood Florals DieHCD1-7125
Decorative Medallion HCD1-7144
Wedding Classics Collection HCDP1-279
Bright Ideas Prills ANC852
Crystal Ultrafine Transparent Glitter 85-glitter
Deluxe Flower Sahping Kit HCST1-401
Stack & Store Daubers HCDA1-449
Dries Clear Adhesive 159723
Metal Tip 352854

Instructions: Other products: Pearl halves, Lace, ribbon, Viva Perlen-Pen, M.S. Border Punch, 3-M Foam Tape, Adirondack Salmon, Adirondack Peach Bellini, Wink of Stella, Copic Markers  C0,C01,C02,C03,C05,C07,C09,E95

Instruction:
Card size is 5 7/8 X 6, I chose a peach colored paper from Classic Wedding Collection and cut it 5 7/8 X 5 7/8 then used a border punch to cut a border on the left side only.  I cut the Decorative Medallion die from white linen and glued it to the left side about 1 1/2" from the bordered edge and wrap the lace (about 2 1/2" width) around the left side, secure in back.  Use a piece of floss to gather and tie the middle portion of lace.  Stamp, die cut and sponge color on 1 large and two smaller lilies and leaves, form the flowers using the Deluxe Flower Shaping Kit and then fashion flowers with stamen which have been glued and dipped in yellow/orange Prills.  Add the large lily to the center of the lace and cover the roses on the right side of the card with the two smaller lilies.  Stamp, die cut and form the tiny flowers from Wildwood Floral, add pearls to the center of each and glue to card around the lilies on the right side. and peach ribbon the both sides.  Stamp, die cut and color Bride and Groom (Copic Markers-C0, C01,C02,C03,C05,C07,C09) Wink of Stella on the veil, then pop up with foam tape.  Add Liquid Pearls Nuvo and Perlen-Pen dots to Bride bouquet.  Cut out a sentiment "ticket" from the Classic Wedding Collection designer paper and attach to left side under large Sunrise Lily (I punched a hole and attached with white floss) Glue to a 5 7/8 X 6" white folded card.

Thanks for visiting today!
Robin

1 Corinthians 13New Living Translation (NLT)

Love Is the Greatest

Love is patient and kind. Love is not jealous or boastful or proud or rude. It does not demand its own way. It is not irritable, and it keeps no record of being wronged. It does not rejoice about injustice but rejoices whenever the truth wins out. Love never gives up, never loses faith, is always hopeful, and endures through every circumstance.

Tuesday, May 3, 2016

ODBDSLC274-May Flowers

Good morning!
Time for a new challenge here at Our Daily Bread Designs!!
The challenge is April Showers Bring ODBD May Flowers.  This challenge is to use flowers whether it be designer paper, flower embellishments or stamped flowers but you must use at least one item from ODBD to enter.


ODBD stamps used: Tea Time
ODBD dies used: Majestic Medallion, Pierced Rectangles, Ovals, Tea Pot and Roses
ODBD paper used:Shabby Rose Collection
I cut an oval out of the rose paper and then cut a sage green frame to go on top.  I cut the Majestic Medallion background and the cut it to size to fit under the oval.  It is backed with a pretty light pink.  I wanted something for my tea pot to sit on so I made a lace border that it appears to be sitting on.  The sentiment is cut with the ovals and popped up and lastly I added a pretty pink linen ribbon and bow.

Breadsticks
Diana and Chris

Participants have until May 29th to enter for a gift certificate prize from ODBD to be used for stamps at the ODBD online store.
You may use ODBD, Artistic Outpost or North Coast Stamps to be featured.
To see all the creations and to find out more information about this challenge please go to the ODBD blog HERE.

New ODBD products used:


Matthew 6:26-30
 26 Look at the birds. They don’t plant or harvest or store food in barns, for your heavenly Father feeds them. And aren’t you far more valuable to him than they are? 27 Can all your worries add a single moment to your life?
28 “And why worry about your clothing? Look at the lilies of the field and how they grow. They don’t work or make their clothing, 29 yet Solomon in all his glory was not dressed as beautifully as they are.30 And if God cares so wonderfully for wildflowers that are here today and thrown into the fire tomorrow, he will certainly care for you. Why do you have so little faith?
This scripture came to mind as I thought about May flowers.  I'm hoping someone out there needs to hear this today!  May God bless you!


Tuesday, March 17, 2015

ODBD Happy Anniversary Blog Hop

Good morning!
Welcome to the Happy Anniversary Blog Hop!
Today we are celebrating the 7th Anniversary of Our Daily Bread Designs!!
ODBD has been offering Scripture and Inspirational stamps since it opened!  I am blessed to be part of the team!
Help us celebrate and you can win prizes!
Here is my first card using the new Anniversary God Verses set.


ODBD stamps: God Verses
ODBD dies used: Vintage Flourish Pattern, Beautiful Borders, Ornate Borders, Antique Labels and Borders , Flourish Star Pattern, Fancy Foliage, Quatrefoil Pattern
ODBD papers used: Shabby Rose Collection
        This is my second card for today's hop, using the God Quotes set.


ODBD dies: Elegant OvalsVintage LabelsVintage Flourish Pattern,
Flourish Star Pattern, Asters & Leaves,

It is such a wonderful experience to design with these talented artist, my sister "breadsticks".
We are all part of the Bread Basket here at Our Daily Bread Designs!!
Robin
                                   ODBD Blog Hop Team
 Lori * Chris * Angie * Silke * Robin * Sabrina * Lisa * Grace * Gracie *
           AudreyWanda * Paula * Cathy * Diana * Dawn * Sandee

   
                                            Prize Information: -Seven randomly selected winners will each receive one of the new ODBD Anniversary stamp sets just for commenting on the Design Team cards!  You have until March 19, 2015 at 9:00 p.m. EDT to leave your comments on the Designers Blogs for a chance to win!  The Winners will be posted on the ODBD Blog on March 20th, so be sure to check back there to see if you won!


  • Sale details - From now through Saturday, March 21, 2015, you can SAVE 25% on all Scripture Collection stamp sets, please see the ODBD Blog for more details.  
  

ODBD products used today: