Pages

Comments are welcome and very much appreciated!
Showing posts with label special release. Show all posts

Thursday, November 24, 2022

One In A Million

 Good morning crafty friends!


Material list HERE

Card size:  3 1/2" X 8 1/2"

Cut a white eyelet panel glue it to a slimline card base.  Cut a pink panel with the Slim Basics to fit inside of white eyelet panel then glue it.  Cut a white and a gold Slim Lattice Oval.  Glue them together slightly offset then glue to card on top of pink layer. 

Stamp the sentiment using Magenta Hue, die cut with the small decorative die of the Slim Lattice Oval set.  Die cut again from gold.  Glue the 2 decorative parts together slightly offset then glue to card.  Glue the sentiment to the center.

Stamp Wild Roses (smallest and next one up) using Magenta Hue, die cut, sponge edges with the Magenta, sponge the insides with magenta Hue and Buttercup. Mold in the Shaping Mold then finish on the Deluxe Flower Shaping Kit mat with a stylist. Pierce centers insert light pink stamen, fill in centers with Prills.  Use Crystal Clear to glitter flowers.

Stamp the leaves using Fern Green, die cut, sponge with Leaf Green and some Magenta.  Form in the Shaping Mold then cut apart in sets of 2 or 3.  Mix shimmer and lacquer together then use a paint brush to paint it onto leaves.

Arrange flowers and leaves on the left side of the card.

Thanks for visiting today!

Robin
I Corinthians 13:4-8a
The greatest love chapter

Love is patient and kind; love does not envy or boast; it is not arrogant or rude. It does not insist on its own way; it is not irritable or resentful; it does not rejoice at wrong doing, but rejoices with the truth. Love bears all things, believes all things, hopes all things, endures all things.

Love never ends. 


Tuesday, August 16, 2022

Hark The Herold Angels!

 Good morning Crafty friends!


Material List HERE

 Card size:  4 5/8” X 6 7/8”

Cut white cardstock 9 1/8” X 6 7/8” then score at 3 3/16” and 7 ¾” (There should be approximately 4 5/8” in the middle.  Be sure when closed edges meet). Cut decorative panels for the 3 inside sections and for the 2 outer sections that make up the front of card.  Before gluing any paper on, glue half the magnet to the top 1 3/8” section in the center, add tape over the top so that magnet does not move while glue is wet.  Put the other half of magnet onto glued magnet from the other side, add a drop of glue then close flap down, this will mark where the other half of magnet will go.  Glue the half magnet down where glue spot is and add a piece of tape. (The tape will not affect the magnets pull).  Glue decorative paper over the two magnet halves, one on outside short flap and one on inside middle section toward the top.  Now finish gluing the rest of the decorative paper panels on to matching card sections.

Cut both decorative dies from lavender cardstock and from silver cardstock.  Glue matching die cuts together, lavender to silver off-setting slightly.

Glue larger bottom die cuts to the bottom section of card front, close the top flap and glue the top decorative die so that it just overlaps bottom die slightly on the sides (make sure to put glue ONLY where the top flap is, you don’t want to glue the card shut! 

Stamp and emboss using VersaMark and silver embossing powder, the stars and snowflakes X 2, Heralding angel, angel with bird, and Noel.  Die cut all pieces. 

On the inside center panel, glue the angel with bird, Noel and some of the small stars and snowflakes, be careful not to cover where you know the magnet is.

On the top flap, glue the large star and some smaller stars to the 2 sides, glue the 2 large snowflakes and a star to the bottom 2 corners.

Die cut another Heralding angel from lavender as a back for the embossed angel (it will show when open, this will also strengthen the angel.  Now pop up the angel to top flap only so that card can open.

Attach silver pearls as desired.

Thanks for visiting today!

Robin

Micah 6:8

He has told you, O man, what is good; and what does the Lord require of you but to do justice, and to love kindness, and to walk humbly with your God?

Tuesday, January 25, 2022

Congratulations!

 Good morning!!

Today I've used some peachy colors for this fun frame!

The gold trim vellum sentiment really sets this card off.


Find the material list HERE

Card size:  5 X 6 7/8”

Because this is a tall tent fold use 2 pieces of white cardstock, cut 1 7 3/8” then score 1/2” at the top to create a tab then fold down, use the outer die of the Flourish Companion Die, make sure to let die hang over fold by about 1/4" so that fold stays intact.  Cut the other piece of cardstock to 5 1/4"X 7” then use the outer die again making a full die cut of the shape.   Glue the front onto your tab matching edges of front with the back of card.  Cut peach color cardstock using the same die then glue the die cut to the front.

Out of Luxe Gold use the large decorative die in the Flourish Companion set to cut, cut out decorative paper to coordinate with peach as well.  Glue the decorative gold die to front as well as the inside of the die cut, cut out of decorative peachy paper.

Stamp the Curvy Floral Frame using black ink, color with Copic Markers or your favorite coloring method.  Stamp the flowers and leaves from Curvy Floral Frame and from Rectangular Floral Frame using black, color, then die cut all.  Die cut a gold Curvy Floral Frame as well.  Glue the gold Floral Frame under the colored frame off set.  Use thin foam pop ups to pop up frame onto cut out Cottage paper, trim paper where needed so that it is all inside frame (you could use the die but since it is popped up the edge can be seen).  Glue this stack onto the card front.

Shape the flowers with a pad and Gold Groove Tools, add Prills to the centers then glitter them and attach to the flower images on the card.  Glitter parts of the card base (avoiding the gold) using a sponge with glue and Crystal Clear.

On Vellum, Use Embossing ink (VersaMark use here) to stamp sentiment then cover with gold embossing powder, remove excess powder and use the heat tool to emboss until shiny.  Cut 2 strips of gold about 1/8” wide, glue them to each side of the sentiment then fishtail the ends with scissors.  Because vellum shows adhesive, put glue under gold trim only, put some thin foam strips under the gold in the center part of the card to make it even with the frame.

(Optional) Die cut decorative paper for the inside of card then glue in place, trim the top so that it does not interfere with score line.

Thanks for visiting!

Robin
Today's thought...
“Judge[a] not, that you be not judged. For with what [b]judgment you judge, you will be judged; and with the measure you use, it will be measured back to you. And why do you look at the speck in your brother’s eye, but do not consider the plank in your own eye? Or how can you say to your brother, ‘Let me remove the speck from your eye’; and look, a plank is in your own eye?

Jesus taught us not to judge another, we are only to love others, it is God who will judge.  Everyone will stand before the judgement seat of God someday, don't worry about what other people (in the world) are doing.  Every person needs grace!

Saturday, December 4, 2021

Amazing Paper Grace Die of the Month for December


 The Enchanting Pocket Card, Tag and Envelope set has many different options to make your creations stand out! It is a sweet gift card-sized envelope that doubles as a card front pocket. The bonus is that there is a tag too that doubles as a label. The inspiration for this set comes from Becca’s love of giving gift cards! It can be used year-round, dressed up or dressed down, and themed for any occasion. Using the different inlay and insert designs, you can cut and make unique variations to keep the design fresh!
 
**Dies for my creations today were supplied by Amazing Paper Grace.**


There are 14 dies included in the Enchanting Pocket Card, Tag and Envelope. 


 My Project Today using Enchanting Pocket Card, Tag and Envelope.
I made a card first of all using Christmas colors since this is December and I also made a very cute gift tag envelope with a small card inside.


The small gift card


Designer Tip:  On the small gift card, offset the gold layer slightly under the red layer to get the extra wow factor.  The inside portion of the gift card is vellum.  I used the top of the Tag die to make the envelope for this gift card and for the tag inside the gift card envelope.
 
Small Gift Card inside


Supplies: Gold embossing powder, white satin ribbon, gold pearls
Accessories:  Amazing Paper Grace December 2021 Die of the Month – Enchanting Pocket Card, Tag and Envelope
Stamps:   SDS-169 Just A Note Sentiments & Tag
Paper: Red cardstock, white cardstock, gold cardstock, green cardstock, vellum
Ink: VersaMark with gold embossing powder.
 
For more Enchanting Pocket Card, Tag and Envelope Inspiration
Visit each Creative Team blog linked below for their take on creative paper crafting ideas with Enchanting Pocket Card, Tag and Envelope, the Amazing Paper Grace December 2021 Die of the Month!

 
The Amazing Paper Grace Die of the Month is available exclusively at Spellbinders Paper Arts during December 2021. Enchanting Pocket Card, Tag and Envelope at the special kit club price, along with other membership perks.
 
View this month's Amazing Paper Grace Die of the Month!  

Would love to hear from you! Comment on how you will use the dies!
 Follow me on Facebook!
Follow me on Instagram!

Thanks for visiting today!
Robin
Luke 2:8-12
That night there were shepherds staying in the fields nearby, guarding their flocks of sheep. Suddenly, an angel of the Lord appeared among them, and the radiance of the Lord’s glory surrounded them. They were terrified, 10 but the angel reassured them. “Don’t be afraid!” he said. “I bring you good news that will bring great joy to all people. 11 The Savior—yes, the Messiah, the Lord—has been born today in Bethlehem, the city of David! 12 And you will recognize him by this sign: You will find a baby wrapped snugly in strips of cloth, lying in a manger.”


Thursday, November 25, 2021

Black Friday Release

Good morning!
My first card is using the beautiful new Black Friday Release, Simply Classic Oval Frame Die
Find the material list HERE

 Card size:  5 X 6 3/4".

Make a shaped card (See video) by folding a piece of white cardstock to make a 5 1/4” X 7” card.  Place the outer die of the Simply Classic Die over the fold by about 1/4", cut.  Cut another front from White and glue to card front matching bottom and sides.  Place the outer die and the next die in the set onto light pinkish decorative paper and cut.  Use the frame on the outer edge, use the inside to cut a small decorative border for later.  On light blueish color decorative paper, place the large decorative part of the die set and in the center the small decorative border (for later as well).  Make a slightly smaller large oval (with scissors) to line the back of the large decorative die (just the oval part).  Glue the pink lined blue cut out onto card front matching cut lines of the outer die cut border.

From white, cut the plain oval from the set and a foam sheet piece to match then glue them together and glue to center of card front.  Off-set pink and blue small decorative ovals as you glue them around the plain white oval.

Stamp Happy Birthday using Rose Madder on white then die cut with 1 1/4" wide small oval from Eyelet Ovals and Basics.  Cut a piece of foam sheet to match, glue together then glue it to the center of the card front.

Use pearl strips to go around 2 ovals on blue large die cut.

Using Deluxe Flower Shaping Cardstock, stamp Wild Roses Small using Rose Matter, sponge with Pink Peony, die cut then shape in the mold.  Use the Deluxe Flower Shaping kit to form centers.  Glue multiple layers together using 2-3 sizes on each.  Insert 1 blue Bead Stamen and several small white pearl stamen into each flower except bud. For bud use a white or blue bead stamen then shape the center petals around it stamped side out.  Make 2 more layers stamp side up.  Cut wire short, glitter flowers with Crystal Clear.

Stamp leaves using Garden Patina, sponge lightly with Sky Blue, die cut and then shape in the mold.  Add a layer of lacquer to the tops of leaves.

Stamp little birds, die cut then color and round backs a little bit with the Deluxe Flower Shaping Kit.  Add foam dots to the back of each bird.

Arrange flowers and leaves onto both the bottom left and the bottom right of card front, let the leaves or flowers hang over bottom edge just enough for the card to display standing straight up (it makes a balance).  Add the little birds into arrangement then glitter the card front using Ultrafine.

My next card uses another beautiful new Black Friday Release,
Fancy Classic Rectangle Frame Die

Find the material list HERE

Card size:  5 X 6 7/8”.

Make a shaped card (See video) with the outer die of the Fancy Classic Rectangle Frames set by placing the die over-lapping the fold by about 1/8”.  Cut another front from pale pink then glue it to the shaped card matching bottom and sides.  Use the large decorative rectangle die in the set to cut plaid decorative paper and silver Luxe cardstock.  Off-set them slightly and glue to card front.  Cut the next 3 dies in out of silver luxe and decorative paper (the larger is from plaid again, then pale pink cardstock and the blue color decorative paper last).   For the top oval layer, stamp the sentiment using embossing ink then emboss with silver powder on pale pink decorative paper.  Cut the sentiment out using an oval die also cut a silver luxe oval.  Off-set each layer with its silver layer then glue to card front, largest to smallest with sentiment last. Pop up each solid layer using foam sheet or pop-up dots.

Using Deluxe Flower Shaping Cardstock, stamp The Classic Rose and just the butterfly from the Sunflower Banner using Magenta Hue, sponge with Pink Peony and small amount of Garden Patina, die cut and shape roses in the mold.  Stamp Leaves from the Classic Rose using Fern Green, sponge with Leaf Green, die cut and shape in the mold.  Finish shaping roses using the Deluxe Flower Shaping Kit.  The center petals are made tightly squeezed together stamp side out by pushing down in the center of non-stamped side.  The rest of the various sized petals are stamp side up when making centers (See video).  Glitter the flowers with Crystal Clear and lacquer the leaves.

Bend the butterfly at the body, glue the body and pop-up the wings on right side of sentiment oval.  Arrange roses and leaves around the left side of card front.

Glitter the card slightly trying not to get glue on any silver cardstock.  Use Stickles in a thin layer on the butterfly wings.

Thanks for visiting today!

Robin
And let the peace of Christ rule in your hearts...
 

Thursday, November 26, 2020

HC Black Friday Special Release


Good morning!
How exciting is this new Black Friday Release?  OMGosh,
it is so beautiful, these gateway dies and these 3 panel card bases, wow!


Elegant Swirl Gateway Die

Elegant Gateway Sentiments Stamp Set

5 X 7” Gateway Fold Card-White

Dazzling Dahlia Die (Butterflies only)

Dazzling Dahlia Stamp Set (Butterflies only)

Small Wild Rose Die

Small Wild Rose Stamp Set

Small 3D Wild Rose Shaping Mold

3D Leafy Accents Shaping Mold

Leafy Accents Die

Leafy Accents Stamp Set

Tickets and Tags Die

Deluxe Flower Shaping Paper Pack of 50-White

Rock Candy Stamen-Small

Magenta Hue Archival Ink

Leaf Green Archival Ink

Fern Green Archival Ink

Rajni Chawla’s Crystal Clear

Crystal Ultrafine Transparent Glitter

Metal Tip for Adhesive Bottle

3-D Crystal Lacquer

Dries Clear Adhesive

White cardstock, Acrylic Shimmer additive

For more tips on creating with the flower shaping molds, watch the tutorial at https://youtu.be/FSdPL7nXvQE

Card size open: 7 X 15”, closed: 5 X 7”.  Use the 3-panel white Gateway card base. Cut 3 panels from decorative paper using the outer die of the Elegant Swirl Gateway Die. Glue the paper to each of the 3 card panels.  Die cut the full decorative die from white for the center panel.  Die cut the decorative frame only (center cut out) for the first panel and cut out the decorative frame, center in, for the 3rd panel.  Stamp on the solid center of the 3rd panel using Magenta Hue ink, the large sentiment with the floral top. 

Glue each of the decorative dies to the corresponding panel and glitter each.

 Stamp flowers using Magenta Hue, die cut, sponge Magenta Hue on the edges, form in shaping mold (see video) then glue 2 layers together for the small flowers and 3 layers for the bigger flowers.  Insert green stamen.  Stamp leaves using Fern Green, sponge with Leaf Green, die cut then form in  the shaping mold.  Stamp small butterflies from the Dahlia flowers as accents for each panel using Magenta Hue.  Glitter the flowers with Rajni’s Crystal Clear.

Arrange some of the flowers and leaves on the first panel at the lower left corner/side.  Arrange about 5 flowers and leaves at the top of center panel and arrange the rest of the flowers on the right bottom corner of the 3rd panel.

Paint leaves with a combination of lacquer and shimmer additive.  Glue tiny butterflies 2 for each panel.  Stamp You’re An Amazing Friend on white using Magenta Hue and die cut with long straight die then fishtail the ends, curl and tuck into flowers on the first panel.

My second card today features another one of the beautiful new Gateway Dies.


Lattice Swirl Gateway Die

 Just for You Sentiments Stamp Set

5 X 7” Gateway Fold Card-White

Oakberry Lane Blossoms Die

Oakberry Lane Blossoms Stamp Set

3D Blossoms Shaping Mold

3D Leafy Accents Shaping Mold

Leafy Accents Die

Leafy Accents Stamp Set

Circle Basics Large Die

Deluxe Flower Shaping Paper Pack of 50-White

Rock Candy Stamen-Small

Deep Purple Archival Ink

Rajni Chawla’s Crystal Clear

Crystal Ultrafine Transparent Glitter

Metal Tip for Adhesive Bottle

Dries Clear Adhesive

White cardstock, Silver Liquid Pearls, Silver cardstock, Silver Delicata Ink.

For more tips on creating with the flower shaping molds, watch the tutorial at https://youtu.be/FSdPL7nXvQE.

For more ideas on creating with the 5 x 7 Decorative Frame Dies, watch the tutorial at https://youtu.be/qdBFA5VpmSo.

Card size: 5 X 7”.  Cut 1 panel off of the Gateway Fold Card Base.  Use the outer die of the Lattice Swirl to cut shaped card leaving the left side of the die over-hanging about 1/4" to keep part of the fold (see video, Decorative Frame Dies above).   Cut another front piece out of white and purple decorative paper using the outer die of the Lattice Swirl as before.  Glue these to the card base.

 Cut the decorative part of the Lattice Swirl twice, once out of white and once out of silver.  Layer them together slightly off-set and glue together.  Stamp “Thing of You” using purple on white cardstock then die cut with a circle die 3 1/2”.  Glue the circle to the under side of the layered decorative Lattice die cuts then glue to the purple card base. 

Stamp Oakberry Lane Blossoms using Deep Purple, die cut, shape in mold (see video).  Insert white and green stamen.  Stamp leaves using Silver ink, die cut, shape then squeeze out a small amount of Silver Liquid Pearls, use your finger to spread it over the edges of the leaves for a more metallic silver look.  Arrange flowers and leaves at bottom right side of card and 1 flower at the top center with 2 leaves.  Use Rajni’s Crystal Clear on the flowers and just a tiny bit of Crystal Ultrafine on the card.  Try to avoid the silver paper as much as possible.

Thanks for visiting today!

Robin

It is now coming on to the Christmas season so I would like to share a part of scripture that is rarely thought of but so important to the reason Christ was born.

This prophesy was said by an old man who had never seen Mary, Joseph or baby Jesus before.

25 And behold, there was a man in Jerusalem whose name was Simeon, and this man was just and devout, waiting for the Consolation of Israel, and the Holy Spirit was upon him. 26 And it had been revealed to him by the Holy Spirit that he would not see death before he had seen the Lord’s Christ. 27 So he came by the Spirit into the temple. And when the parents brought in the Child Jesus, to do for Him according to the custom of the law, 28 he took Him up in his arms and blessed God and said:

29 “Lord, now You are letting Your servant depart in peace,
According to Your word;
30 For my eyes have seen Your salvation
31 Which You have prepared before the face of all peoples,
32 A light to bring revelation to the Gentiles,
And the glory of Your people Israel.”

34 Then Simeon blessed them, and said to Mary His mother, “Behold, this Child is destined for the fall and rising of many in Israel, and for a sign which will be spoken against 35 (yes, a sword will pierce through your own soul also), that the thoughts of many hearts may be revealed.”

To be sure, Christ was not born just to be a cute little baby but was actually born for the eventual death on the cross for our salvation.  Once for all of man kind who will believe on Him and call upon His name.


Tuesday, September 22, 2020

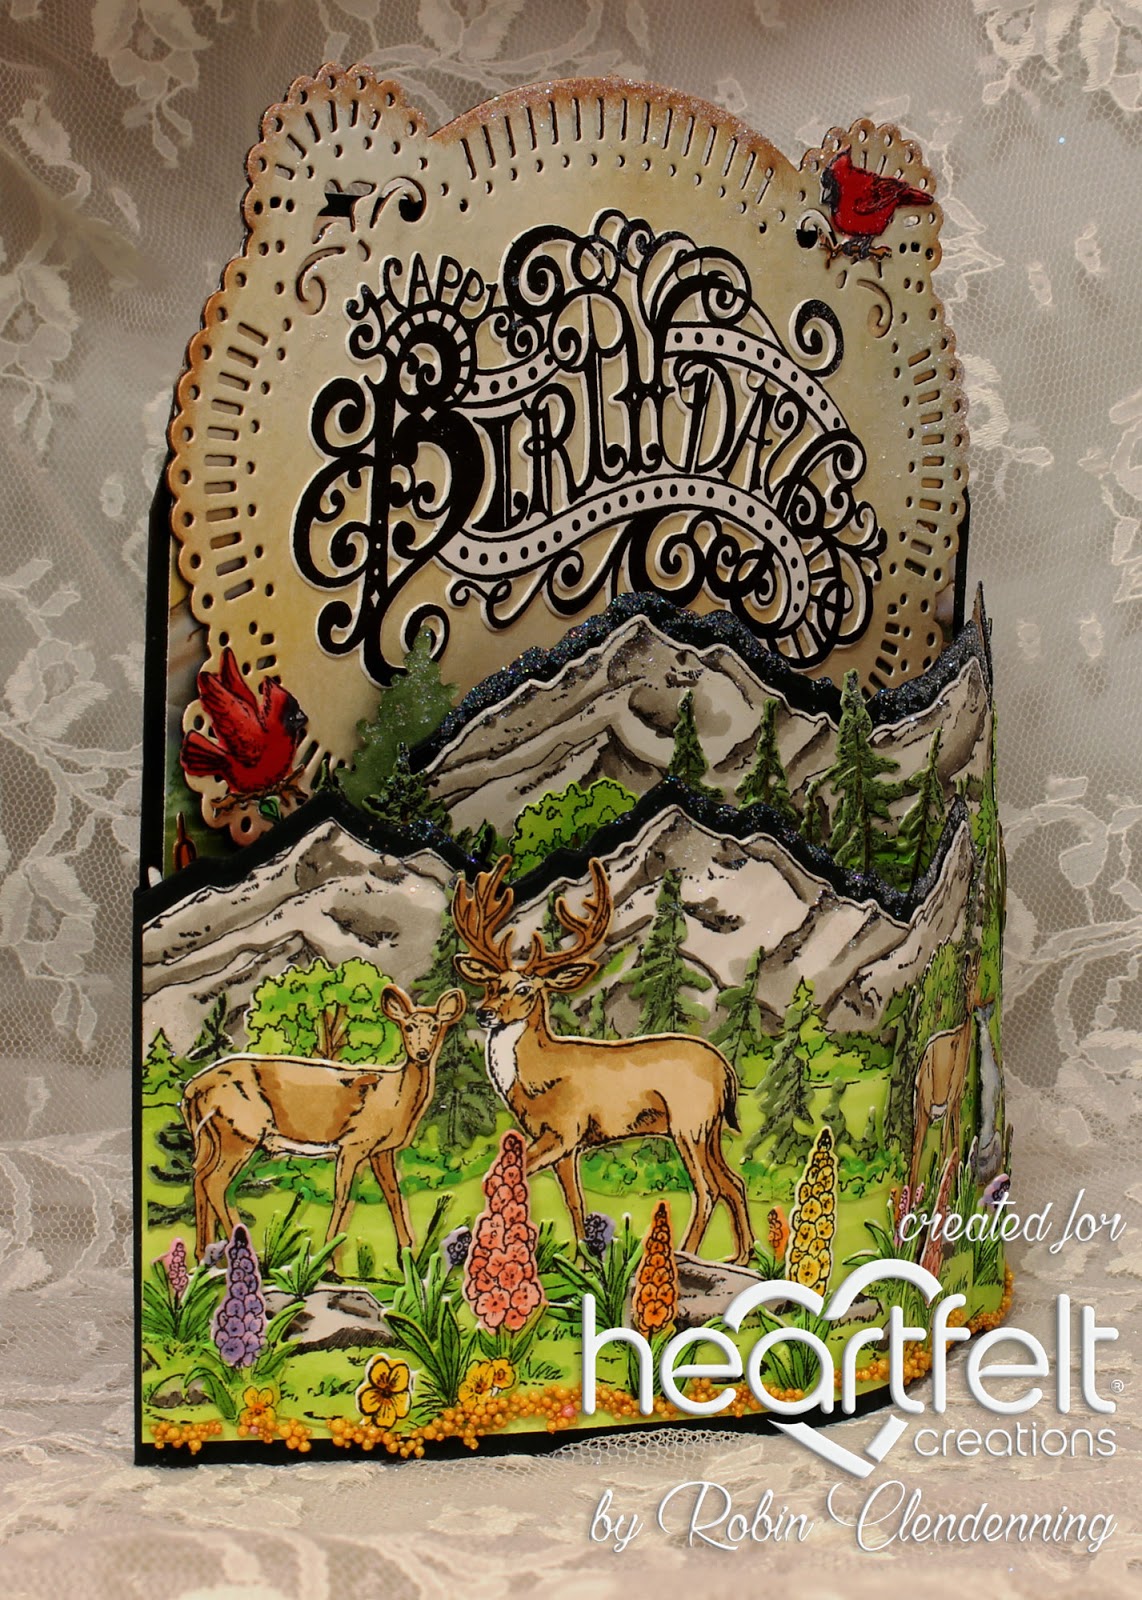
High Sierra Happy Birthday


Good morning!
Bendi cards are so fun to make!
Today I've featured the new Stamp and die sentiment sets!


Elaborate Birthday Die

Elaborate Birthday Stamp Set

Create a ‘scape Backcountry Die

Create a ‘scape Backcountry Stamp Set

Create a ‘scape Wilderness Die

Create a ‘scape Wilderness Stamp Set

Create a ‘scape Trout Lake Die

Create a ‘scape Trout Lake Stamp Set

Create a ‘scape Nature Die

Create a ‘scape Nature Stamp Set

Wilderness Retreat Paper Collection

Woodsy Critters Die

Woodsy Critters Stamp Set

Memento Tuxedo Black Ink

Metal Tip for Adhesive Bottle

Dries Clear Adhesive

Rajni Chawla’s Crystal Clear

Crystal Ultrafine Transparent Glitter

Go Man Go Prills

I Cannot Tell A Lilac Prills

Minnie Pearl Pearls

Deluxe Flower Shaping Paper Pack of 50-White

Other products:

White cardstock, Dark green cardstock, Acrylic Shimmer additive, Brilliance Copper Ink, Copic Markers: C1, C2, C3, C5, W1, W3, W5, E53, E31, E33, E35, E97, E99, E51,E93,YR04, R43, R24, R39, G94, YG63, YG03, YG17, YG05, B91 ,93, B41, YR82

Card size: 6 X 6 3/4".  Make card base from dark green cardstock: Back is 6 X 6”, side flaps are 3 1/2 X 6” and 4 1/2 X 6”.  Score 1/2" on 1 side of both flaps, fold down and score well.  Draw a line on the other side of both at 1/4" then drawn in a tab (both flaps).  Cut away above and below each tab (to reinforce tabs glue acrylic packaging [like dies are packaged in normally] over the tab and inward about 1”, this will be covered by paper later).  Make a slot for the right flap in the back at 1 1/2"from left side by lining up the bottom of flap and back then drawing a line at the top and bottom of the tab made earlier.  Use a ruler and craft knife to cut.  Make a slot for the left flap into the right side flap at 2” from right side using the same method of lining up the bottoms then drawing lines at top and bottom of tab.  (Nothing is glued together at this point because side flaps still have to be die cut with the mountains). 

Using 2 pieces of the same paper design, cut panels for the inside back and both flaps (a continuous lake used in this sample). Save the sky for the inside mountains (die cut only because they are backwards) and for the die cut base of the large sentiment.  The outside of the flaps are stamped scenes pieced together.  Start with the mountains, you need 5 1/2" of mountains on each side so you have to stamp it once then mask the end and stamp again to lengthen mountains.  When you die cut, be careful to only cut the tops not too far down so that you keep mountains together.  You will want each mountain scape to be the width and height of the side flaps.  Die cut a piece of sky paper along with the stamped mountains so that you have mountains for the inside of flaps (add a little color to make them look more like mountain ridges).  Now place the die cut mountains on the dark green flaps then draw a line on cardstock, now cut the dark green cardstock flaps to match mountains.  Color the mountains and tree line then color the rest of the panel green to blend in with other stamped elements.  Glue the backward mountains on then glue the inside decorative paper lake on both side and the back. Now glue each flap to the back panel (in back) using the 1/2" scored tab.

To finish the inside: Stamp the ducks and 2 extra ducks, the deer set, bunny, squirrel, 2 cardinals, 2 sets of cattails and pine tree using Tuxedo Black, color with Copic markers. Glue deer over paper deer, bunny and squirrel on far left, ducks to the back right side.  Glue cattails where needed.

Die cut large sentiment base from dark green (as well as the sky colored decorative paper die cut, glue them together then glue to the back panel over hanging top of back by about 3/4".  Stamp and die cut sentiment using black then glue it to the sentiment base layer.  Sponge copper ink on the edges of the sentiment base. Now glue the cardinals top right and bottom left of sentiment base, glue 1 extra duck to the bottom right and the other extra duck on top of scene duck.  Add white and lavender Prills to the ground sections.

To finish the outside (front) of flaps: Stamp 2 sets of deer, Trout Lake, extra trees of Trout Lake, flowers, rock landscapes, die cut and color all with Copics.  For the right side, glue the Trout Lake extra trees, deer, flowers (cut apart) and rock landscapes and 1 deer piecing together to look best. For the left flap, glue more extra trees, rock landscapes, flowers and 3 deer.   Add Prills to the bottoms of both flaps.  Glitter mountain ridges and lakes inside and out, glitter Happy Birthday panel. Tuck small tabs into the slots to close card, card stands while closed because of the bowed front.


My second card uses another of the new 
sentiment stamps and dies.


Large Garden Zinnia Die

Small Garden Zinnia Die

Large Garden Zinnia Stamp Set

Small Garden Zinnia Stamp Set

Large 3D Zinnia Shaping Mold

Small 3D Zinnia Shaping Mold

Summer’s Garden Paper Collection

3D Leafy Accents Shaping Mold

Leafy Accents Die

Leafy Accents Stamp Set

Groove Golf Tool Set

Decorative Circle Frames Die

Eyelet Circle & Basics Small Die

Fancy Special Day Die

Fancy Special Day Stamp Set

Archival Ink-Majestic Violet

Archival Ink-Buttercup

Archival Ink-Cactus Flower

Archival Ink-Leaf Green

Archival Ink-Fern Green

3-D Crystal Lacquer

Metal Tip for Adhesive Bottle

Dries Clear Adhesive

Rajni Chawla’s Crystal Clear

Crystal Ultrafine Transparent Glitter

Go Man Go Prills

Deluxe Flower Shaping Paper Pack of 50-White

Other products:

White cardstock, Acrylic Shimmer additive, Fun Foam sheet

For more tips on creating with the flower shaping molds, watch the tutorial at https://youtu.be/FSdPL7nXvQE.

For more ideas on creating with the 5 x 7 Decorative Frame Dies, watch the tutorial at https://youtu.be/qdBFA5VpmSo

Card size: 4 3/4 X 6 3/4".  See video for making shaped cards then cut another front from purple decorative paper.  Cute large decorative die from white also from Fun Foam sheet.  Cut 2 eyelet circles from the die set from purple decorative paper and 1 circle in between eyelet circle sizes out of white along with another Fun Foam sheet circle to fit.  Stamp sentiment using Majestic Violet, die cut and die cut sentiment base from white.  Stack all layers together and glue. Tip, when using foam sheets for dimension, after gluing, lay a book or something with weight on top so that it dries nice and flat, if needed put a piece of wax paper on top before book so that nothing sticks).

Stamp medium and small zinnia using Majestic Violet, sponge with the same plus some Cactus flower in the centers.  Stamp smallest zinnia again using Buttercup, sponge with Buttercup, die cut all the flowers, shape in molds.  Use Groove Golf tool for shaping the tubular yellow centers of the zinnia (larger flower).  Glue 4-5 layers together for each flower and fill centers with Prills.  Stamp leaves with Fern Green, sponge with Leaf Green, die cut, shape in the leaf mold then cut apart to use as needed.  Arrange flowers and leaves on the right and left sides of the circle with sentiment.  Glitter the card front and use Rajni’s Crystal Clear to glitter the flowers.

Thanks for visiting today!

Robin

Psalms 139:23-24

23 Search me, O God, and know my heart;
Try me, and know my anxieties;
24 And see if there is any wicked way in me,
And lead me in the way everlasting.