Pages

Comments are welcome and very much appreciated!

Tuesday, December 27, 2022

Hugs

 Good morning crafty friends!


Card size:  5 X 6 7/8”

Make a shaped card using the outer die of the Flourish Companion Frame on a white folded card measuring 5 1/4" X 7 1/4" (see video).  Cut a panel from lavender using the same die.  Glue the lavender panel to the card.

Use the outer die of the Rectangle Filigree Frame to cut the green decorative paper panels.  Glue the outer cut to the lavender front.  Pop up the center green panel. 

Die cut the inner decorative part of the Rectangle Filigree from lavender.  Glue this die cut to the center of card.

Stamp the short basket, handle, and Basket Blooms using black, die cut and color.  Stamp the bow with Cactus Flower then die cut and color.

Pop up the basket, pop up the flowers, make a small slit where the handle should meet basket then insert handle and tuck the back of handle behind the blooms.  Glue the bow to the top of handle.

Glitter the flowers and the card.  Add Nuvo white drops to the baby’s breath then add tiny half pearls on top.

Stamp the sentiment using Cactus Flower on a decorative tag from paper collection, die cut, add a ribbon at the top then tuck it into blooms and basket.

Thanks for visiting!

Robin

Luke 2:26-32

26 And it had been revealed to him by the Holy Spirit that he would not see death before he had seen the Lord's Christ. 27 And he came in the Spirit into the temple, and when the parents brought in the child Jesus, to do for him according to the custom of the Law, 28 he took him up in his arms and blessed God and said,

29 “Lord, now you are letting your servant[e] depart in peace,
    according to your word;
30 for my eyes have seen your salvation
31     that you have prepared in the presence of all peoples,
32 a light for revelation to the Gentiles,
    and for glory to your people Israel.”


Tuesday, December 20, 2022

Thoughtful

Good morning!
Another gorgeous basket to share this morning!
Also, don't you just love these new dies that came out on Black Friday?


Material list HERE

Card size:  5” X 7 7/8”

Make a shaped card using the outer die of the Flourish Companion Frame on a folded 5 1/4” X 7 1/4" card, letting edge of die hang over the fold at the top by about 1/4" (see video).

Die cut a blue decorative paper panel using the same outer die.  Glue panel to the folded card.  Die cut the large decorative frame of the same set from white cardstock then glue it to the blue panel.

Die cut 2 Delicate Daisy Borders from white and from silver, glue each set together slightly off-set. Pop these up onto card both bottoms facing each other in the center (ends will hang over card).

Stamp the Basket blooms and extra lily (2 lilies) using black ink.  Stamp the shorter basket using black ink, die cut all then color.

Pop the basket and then pop the flowers on top in the center of card.  Tuck the 2 sets of lilies under the basket on both sides.

Stamp the sentiment using VersaMark then emboss with silver powder and a heat gun.  Die cut with the Ticket and Tags set.  Cut a silver mat for the sentiment. Pop sentiment up under the basket.

Randomly glitter card, glitter the flowers, use white Nuvo on the baby’s breath, glue silver half pearls on each corner.
Thanks for visiting today!


Robin

Luke 2:7-11

 And she gave birth to her firstborn son and wrapped him in swaddling cloths and laid him in a manger, because there was no place for them in the inn.[c]

And in the same region there were shepherds out in the field, keeping watch over their flock by night. And an angel of the Lord appeared to them, and the glory of the Lord shone around them, and they were filled with great fear. 10 And the angel said to them, “Fear not, for behold, I bring you good news of great joy that will be for all the people. 11 For unto you is born this day in the city of David a Savior, who is Christ the Lord. 

Tuesday, December 13, 2022

My Friend


Good morning crafty friends!
Time for the debut of these gorgeous baskets and bouquets...don't you just LOVE them!


Material list HERE

Card size:  4 1/2" X 7 3/4"

Cut 1 white eyelet slimline sized 3 1/4" X 7 3/4", Cut 1 blue decorative paper slimline straight edge 2 7/8” X 7 3/8” then cut a gold mat about 1/32”.  Glue these onto a white folded card size 3 X 7 1/2.

Cut 1 each of the Daisy Corners (left and right) from white and from gold then glue these sets together slightly off-set.  Pop these corners onto the slimline card at bottom corners. 

Stamp the tall basket, the Basket Florals and the 2 butterflies using black ink, die cut then color.  Pop the basket up in the center of card then glue the Basket Floral onto the basket. Pop butterflies up onto card, glue a rhinestone onto each head and Stickle the wings.

Stamp the sentiment using Oxide Ink (partly pigment so it stays wet long enough to emboss) onto vellum.  Add clear powder then heat emboss.  Trim vellum closely then glue gold trim onto top and bottom and fishtail ends.  Curl sentiment slightly around a fat round pen.  Glue sentiment to card putting glue on bottom of gold only so that it won’t show.

Use white Nuvo to enhance the baby’s breath also use glitter to glitter flowers.

Thanks for visiting today!

Robin


Therefore the Lord himself will give you a sign. Behold, the virgin shall conceive and bear a son, and shall call his name Immanuel.


Tuesday, December 6, 2022

In My Heart


Material List HERE

Card size:  3 7/8 X 8 1/2"

Cut the outer shape from black decorative paper (Friendship Rose Paper Collection) using the large Slim Eyelet Rectangle die, cut the top with the end of the Curvy Accent Border (Eyelet Edge edge).  Using the Slim Basic Rectangle die to fit, cut a layer of Luxe Silver and foam sheet.  Cut the top with the Curvy Accent Border (plain edge) die to match the top of the Eyelet in curved shape.  Cut a piece of coordinating decorative paper to 3 1/4" X 8” then cut he top with the plain edge Curvy Accent Border to match the curve shape of the other tops.  Glue panels in order on top of a folded slim card size 3 5/8” X 8” (this will insure that none of the white card base shows under the black eyelet layer).

Stamp the sentiment using Vibrant Fuchsia onto white cardstock then cut out using the Decorative Heart die.  Cut a foam sheet the same size then glue it under the sentiment and onto card on top of decorative paper heart (if that paper was chosen).

Stamp the Small Wild Rose onto Deluxe Flower Shaping Paper using Vibrant Fuchsia then sponge with Magenta Hue, die cut then sponge edges and backs with Vibrant Fuchsia.  Shape all the blossoms in the 3D shaping Mold then glue 2 of the same size together for each flower (stamp side up), except the bud which is only 1 blossom and stamp side down so that when petals are squeezed together to form the bud, the stamp side will show. Punch a small pointy flower from green to make a sepal for the bud.

Pierce all the open blossoms in the centers then thread the silver pearl stamen through the centers, secure with hot glue then trim the backs of all threads.  Glitter the flowers with Crystal Clear.

Stamp the leaves on Deluxe Flower Shaping Paper using Fern Green then sponge with Leaf Green and a little Magenta Hue.  Die cut then sponge the backs and shape in the mold.  Cut leaf into 2 or 1 leaf sections.  Glaze the tops with 3D Lacquer mixed with shimmer additive (or whatever you have like lacquer).

Arrange leaves and flowers onto card at the bottom left side.  Randomly glitter card using a sponge and Crystal Clear.

Thanks for visiting today!

Robin

Luke 2:10-14

10 And the angel said to them, “Fear not, for behold, I bring you good news of great joy that will be for all the people. 11 For unto you is born this day in the city of David a Savior, who is Christ the Lord. 12 And this will be a sign for you: you will find a baby wrapped in swaddling cloths and lying in a manger.” 13 And suddenly there was with the angel a multitude of the heavenly host praising God and saying,

14 “Glory to God in the highest,
    and on earth peace among those with whom he is pleased!”[d]


Monday, November 28, 2022

The Church Sizzix Tim Holtz


Good morning crafty friends!

Yes, first of all, these dies have been sitting in my craft room unused for years.
These are the original steel rule big dies from Sizzix.
I always wanted to play with them and this year was finally the year to do it.
What got me started was the mansion at Halloween for my daughter, (her birthday is Halloween).  I always try to do something different for her but this year I was coming up short of ideas until I looked up and saw the big dies I never used!
So, I made her the cutest haunted house ever all lit up on the inside with purple Halloween tiny lights.  I loved it so much I almost didn't send it to her!! LOL!
Well, that got me started.  Next, I made the regular size church (still using the same steel rule dies) for my sister who really loves churches.  It was similar to what you see here only on a smaller scale, I did not use the mansion piece, nor did I expand the width.
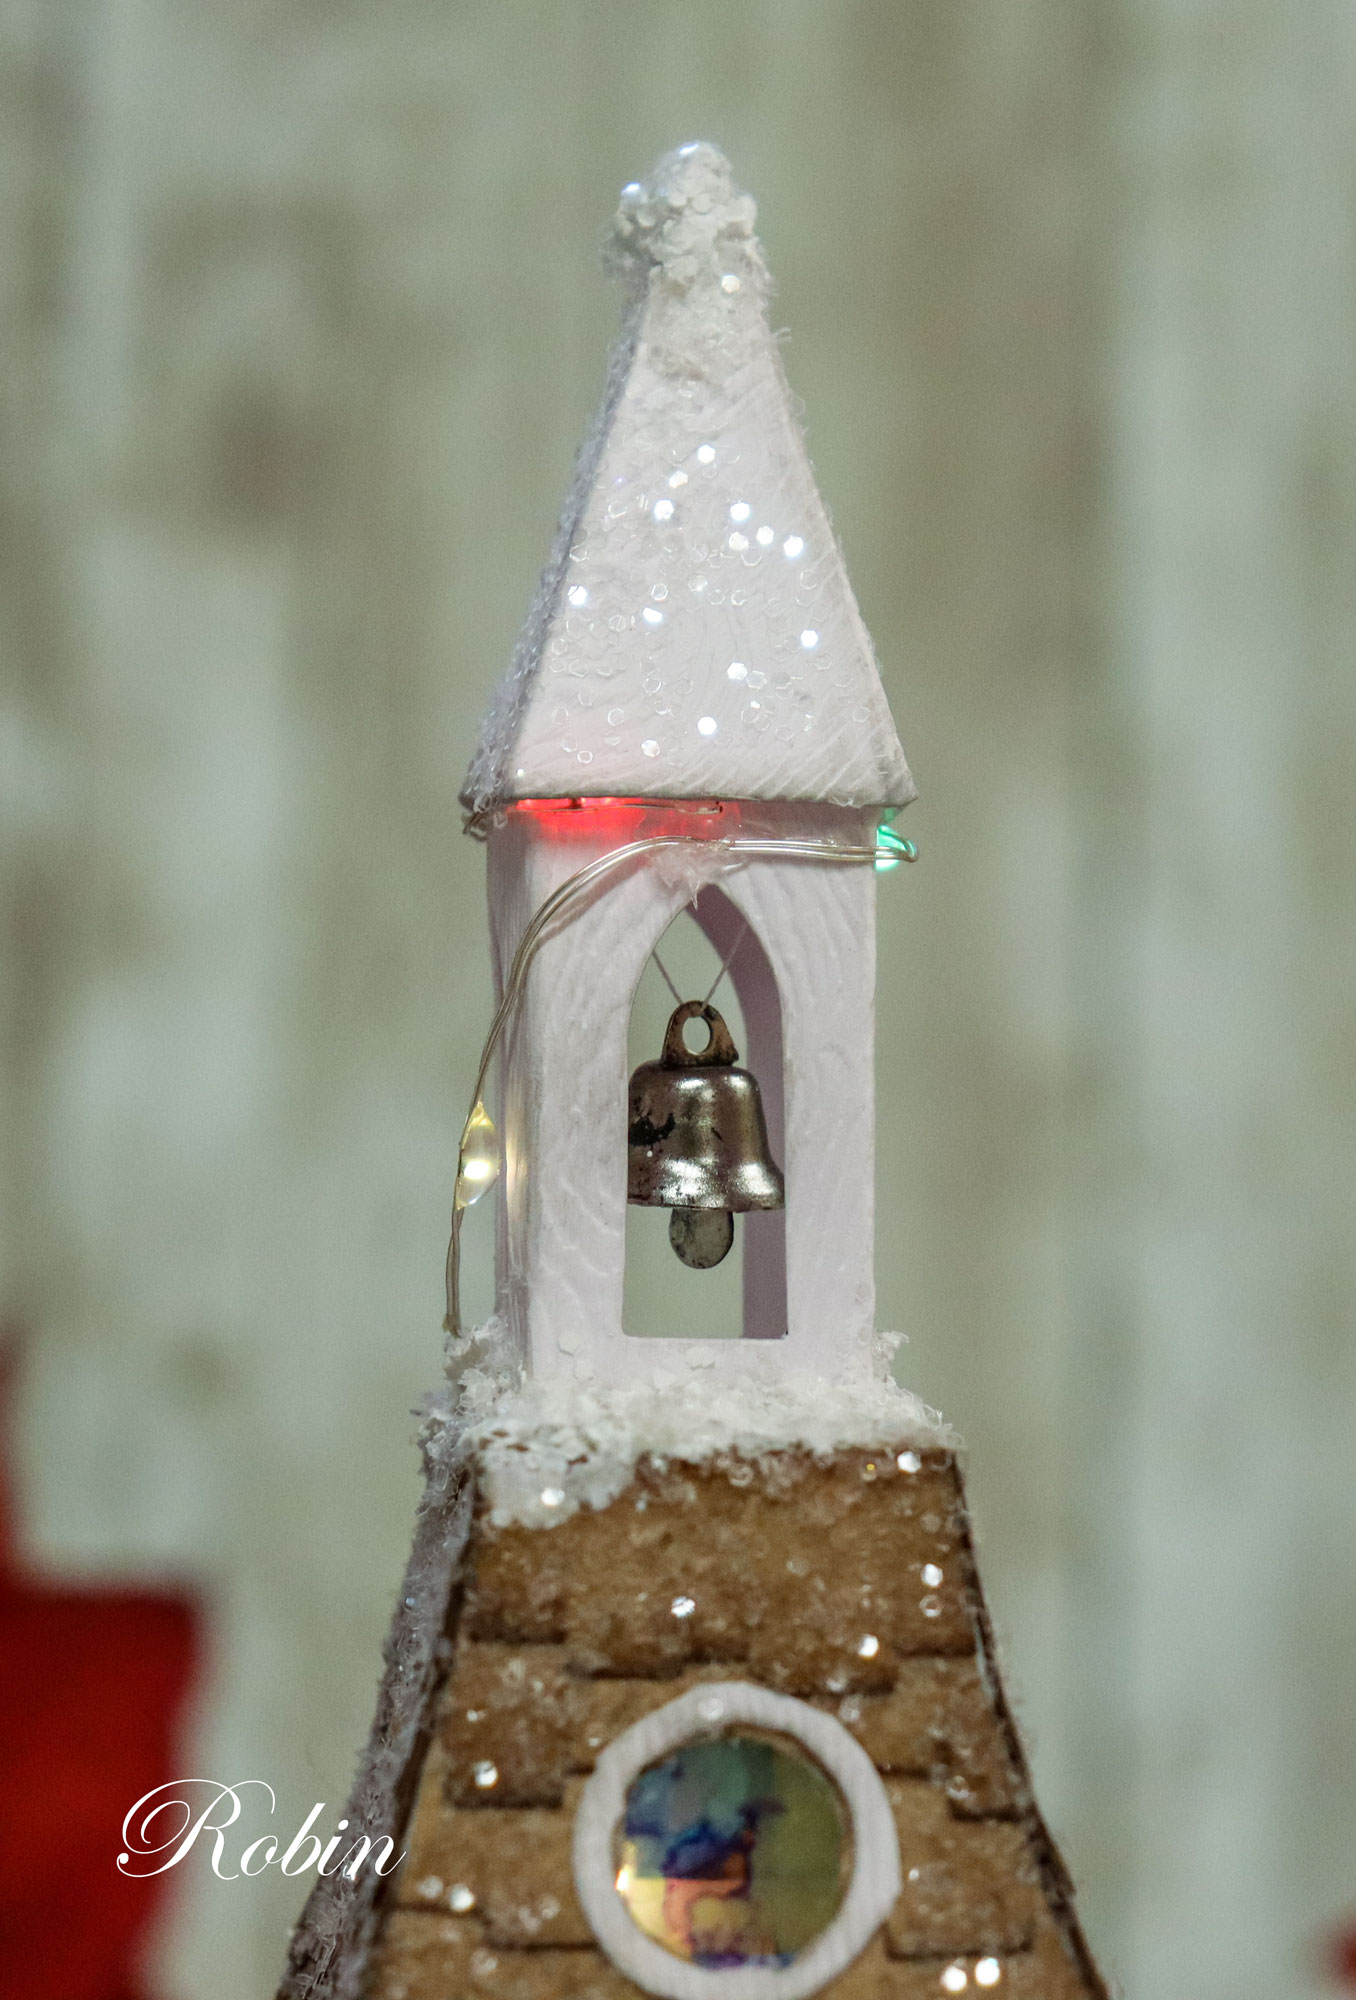
Here are a few pictures of the church I made for our family.
 
I used a shadow box upside down for my stand, this works perfectly for hiding tiny light switches inside.  I used some of Tim's new adhesive Christmas plaid ribbon on the outside of the box, painted the rest with white and used a palette knife to add Snow-Tex and glitter.
I drilled small holes for the trees and a larger hole for the wires to come up from under the box to the inside and outside of the church, none of that shows of course.

The trees just have a bit of white gesso painted on them then glittered.

I used the cobblestone embossing folder from Sizzix to make the stone part of the building, steps and walkway.
The wreath was made with some of the greenery Tim released this year at Christmas. (I got most everything from Simon Says Stamps.  I picked from Sizzix folders and Idea-ology (I already had the Sizzix Dies).


From this photo of the whole church, you can see that I used pieces from the Mansion and also that I expanded the sides to make it a larger scale church than the original.


Sizzix does not make these dies anymore BUT, they make all the pieces for all the buildings in 1 set now, they are just on a little smaller scale.
I resisted the new dies for as long as I could because of having MOST of the large ones but I finally gave in and recently purchased the smaller set of the Village Collection.


Even the little bell is from Idea-ology.

I'm hoping you can see that the windows (which are pieces of Mica) have been dyed on the inside with a combo of pinks, yellows and purple alcohol inks to make some "stained glass windows".


When I was finished putting everything together and stuffing tiny lights (clear) inside the church, I glued it to the base along with everything else and touched up the texture paste around the building base.
I glued my tiny Christmas lights onto the outside of the church, glued my tiny wreath with red ribbon and 2 gold half balls on the doors for knobs.
If you are curious about the building siding there are several You Tube videos out there, including one from Tim Holts (the Haunted Mansion).
For the widening of the church, there is no pattern, I just measured and cut my own extra panels with tabs for gluing.  Once the siding is on you can't see where the seams were.
So, this was me finally using my dies!
I'm so proud of myself, LOL!
Hope you enjoyed this little project, it was a lot of work, but I loved it!
Now, don't be telling my sister that she got a smaller church!

Thanks for visiting!
Robin

Luke 2:6-14 

And while they were there, the time came for her to give birth. And she gave birth to her firstborn son and wrapped him in swaddling cloths and laid him in a manger, because there was no place for them in the inn.[c]

The Shepherds and the Angels

And in the same region there were shepherds out in the field, keeping watch over their flock by night. And an angel of the Lord appeared to them, and the glory of the Lord shone around them, and they were filled with great fear. 10 And the angel said to them, “Fear not, for behold, I bring you good news of great joy that will be for all the people. 11 For unto you is born this day in the city of David a Savior, who is Christ the Lord. 12 And this will be a sign for you: you will find a baby wrapped in swaddling cloths and lying in a manger.” 13 And suddenly there was with the angel a multitude of the heavenly host praising God and saying, “Glory to God in the highest,

    and on earth peace among those with whom he is pleased!”[d]

Sunday, November 27, 2022

Love

 Well good morning friends!

Today is Cyber Monday and Heartfelt Creations has more deals for you today and a new die just for Cyber Monday! Heartfelt online store.


Material list here

 Card size:  4 X 9”

Make a card base to fit 4 X 9” card folded.  Cut 1 base layer from decorative paper (lavender multi-color from the Elegant Rose Frames used here), glue it to card base.  Cut a white Slim Star Lattice layer without center inset.  Glue a half magnet to the upper portion of the white center then cut another white center using the inset outer die, glue it over the magnet. 

Make a pocket for the removable tag/bookmark using the outer and inner corner dies from the Delicate Daisy Corners and Border set from white, die cut outer only from lavender decorative paper.  Glue to card on top and outer edges only to form a pocket.

Tag/bookmark: Die cut the inner part of the Slim Star Lattice from white.  Die cut outer portion only from peach decorative paper (Friendship Rose Paper).  Glue then together.  Glue the other half of the magnet behind upper part of tag then cover with a thin piece of white cardstock cut with the outer die only.  Punch a hole at the top of the tag and insert fibers or ribbon in peach and lavender.  Die cut the word love from white and die cut the center of the Decorative heart from white (small heart).  Sponge the word with Majestic Violet and Pink Peony then glue it to the heart, glue the heart to the tag/bookmark.  Slide the bookmark into the pocket.

Stamp smallest 2 sets of poppies using Majestic Violet, sponge with Majestic Violet and Pink Peony, die cut, sponge the edges with more Majestic Violet.  Shape in the mold, glue 2 same size petals together for each flower, glue Prills to the centers and glitter flowers.  Also glitter card randomly.

Stamp leaves using Fern Green, sponge with Leaf Green, die cut, shape in the mold.

Arrange flowers and leaves at left bottom corner (be sure to not close up pocket at any point when gluing).

Bookmarker will stay put because of pocket and magnet.

Thanks for visiting today!

Robin

Colossians 3:12-14
12 Put on then, as God's chosen ones, holy and beloved, compassionate hearts, kindness, humility, meekness, and patience, 13 bearing with one another and, if one has a complaint against another, forgiving each other; as the Lord has forgiven you, so you also must forgive. 14 And above all these put on love, which binds everything together in perfect harmony. 


Thursday, November 24, 2022

One In A Million

 Good morning crafty friends!


Material list HERE

Card size:  3 1/2" X 8 1/2"

Cut a white eyelet panel glue it to a slimline card base.  Cut a pink panel with the Slim Basics to fit inside of white eyelet panel then glue it.  Cut a white and a gold Slim Lattice Oval.  Glue them together slightly offset then glue to card on top of pink layer. 

Stamp the sentiment using Magenta Hue, die cut with the small decorative die of the Slim Lattice Oval set.  Die cut again from gold.  Glue the 2 decorative parts together slightly offset then glue to card.  Glue the sentiment to the center.

Stamp Wild Roses (smallest and next one up) using Magenta Hue, die cut, sponge edges with the Magenta, sponge the insides with magenta Hue and Buttercup. Mold in the Shaping Mold then finish on the Deluxe Flower Shaping Kit mat with a stylist. Pierce centers insert light pink stamen, fill in centers with Prills.  Use Crystal Clear to glitter flowers.

Stamp the leaves using Fern Green, die cut, sponge with Leaf Green and some Magenta.  Form in the Shaping Mold then cut apart in sets of 2 or 3.  Mix shimmer and lacquer together then use a paint brush to paint it onto leaves.

Arrange flowers and leaves on the left side of the card.

Thanks for visiting today!

Robin
I Corinthians 13:4-8a
The greatest love chapter

Love is patient and kind; love does not envy or boast; it is not arrogant or rude. It does not insist on its own way; it is not irritable or resentful; it does not rejoice at wrong doing, but rejoices with the truth. Love bears all things, believes all things, hopes all things, endures all things.

Love never ends. 


Tuesday, November 15, 2022

Special Place In My Heart


Good morning crafty friends!
What a fun Valentine!
This new heart die and rose images are
so pretty!


Material List HERE

 Card size:  5 X 6 7/8”

Make a shaped card base with a side fold (see video) using the outer die of the Flourished Companion Frame die. Then cut another panel with the outer die from pink decorative paper.  Use the outer die and the large decorative die together to make a thin white frame for the card base then glue it on top of the pink paper matching edges.

Splatter the pink paper with white acrylic paint (you can use a toothbrush or similar brush wet with water first to accomplish this).  This mimics the Baby’s Breath.

Cut the Decorative Heart from white.  Glue the large part onto card without inner hearts.  On the smallest heart, stamp the sentiment using Vibrant Fuchsia then glue it to the center of open scalloped heart cut out.

Stamp the Budding Heart using black, die cut then color.  Pop up the colored heart onto card, be sure not to cover wording.  Add pearls around heart edge.

Add white acrylic dots to Baby’s Breath and Diamond Stickles to Roses.  Randomly glitter card base.

Add single pearl halves to card base.  Add a strip of decorative paper to the inside of card on the right edges.

Thanks for visiting today!

Robin


For this is the will of God, that by doing good you should put to silence the ignorance of foolish people. Live as people who are free, not using your freedom as a cover-up for evil, but living as servants of God.

Tuesday, November 8, 2022

Happy Valentine's Day


Good morning crafty friends!


Material List HERE

Card size:  4 1/2" x 7 1/4"

Cut a card base from white that measures 3 3/4" X 7 1/4" when folded.  Cut a gold panel 3 1/2" X 7”, glue it to the card base.  Cut a light pink decorative panel and vellum panel 3 3/8” X 6 7/8”, glue them together being careful to only put glue where it won’t be seen. Then glue the 2 panels to the gold panel.

Cut out 2 gold frames using the large eyelet Diamonds and Basic Diamonds.  Cut 2 vellum insets for the frames.  Cut 2 smaller light pink decorative paper diamonds then glue them in the center of the vellum diamonds. Use pop-up between layers onto card placing the top of gold frame on bottom diamond at the top of card and placing the bottom of other gold frame at the bottom of card.

Stamp the heart and the single roses using Memento Tuxedo, color with Copic Markers or other coloring method, die cut.  Use foam under the heart and adhere it toward the bottom center of card.  Adhere each single rose on a different layer sticking up from diamonds.  Add some pearls on a line and some half pearls on the corners of the diamonds.  Add a white cord loopy loo to the left side of heart securing under the heart.

Add white paint dots to the Baby’s Breath and Diamond Stickles to the roses and Baby’s Breath, add some gold dots as well if desired.


Thanks for visiting today!

Robin

Ephesians 1:16-21 
16 I do not cease to give thanks for you, remembering you in my prayers, 17 that the God of our Lord Jesus Christ, the Father of glory, may give you the Spirit of wisdom and of revelation in the knowledge of him, 18 having the eyes of your hearts enlightened, that you may know what is the hope to which he has called you, what are the riches of his glorious inheritance in the saints, 19 and what is the immeasurable greatness of his power toward us who believe, according to the working of his great might 20 that he worked in Christ when he raised him from the dead and seated him at his right hand in the heavenly places, 21 far above all rule and authority and power and dominion, and above every name that is named, not only in this age but also in the one to come.

Monday, November 7, 2022

November Die of the Month


My projects today are a 3D Alarm Clock in gold and Ivory and a flat 
card in the same colors.
I love the old fashion alarm clock look so I was excited to make this 
project today in my chosen
colors and with lots of flowers and ribbon.
It makes such an elegant card to give someone special!
The 3D card folds flat so that sending through the mail is easy.


Today's creations were created with the dies supplied by Amazing Paper Grace.

There are 21 cutting dies included in the Pop Up 3D Vignette Alarm Clock.   


Supplies:
Amazing Paper Grace November 2022 Die of the Month – Pop Up 3D Vignette Alarm Clock, S5-311 Emmeline Treillage, S3-420 Petite Floral Potpourri, S5-436 Grand Cinch and Go
Other supplies:
Ivory cardstock, gold mirror cardstock, gold Prills, ivory 1/8" ribbon, brads, gold half balls, gold Delicata ink pad (pigment ink).


The Amazing Paper Grace Die of the Month is available exclusively at Spellbinders Paper Arts during November 2022, Pop Up 3D Vignette Alarm Clock along with other membership perks.

View this month’s Amazing Paper Grace Die of the Month! 
Follow me on Facebook!
Follow me on Instagram!

Thanks for visiting today!
Robin