Pages

Comments are welcome and very much appreciated!

Monday, February 28, 2022

For You

 Good morning!


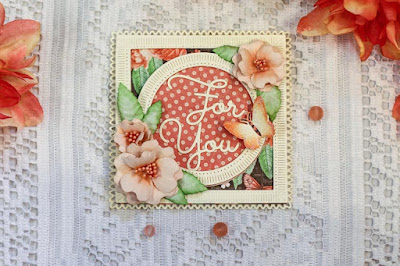
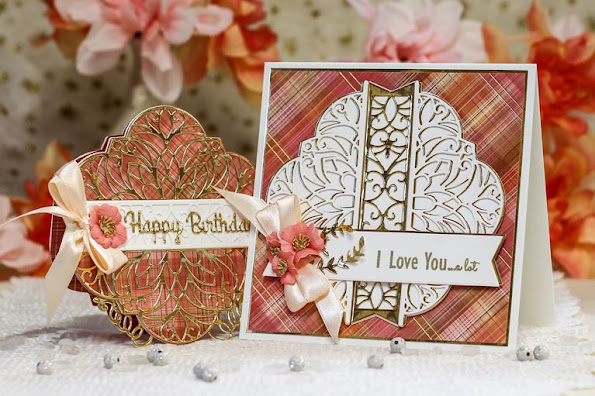
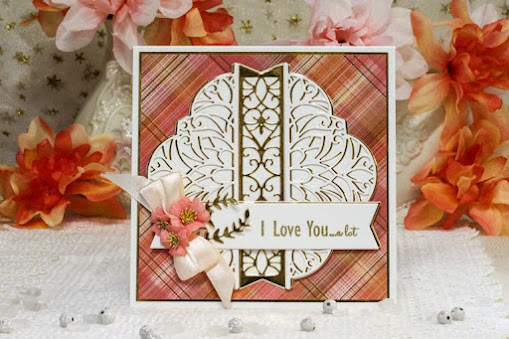
I'm using the Fluted Classics today to make a cute "For You" card.
S4-982 Cinch and Go Flowers

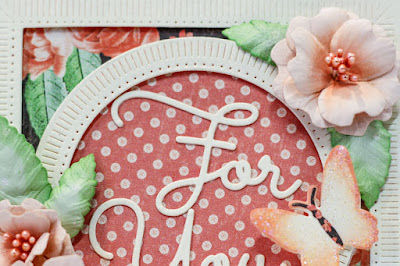
I used ivory cardstock along with this older peach and green Graphic 45 paper I've been hanging on to.  My flowers are 3 layers, shaped from the back with a Groove Golf Tool and sponged in the center for some added color.  The cardstock for the flowers is a very pale pink.  With the ink it gives the appearance of a peachy color.  The ink color is Tea Rose from Archival.
The Fluted Square and Fluted Circle frames were both popped up.

Thanks for visiting today!

Robin

Psalms 91:14-16
“Because he holds fast to Me in love, I will deliver him;
    I will protect him, because he knows My name.
15 When he calls to Me, I will answer him;
    I will be with him in trouble;
    I will rescue him and honor him.
16 With long life I will satisfy him
    and show him My salvation.”

Tuesday, February 22, 2022

Sending You Birthday Love

 Good morning!


Heartfelt Creations materials list: HERE

 Card size:  6” X 6”

Make a white (or black) 6 X 6 card with 6 X 12 cardstock then fold. Die cut the Courtyard Elegance using outer die with inner decorative die together from black. Die cut again from gold cardstock, glue together off set a little. Glue to card front.

Die cut the Elegant Hearts Centerpiece from black and again from gold, off set and glue together. Die cut simple Centerpiece frame (outer width 5” inner 4 1/2") from black and from gold. Add foam strips under frame. Using Simple Centerpiece again, die cut a 5 1/2" red panel then glue that under the Elegant Hearts set. Add foam under the Elegant Hearts layers then adhere to card front follow by the black and gold frame popped up.

Stamp the sentiment using VersaMark and embossing with gold on red cardstock then die cut with matching die and glue to the center of card. Add gold Pearl drops as desired.

Stamp Sunflowers and leaves using black ink, sponge flowers with dark red, sponge leaves with gold ink, die cut then shape. Finish shaping using the Deluxe Flower Shaping kit. Glue 3 to 4 layers together for each flower then use gold glitter glue on the edges. Add gold Prills to the centers. For the leaves, sponge clear embossing ink on edges then dip in gold powder and emboss.

Glue 1 flower to each of 2 opposite corners and add leaves then tuck some gold stamen in under flowers.

Add black rhinestones to the intersections of Courtyard die cut at corners showing. Add gold pearls to all 4 card corners.

For the inside, make a black panel and a red panel then glue to inside of card just to make all cohesive.


Thanks for visiting today!

Robin


Psalms 8:3-8

When I look at your heavens, the work of your fingers,
    the moon and the stars, which you have set in place,
what is man that you are mindful of him,
    and the son of man that you care for him?

Yet you have made him a little lower than the heavenly beings[b]
    and crowned him with glory and honor.
You have given him dominion over the works of your hands;
    you have put all things under his feet,
all sheep and oxen,
    and also the beasts of the field,
the birds of the heavens, and the fish of the sea,
    whatever passes along the paths of the seas.


Monday, February 21, 2022

Adoring You!

 Good morning!


This die set is part of the new Classically Becca dies at Spellbinders.
I also used:


This die set is perfect for making a shaped card, which is what I chose to do here.
Each layer has a gold layer under it and off-set just enough to give the card a natural glint.
The petals of the flowers were sponged with purple ink and the centers filled with purple stamen inserted through the center hole.
The decorative paper is an older Graphic 45 paper that I happen to have in my stash.
Don't we all have that "stash" of special papers we bought but hoarded (never used!)  Well, maybe I'm guilty alone, I don't know but I don't quite think so!  So anyway, I've started using my paper now, no more hoarding as I usually end up giving BOXES of paper away to make more room in my "studio".

Look at that sweet Adoring You, I just love that font and wording.  Altogether, these dies make a beautiful card, don't you think?  Let me know in the comment section below how you like this card!!
Are there things you would like to see in future?

Thanks for visiting today! Happy crafting!!

Robin
Psalms 18: 1-3
18 I love you, O Lord, my strength.
The Lord is my rock and my fortress and my deliverer,
    my God, my rock, in whom I take refuge,
    my shield, and the horn of my salvation, my stronghold.
I call upon the Lord, who is worthy to be praised,
    and I am saved from my enemies.


Tuesday, February 15, 2022

You Are So Thoughtful Mosaic

 Good morning!

Today I've used a lot of dimensionals to accent my mosaic.

Nuvo dots and Liquid Pearls on each layer besides the foam sheet under each layer.


 Card size:  6” X 6”

Make a card base using 6 X 12” white cardstock, fold to make 6 X 6” card. Cut decorative paper panels as follows: blue-6 X 6”, 4 5/8 X 4 5/8”, and 3 5/8 X 3 5/8”, Aqua-5 3/4" square plus an aqua decorative square panel with cottage for the inside, light green-4 1/2" square, Red-3 1/2" square, round corners. Also out of the red die cut 4 corners using the Album Tags and Accents die set.

Layer card as follows: blue, aqua, 4 corners. Glue together blue and green then pop up and glue to card. Glue blue and red tother then pop up on card. Glue the inside layer in.

Stamp the Mosaic 4 times using gray ink (London Fog Memento used here as Memento ink stands up to alcohol pens). Die cut smaller and smaller using Mosaic dies in set. Color all layers as desired matching papers chosen then add foam to each layer. Glue layers together then decorate with glitter glue and rhinestone in center.

Stamp sentiment using Carnation Red onto decorative paper label strip, cut to size and glue to Mosaic at the bottom. Add red rhinestones to red panel and red corners. Glitter card.

Thanks for visiting today!

Robin 


Psalms 139:23-24
Search me, O God, and know my heart!
    Try me and know my thoughts![c]
24 And see if there be any grievous way in me,
    and lead me in the way everlasting!

You Are Phenomenal Tutorial at FaceBook

 Hello Amazing friends!  
Head on over to my tutorial for this card at
The Amazing Paper Grace Creative Encouragement Page
on FaceBook HERE

Robin

Tuesday, February 8, 2022

Good Things Take Time-Mosaic

 Good morning!  I saw something like this (the silver octagons) on Pinterest one day, they are spaced so that it almost looks like a circle.  I decided to give it a try on this card since the circle shape (especially on the inside) goes well with the circular Mosaic medallions.


On the inside it says "Good Things Take Time"

Material list HERE

 Card size:  6 X 6

Make a card base with white 6 X 12” cardstock then fold in half for a 6 X 6” card.  Cut 1 silver piece of cardstock to 6 X 6, 1 to 5 1/2 X 5 1/2", 1 to 5 1/8 X 5 1/8" and cut 3 silver Simple Centerpiece frames (using 2 dies together) that measure 5 X 5” (outer diameter and 4 3/4 X 4 3/4" inner diameter).

Cut decorative paper as follows: 1 outer piece 5 7/8” square-multi color, next 5 3/8” square-purple, next 4 7/8” square-aqua.  For inside, 1 5 7/8” square-green with a bottom border.  From this inside piece, cut an eyelet circle (largest of the Eyelet Circles Small).  You will use this spot for the sentiment so die cut where you would like the sentiment to eventually go.  Using the same eyelet die, cut a purple eyelet circle.  Set aside inside pieces (green panel and purple circle) for later.

Stamp Mosaic 4 times, once in each of 4 colors, Majestic Violet, Paradise Teal, Vivid Chartreuse and Bright Tangelo, die cut each and use the layers in a stack with foam sheet or pop ups under each layer, starting with Teal then violet, green and finally orange (do not glue yet), sponge each layer with the same color as stamped.  Die cut silver with the same dies for each layer.  Glue the silver off-set a bit under each colored panel, once all layers are glued, glue foam or pop ups under layers. Use Nuvo white and Stickles as desired to decorate the layers then set aside to dry.

When Stickles is dry start layering the front of your card as follows: Silver, Multi color.  Glue foam under the next silver with purple then glue to card.  Glue foam to the next silver with aqua then glue to card. Now glue green eyelet circle to the center of aqua panel.  Layer the silver centerpieces off set so that it basically makes a circle on top of the aqua panel.  Glue the Mosaic stack made earlier to the center of green circle.

Stamp Mosaic border using Majestic Violet 2 times.  Cut borders to fit the 4 aqua corners (in the sample they overhang the aqua panel to line up with the purple panel under).

For the inside: glue the green panel to the inside of card then glue the purple circle in the circle opening.  Die cut a smaller circle from green patterned patter and glue it to the center of purple.  Stamp Good Things sentiment using teal then die cut with circle die.  Glue it to the center of other circles.  Glitter card using Crystal Clear.


My next card features a round card design (with legs!)

Material List HERE

Card size:  6” X 6”

Cut 1 panel off the Bi-Fold card base. Die cut 2 stands from white using the Swirly Accents Spray die set.  Die cut 2 eyelet circles using the Rounded Eyelet Window die set from decorative paper. Cut 2 purple decorative paper panels using the outer die of the Simply Elegant Centerpiece die set. Cut 1 turquoise decorative die cut from Simply Elegant Centerpiece. Cut 1 decorative paper Mosaic piece for the inside sentiment circle, cut 1 3 5/8” decorative paper-multi color using circle die.

Glue 1 patterned eyelet circle to the front and 1 to the inside of card. Glue coordinating purple Centerpiece over eyelet on both front and inside. Glue the turquoise decorative paper centerpiece to purple on the front only then glue the multi color circle to the center.

Stamp 4 Floral Mosaics using London Fog (or other gray ink). Die cut each layer smaller and smaller using dies provided in the set. Color each layer with colored pencils as desired to match chosen papers used.

Use foam dots, strips or sheet to pop up each layer of mosaic then glue the stack to the center of circle.  Decorate with different colors of glitter glue ending with a rhinestone in the center.

Stamp For My Friend using Deep Purple then trim as close as possible and fishtail end.  Add a small purple pearl to 1 corner, tuck the other corner under a bit of simply Elegant Centerpiece turquoise die cut.  Glue to secure.

When all glitter glue is dry, open card and finish by gluing the mosaic die cut to the purple layer.  Stamp the circle sentiment from Just for You using purple then glue it on top of mosaic.  Glue the 2 stands on the back of front and the back of card (make sure they are even with each other and with card circle bottom.  These will help your round card stand upright instead of off kilter. Glitter card as desired.

Thanks for visiting today!

Robin
Whoever pursues righteousness and kindness will find life, righteousness, and honor.

Monday, February 7, 2022

Hello!


Hello Amazing friends!


A slimline card with something extra!


I've made another card using the Sweet Serenade die set from Amazing Paper Grace.
I find it is so easy to come up with different ways to use the same dies, don't you just love that when you can use the same die over and over and make it look different?
and S4-995 Cinch and Go Flowers


The decorative paper is from Memory Box paper pad.
Each layer has a gold layer under off-set just enough to see it.
This makes everything shine!

Hope you like this card and go make one for yourself!
Happy crafting!

Robin
Psalms 139: 13-16
13 For you formed my inward parts;
    you knitted me together in my mother's womb.
14 I praise you, for I am fearfully and wonderfully made. [a]
Wonderful are your works;
    my soul knows it very well.
15 My frame was not hidden from you,
when I was being made in secret,
    intricately woven in the depths of the earth.
16 Your eyes saw my unformed substance;
in your book were written, every one of them,
    the days that were formed for me,
    when as yet there was none of them.

Friday, February 4, 2022

February Die of The Month from Amazing Paper Grace


I love making shaped cards so when I see a beautifully shaped die set my first thought goes there.  I have some paper with gold embossed lines and some gold mirror paper, I'm halfway there!! 
Today I have used the dies in both directions, one shaped card with a horizontal center line and one traditional square card with center line at the vertical.  I love both don't you?  Tell me, which design do you like best?
 
Dies for my creations today were supplied by Amazing Paper Grace.

There are 13 dies included in the Marvelous Medallion.


Supplies:
Amazing Paper Grace February 2022 Die of the Month – Marvelous Medallion
S2-082 Sentiments One, S6-045 Cascading Grace, SDS-169 Just A Note Sentiments and Tag
Gold embossing powder, white cardstock, decorative paper, gold mirror paper, Apricot satin ribbon, embossing ink

For more Marvelous Medallion Inspiration
Visit each Creative Team blog linked below for their take on creative paper crafting ideas with Marvelous Medallion, the Amazing Paper Grace February 2022 Die of the Month!
View this month’s Amazing Paper Grace Die of the Month! 
See the video HERE

Follow me on Facebook!
Follow me on Instagram!


Thanks for visiting!
Robin
bearing with one another and, if one has a complaint against another, forgiving each other; as the Lord has forgiven you, so you also must forgive.


Tuesday, February 1, 2022

Grateful for You Butterflies


Good morning!
Today I've used an ink sprayed background I had hanging about to create this colorful card!


Find the material list HERE

Card size:  4 3/4" X 6 5/8”

Start with 1 piece of white cardstock that is 5 1/2” X 6 5/8”, score at 3/8” on both long sides for tabs to glue to 2 pieces of white cardstock that are 1 1/2" X 6 5/8” Glue the 1 1/2" pieces to the tabs, card base is done.

You need two 1/2" by 6 5/8” plus one 4 3/8” X 6 3/8” pieces of white cardstock to spray Oxide inks on, whichever your preferred colors are (a mixed media type cardstock works best).  When completely dry glue the 1/2" pieces to the 2 sides and glue the larger piece inside of card.

Use gold cardstock to cut the front (gatefold) die cuts using the new Classic Companion Border Die (cuts both sides at once).  Also cut 2 decorative butterflies, one 2 1/2" circle and one 7/8” X 5” piece out of gold.  From white cardstock cut 2 butterfly decorative die cuts, one 2 3/8” circle and 1 banner shortened to 4 3/8” long.

Use Majestic Violet to stamp both sentiments, 1 on the banner and 1 on the white circle.  Glue banner onto the 5” gold strip then trim ends of gold to match banner.  Glue white circle to gold circle then glue the circles to the center of inside. 

Stamp VersaMark on white 2 times and on gold 2 times.  Use gold embossing powder for the gold stamped butterflies and use white embossing powder for the 2 white.  Heat emboss then die cut all 4 butterfly bases.  Glue white filigree butterflies to gold stamped bases and gold filigree die cuts to white stamped bases.  Glue the 2 gold base butterflies inside with circle sentiment.

Glue the 2 gatefold gold to the 1/2” front sides of card base.  The 2 gold fronts should meet in the middle just perfectly.  Use foam tape or other dimensional adhesive to adhere left half of banner sentiment to left side of card at a slight angle.  Adhere both white base butterflies using foam tape under their bodies on the top left and bottom right side of card front.


Thanks so much for visiting today!

Robin

Hello friends, here is my thought of the day...

Taken from Deuteronomy 6:4-5 

“Hear, O Israel: The Lord our God, the Lord is one. You shall love the Lord your God with all your heart and with all your soul and with all your might.
To the one who created us and keeps us in every way, the breathe of life, food to eat, clothes to wear, He keeps you in His care...He deserves our total love and devotion.
Did you know that He requires us to love one another?  Yep, He wants us to love each other like He loves us!  Think about it!  Forgive and love.  Even that person you don't agree with!!  You don't have to agree with them, just love them, we will all stand before the judgement seat of God, let Him be the judge of them, not you.