Pages

Comments are welcome and very much appreciated!
Showing posts with label Lilac. Show all posts

Tuesday, October 22, 2019

HC Sea Breeze FoldOut


Good morning!
I love these fold out cards don't you?
You can do so much with them and use so many stamps and die and that is what we love isn't it?

I made a continuous shore line on this card and used the texture paste with glitter to make a fun wave foam.
I used real shells on gauze for some fun trim
I also used real sand on the sand (found it at a hobby shop, part of the landscaping stuff for models).


HC PRODUCTS USED      
HCD1-7264     SeaBreeze Harbor Die
HCD1-7265     Sandand Sunset Die
HCD1-7266     A Dayat Sea Die
HCPC-3890     SeaBreeze Harbor Stamp Set
HCPC-3892     Sandand Sunsets Stamp Set
HCPC-3892     A Dayat Sea Stamp Set
HCDP1-2107   SeaBreeze Paper Collection
HCPC-3844      ForMy Friend Sentiments Stamp Set
HCD1-7118     DelicateBorder Basics Die
HCD1-7119     Classic Border Basics Die
HCD1-7120     FleurBorder Basics Die
HCD1-7121     ElegantBorder Basics Die
RINK44444    Ranger Texture Paste Opaque
PGM15015     RajniChawla’s Crystal Clear
352854            Metal Tip for Adhesive
159723            Dries Clear Adhesive
HCCF1-445-2  6 X 6Foldout Cards-White
TSMP900        TuxedoBlack Memento Ink
RACP412         Forget Me Not Archival Ink

Other Products:
White cardstock, aqua cardstock, tan cardstock, turquoise cardstock, gauze, shells, foam tape, sand, Stickles, Copic Markers: E81, E42, E43, E51, E53, E33, E35, E57, E08, YR82,E97, YG03, YG17, Y11, Y15, Y21, Y24, Y38, R81, R11, R17, R29, W2, W3, W5, C2, C3, C5, BG72, BG11,

For more tips on creating with the border dies & foldout cards, watch the tutorial at https://youtu.be/wxX94X84kUo.

Instructions: 
Card size: 6 X 6 1/2" closed. 6 1/2 X 24” Open. Cut back of foldout card with the Classic Border Basics Die and cut paper to match.   Cut front and back panels with the Fleur Border Basics out of decorative paper with water across the 12” (it takes 2 pieces, top and bottom.  Cut sandpipers off the bottom of both pieces then cut vertically at 6” and horizontally at 5 3/4 for the back and 3rd panel, 5” for the 2nd and 1st panel).  Use the top pieces for the back of each panel.  Cut front and back together when cutting each panels papers.  Glue the paper onto coordinating panels. For the back of panels, add water by cutting turquoise cardstock 1 1/2" strips, glue them to the bottoms of 1,2 and 3rd panel backs.  Tear tan cardstock for sand about 1/2" deep for all panels both sides.  Use texture paste on the torn edge of all sand pieces, sprinkle with glitter then let dry.  Once dry, glue each sand strip to the bottom of each panel front and back then add real sand.

Cut 3 Elegant Border Basics from Aqua and 1 Delicate Border Basics from Aqua.  Glue the Delicate Border to the back panel of foldout and glue the 3 Elegant Borders onto panel 1, 2 and 3.

Stamp large lighthouse scene (X2), large cloud (X2), sailboat (X2), rowboat (X2), sunset, Shells (X3), Birds (X2), plants (X4), sandpipers (X2), Rope Frame (X2), Fence (X2), bird on post, small lighthouse, die cut and color all pieces.  Stamp sentiment using Forget Me Not on yellowish background paper cut then mate with white.

Start decorating card with images, panel 1 in closed position-Pop fence up on left side then pop bird on post on top of it.  Pop shells and sand to right side then pop shells only on top.  Inside-Pop up rowboat plant on left and on right and shells.  Glue one bird in the sky.

Panel 2 inside- glue sunset matching horizons to left side glue clouds to right side and pop sailboat on top, about half-way down water.  Glue 2 sandpipers to sand left side. Pop up shell on right side of sand.  Glue 1 bird in the sky.  Back side- pop up rowboat, matching sand lines.

3rd panel inside- Glue sailboat at horizon toward right side, glue 2 birds in the sky, glue plant, shell and sandpiper to right side of sand and glue shell to left side of sand.  Back side-Glue small lighthouse and pop up rope frame.

Back panel- Glue large cloud to sky and 2 birds.  Glue the large lighthouse scene to right side, pop up extra rocks (from second stamped lighthouse scene).  Pop up short piece of fence to right side, glue wood post and anchor (from second stamped rope frame) and a plant in front of fence.  Glue 2 shells next to anchor and glue 3 sand pipers to left side.  Glue the sentiment to left side.

Steep gauze in some black tea for 15 minutes or so then hand up to dry.  Add pieces of gauze to each panel top then add small shells , seahorses and starfish.  Add glitter to gauze, and add Stickles to water.


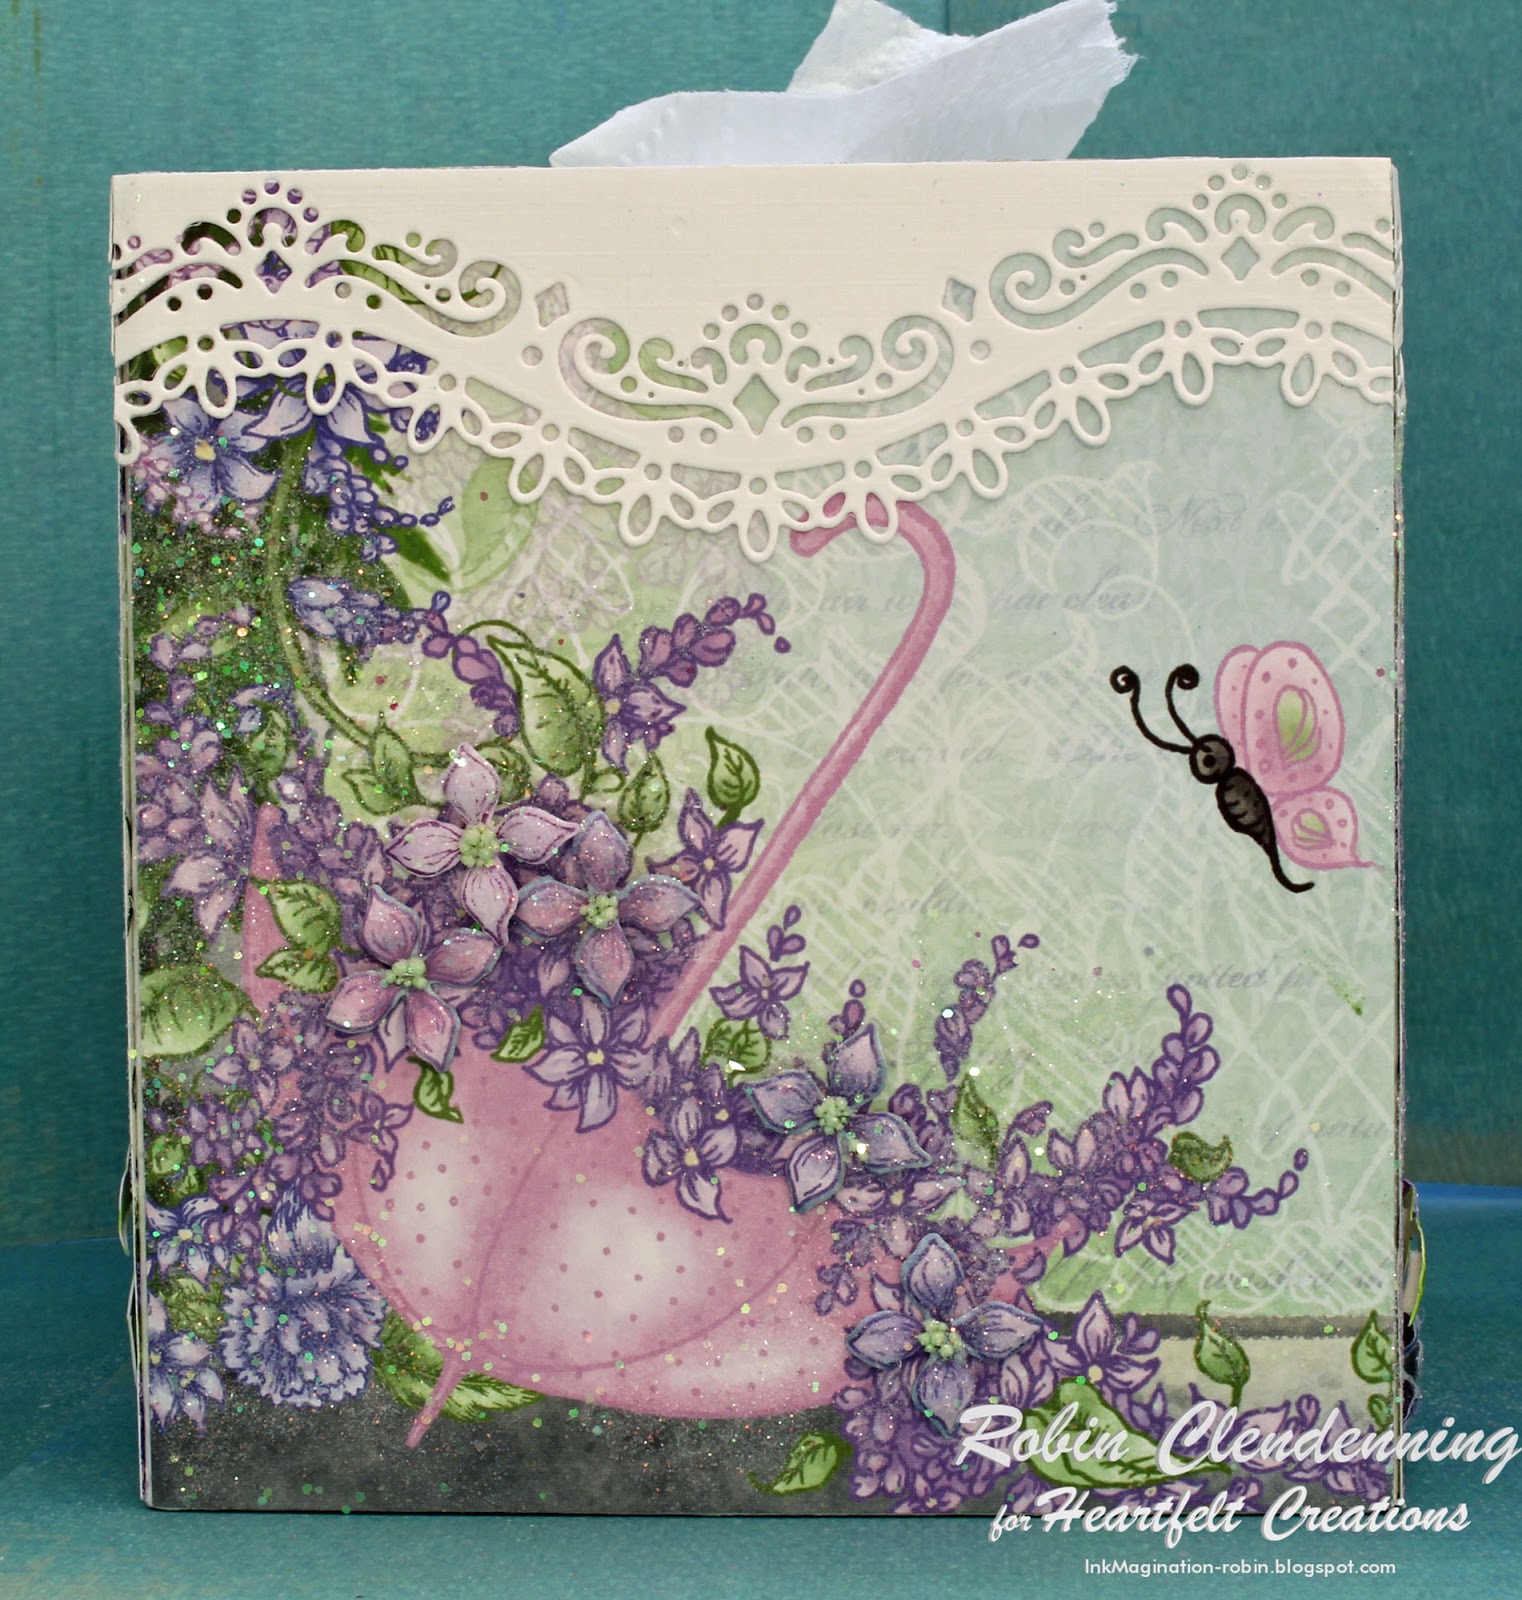
My second card is done with the Frame a Card Leafy Borders Set and the Lush Lilac


HC PRODUCTS USED      
HCPP1-475    DeluxeFlower Shaping Paper Pack pf 50-White
HCPC-3816    LushLilac Stamp Set
HCPC-3818    LushLilac Scroll & Notes Stamp Set
HCD1-7170    LushLilac Die
HCD1-7172    LushLilac Scroll & Cage Die
HCDP1-287    LushLilac Paper Collection
HCFB1-466     3DLush Lilac Shaping Mold
HCD1-7193    LeafyAccents Die
HCPC-3835    LeafyAccents Stamp Set
HCFB1-467     3DLeafy Accents Shaping Mold
HCD2-7190    Framea Card Leafy Borders Die
TSMP900       Tuxedo Black
RACP436        LeafGreen Archival Ink
RACP962        FernGreen Archival Ink
RACP494       Majestic Violet Archival Ink
RACP430        DeepPurple Archival Ink
352854          Metal Tip for Adhesive Bottle
159723          Dries Clear Adhesive
PGM15015    RajniChawla’s Crystal Clear
ANC814         Lettuce Entertain You Prills

Other Products:
White cardstock, pearls, Copics: YG61, G82, V12, V15, E50, E21, E33, E53, E35.

For more tips on creating with the flower shaping molds, watch the tutorial at https://youtu.be/FSdPL7nXvQE

Instructions:
Card size: 5 3/8 X 7 3/8”.  Cut white cardstock 7 3/8 X 10 3/4", score and fold in half.  Cut a piece of decorative paper 5 X 7”. Cut two 5” Leafy borders with insets, cut two 7” Leafy Borders with insets.  Form the frame on top of the 5 X 7” decorative paper.  Cut another piece of decorative paper to fit inside of frame then glue inside of frame.  Glue frame to card front.   

Stamp Lilac branch and scroll using black, stamp the sentiment onto scroll using black, die cut and color.  Stamp Lilac blossoms using Deep Purple and Majestic Violet.  Stamp leaves using Fern Green and sponge with Leaf Green and Majestic Violet, die cut and shape in mold.  Glue green Prills to the centers.

Glue scroll to paper inside the frame and glue branch to outside, going into the inside.  Glue Lilac blossoms to cover branch and aa few around the scroll.  Add more leaves to the top portion of the Lilac blossoms.

Add pearls to the corners of the frame.  Glue glitter to all the flowers.

Thanks for visiting today!!
Robin

John 3:16 New King James Version (NKJV)

16 For God so loved the world that He gave His only begotten Son, that whoever believes in Him should not perish but have everlasting life.
We cannot make ourselves perfect enough to enter heaven, did you know that?
But we don't have to because God provided a way for us Himself.  He sent His son Jesus the Christ to take the punishment for sin [for everyone who will believe] Himself so that He could provide, as a gift, a way to Himself and heaven.
All we have to do is believe that Jesus died for us, that He was raised from the dead [defeated death] and confess Him with our mouths as our savior, and accept Him as our Lord [boss]. 
It may sound too easy to you but in reality, living to please Him (because He is our Lord) is not easy.  Our flesh fights us everyday wanting it's own way.  But God gives us strength, He gives us His Holy Spirit to help us day by day.  He knows we are weak, frail humans and our lives pass by in a blink of an eye (compaired to eternity). He helps us day by day and He is with us.  He said He would never leave us nor forsake us.  Go to Him now in prayer and make Him your Lord and savior.
He said that there is nothing you have done that is too hard for Him to forgive and cleanse, He can lift that weight of sin off of you, go to Him.

Tuesday, September 17, 2019

HC Daydream Asters

Good morning!
I have another sweet Aster card today.


HC PRODUCTS USED      
HCD1-7257    Wild Aster Die
HCPC-3887    Wild Aster Stamp Set
HCD1-7258    Wild Aster Scroll & Cluster Die
HCPC-3889    Wild Aster Scroll & Cluster Stamp Set
HCD2-7192    Eyelet Lace Frames Die
HCDP1-2100  Cherry Blossom Retreat Paper Collection
HCDP1-2106   Wild Aster Paper Collection
RACP436        Leaf Green Archival Ink
RACP962        FernGreen Archival Ink
RACP494        Majestic Violet Archival Ink
PGM15015    Rajni Chawla’s Crystal Clear
ANC818         GoMan Go Prills
352854          MetalTip for Adhesive
159723          Dries Clear Adhesive
HCST1-401    DeluxeFlower Shaping Kit
HCPP1-475    Deluxe Flower Shaping Paper Pack of 50-White


Other Products:
Chipboard, white cardstock , blue cardstock

For more tips on creating with the flower shaping molds, watch the tutorial at https://youtu.be/FSdPL7nXvQE

Instructions: 
Card size: 5 1/8 X 7 1/8”.  Cut white cardstock 7 1/8 X 10 1/4 then fold in half.  Cut the Eyelet Lace Frame out of white and also a piece of chipboard.  Glue the 2 die cuts together.  Using the same die, cut the bridge scene from the Cherry Blossoms decorative paper.  Cut a piece of blue cardstock to 5 X 7” then glue it to the card base.  Cut a piece of Aster lavender paper to 4 3/4 X 6 3/4" then glue it to the blue.  Glue frame to the lavender paper then glue the bridge scene to the inside. 

Stamp asters using Majestic Violet, sponge with the same, die cut and form.  Stamp the leaves using Fern Green, sponge with Leaf Green and Majestic Violet, die cut and form.  Glue 3-4 blossoms for each flower together then add yellow Prills to the centers.    Cut sentiments from the Aster paper and then arrange them with the flowers and leaves left bottom and top right on frame.

Randomly glitter card and also glitter the flowers.

I also have another Lilac and "Frame A Card" card for you.


The Lord's Unfailing Love Lilac card.

HC PRODUCTS USED      
HCD1-7226      Diamond Basics Die
HCD1-7227       EyeletDiamond Die
HCD2-7190      Frame A Card Leafy Borders
HCD1-7170      Lush Lilac Die
HCPC-3816      Lush Lilac Stamp Set
HCPC-3817      Lush Lilac & Umbrella Spray Stamp Set
HCD1-7171      LushLilac & Umbrella Spray Die
HCDP1-287      LushLilac Paper Collection
HCFB1-466       3DLush Lilac Shaping Mold
Deluxe Flower Shaping Paper Pack of 50-White
HCPC-3763     Courage and Strength Stamp Set
RACP436         Leaf Green Archival Ink
RACP962         Fern Green Archival Ink
RACP494         Majestic Violet Archival Ink
RACP430        Deep Purple Archival Ink
TSMP900       Tuxedo Black Memento Ink
352854           Metal Tip for Adhesive Bottle
159723           Dries Clear Adhesive
ANC814           Lettuce Entertain You Prills

Other Products:
White cardstock, pearls, foam sheet, Copics: V12, V15, BV00, BV02, YG03, YG17

For more tips on creating with the flower shaping molds, watch the tutorial at https://youtu.be/FSdPL7nXvQE

Instructions: 
5 1/4 X 5 1/4".  Cut white cardstock 10 1/2 X 5 1/4", score then fold in half to make a square card.  Use the 5” frame die with insert 4 times and glue together on top of a piece of decorative paper 5 X 5” to form a square frame then glue it to the card base.

Stamp the sentiment onto white cardstock using Deep Purple then die cut it with the Basic Diamonds.  Fill in letters with a violet fine tip pen or fine paint brush and ink. Cut a smaller Diamond from a foam sheet and glue it to the back of the sentiment Diamond.  Cut a slightly larger Eyelet Diamond for a mat to sentiment then glue it to the foam Diamond then onto the card.  Add pearls to the 4 frame corners.

Stamp  Lilac spray and 2 small Lilac branch clusters using black, die cut then color with Copics.  Stamp Lilac blossoms with Deep Purple and Majestic Violet, sponge on color, die cut then shape in the mold.  Add green Prills to the center of each.

Glue a Lilac branch cluster to each side of the Diamond sentiment at the bottom and glue the spray to the top left of the Diamond.  Glue individual Lilac blossoms over branches and spray then glitter all flowers sponging glue on and then sprinkling with glitter.

Thanks for visiting today!
Robin
Matthew 25:35-40
35 for I was hungry and you gave Me food; I was thirsty and you gave Me drink; I was a stranger and you took Me in; 36 I was naked and you clothed Me; I was sick and you visited Me; I was in prison
and you came to Me.’37 “Then the righteous will answer Him, saying, ‘Lord, when did we see You hungry and feed You, or thirsty and give You drink? 38 When did we see You a stranger and take You in, or naked and clothe You? 39 Or when did we see You sick, or in prison, and come to You?’ 40 And the King will answer and say to them, ‘Assuredly, I say to you, inasmuch as you did it to one of the least of these My brethren, you did it to Me.’


Wednesday, March 7, 2018

Heartfelt- Lilac Tissue Box Holder

Good morning!

This lilac collection is my favorite, but then I DO LOVE purple!
 The paper is just gorgeous and it really serves well
for this tissue box!
What a great gift to a friend especially one who is
sick and may need a little lift.
I don't like to have a cold but if I did I sure would like to receive
 something like this from a good friend!


Heartfelt Creations products used:
   

Other Products:
3-M foam tape, Copic Markers: E50, E21, E51, V01, V12, V15, YG03, YG23, YG17, R20, R21, B00, B21, B23, B24.  Spellbinders Scallop Oval and Oval dies, paper mache tissue box holder

For more tips on creating with the flower shaping molds, watch the tutorial at https://youtu.be/FSdPL7nXvQE.

Instructions:
Piant paper mache box white on all corners and inside oval opening.  Cut panels from Lush Lilac decorative paper for each side and the top (to get proper placement of oval opening on the top panel of paper, place paper on the table good side up, place tissue box holder upside down on top of paper and draw a line inside oval opening then take the paper out and die cut opening).  Spread good adhesive onto each side, one at a time, with a paint brush to make sure it is completely covered then place paper on adhesive and smooth until dry, do this for each panel of paper.  Cut border from white linen and cut to fit making sure to cut each side the same so that the corners match up.  Die cut scalloped oval and oval frame out of white linen for the top of box and glue in place.   Sponge randomly with glue on all sides and top then sprinkle Crystal Clear on all the glue.
Stamp and die cut scroll, blossoms, Lilac flowers and birds using purple ink for flowers and scroll and blue ink for birds.  Color with Copics or sponge color onto die cuts.  The Lilac blossoms were die cut directly from decorative paper so they are already colored.  Place some of the Lilac blossoms onto blossoms in the paper design.  Place scroll with sentiment on the front side with foam tape and add some Lilac blossoms.  Pick a side with less design and foam tape birds and Lilac Flower stem to it then add more Lilac blossoms.  On the side with the house, add a Rain Boots & Blossoms Lilac stem and flowers to it with a few Lilac blossoms as well, (see photos for placement).

Thank you for visiting today, I really appreciate your time.
Robin

Psalm 139:13-16
13 You made all the delicate, inner parts of my body
    and knit me together in my mother’s womb.
14 Thank you for making me so wonderfully complex!
    Your workmanship is marvelous—how well I know it.
15 You watched me as I was being formed in utter seclusion,
    as I was woven together in the dark of the womb.
16 You saw me before I was born.
    Every day of my life was recorded in your book.
Every moment was laid out
    before a single day had passed.

Have you ever seen that fast motion video of a baby in the womb from conception to birth?  It is fascinating!  Watching the baby form and heart beat, eyes, ears, little fingers and so cute seeing the baby put his thumb in his little mouth, yes, still in the womb.
God has a plan for each and every life, life is so precious!!! 

Wednesday, February 28, 2018

Heartfelt- Beautiful Birdcage Encouragement

Good morning!

When you need to give a friend a lift what could be better than a handmade card
with scripture tags that they can take out and maybe put in a book or Bible 
as a reminder of God's goodness and love for them?
My card today is just that, a card of encouragement for friend or family
who just needs a bit of lifting.
I love encouraging people, it is just in me to want to
see others succeed, to want to see them have peace and strength
to get through whatever they face.  Whatever the encouragement
needed, I like to give it, so this card would go to a sweet friend who
maybe just needs to be reminded that they are special and
God has them in His capable hands.


HC PRODUCTS USED      

Other Products:
Grape Jelly Memento, Pretty Petunia VersaMagic, white card stock, pearls

For more tips on creating with the flower shaping molds, watch the tutorial at https://youtu.be/FSdPL7nXvQE.

Instructions:
Card size: 5 X 7”, fold 5 X 21” Flipfold insert in an accordion style (mountain, valley, mountain, etc.).  Add decorative paper to 3 front sections then glue all sides together leaving a 5 X 7 folded card at the back (do not glue tops as these are pockets).  Fold and assemble 4 3/8 X 3 1/8” shadow box.  Place a decorative panel inside (I chose one with birds), stamp, color and die cut birds from the umbrella handle of the Song of Spring stamp and die set then foam tape them inside shadow box.  Cover front of shadow box with another decorative panel then with bird cage cut from white and decorate with pearls.   Cut 2 white Window Box Elements and glue to first and second pockets all the way to the right then glue shadow box to card on the left.
Make 2 tags from two different paper panels in the paper pack and using Wisteria or Grape Jelly, stamp them with some encouraging scripture.  Punch holes, re-enforce with re-enforcer die from Luggage and Tags and add ribbon.  Stamp, color and die cut blossoms using Wisteria or Grape Jelly ink and Lulu Lavender ink to color.  Add the blossoms to bottom right side to decorate and then add Prills to fill.

Thanks for visiting today!
Robin


Matthew 22:37-39 (NKJV)

37 Jesus said to him, “‘You shall love the Lord your God with all your heart, with all your soul, and with all your mind.’ 38 This is the first and great commandment. 39 And the second is like it: ‘You shall love your neighbor as yourself.’
Loving your neighbor as yourself is not always easy but can you imagine if everyone followed Jesus example...wow, what a wonderful world this would be.  Well, not everyone does but, let it begin with me.
Another thing to think about regarding this verse and others like it...your own family, husband, kids, in laws...do we practice this with them too?  Sometimes the people we are closest to we do not treat as the brother or sister in Christ like we  should, or like we would treat... our friends at church...are we REALLY living like Christ or just acting like it when we are with other followers of Christ?  Practice your love, joy, peace, kindness, goodness, self-control, gentleness, patience and faithfulness at home first!