Pages

Comments are welcome and very much appreciated!
Showing posts with label bees. Show all posts

Monday, April 29, 2024

Product Focus-Patterned Paper

Hello crafty friends,
Today we are all about patterned paper.
One of my favorite patterns is plaid, I've used it with this beautiful rose set on this card.


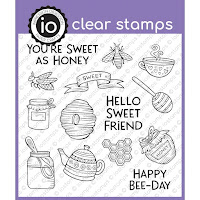
This new paper has a bee theme so I've used it with the Sweet as Honey set.


Thanks for visiting!
Robin


Monday, April 15, 2024

April Release Day 1

 Welcome to the April Release Hop!

April 15th -16th The Impression Obsession Team will be sharing projects with NEW April Release products! You can find a list of participants on the Impression Obsession Blog each day through the event.
Prizes - Two lucky customers who place an Impression Obsession order during the April Release week (April 15th – 22nd) will be chosen and will have a very special Impression Obsession prize package added to their orders!


        Robin Clendenning (me)


My second card features these beautiful butterflies, solid and outlines.
I also used a background piece made with glossy cardstock and alcohol inks.


And last is a card using one of the background stamps and also the beautiful roses.


Thanks for visiting today!
Robin


Friday, July 28, 2023

Impression Obsession Just Bee-Cause

Hello friends! 


Just Bee-cause I love you or just Bee-cause of no reason at all, this is a fun card to make and send.

I used the DIE1144-R Skeletal Structure to make a stencil for the bee background.  I stenciled on top of the PP048 Vintage Letters paper using Wild Honey Oxide Ink. I cut up the stencil I made and used parts of it on the corners of the card.  On the stenciled background, I stamped the large bee and bee sentiment from CL1239 Just Bee-Cause, using Versafine Claire black (it stamps nicely over Oxide Ink). I then cut it out with DIE837-YY Wacky Stitched Circles along with a black mat from the same dies.


On my next card, I used some of the same stenciled background paper and then stamped it with 3 bees from CL1239 Just Bee-Cause.
I used DIE975-V Cute Scalloped Rectangles to cut the bees out and then used the same die on black for the frame.  I then used 1 of the smaller rectangles to cut out the sentiment.
I was able to use some of the inner parts of the Skeletal Structure as embellishments.


Thanks for popping by!  Go get crafty!
Robin


Ephesians 4
...walk in a manner worthy of the calling to which you have been called, with all humility and gentleness, with patience, bearing with one another in love, 


Monday, July 24, 2023

Buzzin By

Hello friends,
Today is team favorites day.
I'm not really sure which set is my favorite but for today
I am going with these cute bees!
Sort of reminds me of Wednesday Addams as well if you've seen that Netflix limited series.

So, this first card has lots of texture, starting with the pink corrugated stock, multiple layers, and then pearl trails.


Thanks for visiting today!

Robin


Friday, April 15, 2022

Facebook Talent Tutorial at Amazing Paper Grace Creative Encouragement

 Good morning!

Dies used: S6-174 Romantic Chargeour and S4-982 Cinch and Go IV

Please go to the Facebook page HERE for the step by step (with photos) exclusive tutorial.

Wednesday, July 4, 2018

Heartfelt Creations Bee Bungalow Ornament


Good morning!

This morning I've got a cute little Bee Bungalow ornament to share.

It started as a bird house from a template made smaller.


HC PRODUCTS USED      

Other Products:
Gold half balls, acetate, twine, white card stock, Copic markers: YR27,YR15, BG10, Y32, YR24, Y11, E31, E33, E35, E37, W02, W03, W05, YGO3, YG23, YG17, C03, C05, Distress Ink-Wild Honey

For more tips on creating with the flower shaping molds, watch the tutorial at https://youtu.be/FSdPL7nXvQE.

Instructions:
Ornament size: 4 1/4 X 3 1/4” Start by making a narrow birdhouse type box  that will be small enough for the Bee Bungalow to cover the front of it. Use a piece of pale yellow decorative paper to cover it stamping it with the honeycomb first using Wild Honey Distress Ink. Insert a piece of twine at the top for a hanger.  Stamp 2 Bee Bungalows with Tuxedo Black Memento Ink, die cut and color with Copics (or favorite coloring method).  Stamp the small bees, die cut and color.  Stamp Lilacs with Majestic Violet and Wildwood Florals with Buttercup and Vibrant Fuchsia, die cut, color with sponges and ink color stamped with.  Use the Lilac Flower Shaping mold for the Lilacs and the Deluxe Flower Shaping kit for the Wildwood Florals to shape flowers.  Inset stamen in the Lilacs and Use Prills for the Wildwood Florals in the centers.
Cover box sides and roof with the stamped decorative paper then glue bungalows on front and back…glitter Bungalow except window with Crystal Clear then glitter windows and bee’s wings with Ultrafine Crystal Transparent.  Glue strips of acetate to the back of bees.   Now start decorating the front and back of box with flowers, bees and the gold half balls (door knobs).  Use the Twine hanger to hang ornament on an ornament hanger or on whatever you desire.


Wednesday, June 20, 2018

Heartfelt Creations You Are Bee-utiful

Good morning dear friends!

Here is another sweet Bee Maiden
card, they are so cute!

I've used the hexagon for the sentiment.

 
This is a gatefold type card with the maidens interlocking
But I've also made a band closure to go with it to help 
keep it closed, it slips on and off.

I've added a few mini 3D coneflowers in purple
made with the Classic Sunflower.

.

HC PRODUCTS USED      

 Other Products: 
White Linen card stock,  bright white Neenah smooth card stock, Pearl halves, Copics: Y32, Y11,Y15,YR24, Y38, YG03,YG05,B00,B01,B02,E00,E01,E93,C01,C03,C05,E42,E43,E44,E50,E31,E34,E37,E29,R81,R83,R00. Green card stock

Instructions: 
Card size: folded 6 1/4 X 4 1/4”  Open: 6 1/4 X 12 1/2” Start with 2 pieces of 8 1/2” X 5 1/2” card stock and score each at 2 1/8”, 4 1/4” leaving the last 4 1/4” un-scored on both.  Cut about 1/8” off of one of the pieces at the un-scored 4 1/4” side.  This one will be glued to the top of the other 4 1/4” piece on the other panel (make sure to turn one around so that each has the 2 1/8” scored part on the ends).  Fold on the score lines making a hinged gatefold closure.  This allows for the entire card to be viewed while open, on a normal gatefold card you would not see the front when you open the card to view the inside.  Cut decorative paper from the Sweet as Honey Paper Collection to fit on each panel leaving about 1/8” border around each.  Cut 2 Sweetheart Borders and one Festive Holiday die from white linen.  Fold each Sweetheart Border in half so that each side is the same and is even on the upper edge.  Place the fold on the first fold of the “gate” and measure from there to cut off both ends, this way the edges will be matched and even while closed.  The inside ends should meet the Festive Holiday die for a continuous border. Set this card base aside.
Stamp, die cut and color two Bee Maidens, 5 little bees, 1 Bungalow, Backyard Blossoms, Classic Sunflower, and Wildwood Florals (the images are colored with Copics except for the Wildwood Florals, they are stamped and color sponged with the Archival Tiger Lily, Buttercup and Magenta).  Form the smallest Sunflowers to make them into Coneflowers and use glue to build up the centers with Prills, glue a wire in the center and set aside to dry thoroughly.  Form the Wildwood Floral smallest blossoms and add Prills to the centers.  Glitter the wings of all bees and the flowers.  Add pearls to the border.  Stamp and die cut sentiment using the hexagon dies. Decorate the card base with all the images and flowers.  The Bee Maidens each hang over the first fold, one on each side so that when closed they meet in the middle (make sure they coordinate so that the card closes properly).  They have foam tape on one side only so they don’t stick to anything when completely closed.
Make a band using white card stock 1/2” X 8 1/2”.  Fold so that there is a 4 1/2” part in the center.  Glue ends together and having the seam at the top (it will be covered with the decorative hexagon later).  Cut a piece of blue decorative paper the same size and cut 2 more Sweetheart Borders.  Glue (top of band only) Sweetheart  Borders, one on top and one on the bottom then trim ends.  Cover band with the blue decorative paper ending with the seam on top in the middle.  Die cut Be Happy honey jar from decorative paper with the hexagon die and make a mat for it.  Add hexagon medallion to center of band to cover seams.  Add pearls to band.  Close card and slide band on from the bottom up to first Bee Maiden to keep card closed.  

Thanks for visiting today!
Robin


Psalm 68:4-5 New King James Version

Sing to God, sing praises to His name;
Extol[a] Him who rides on the [b]clouds,
By His name [c]Yah,
And rejoice before Him.
A father of the fatherless, a defender of widows,
Is God in His holy habitation.