Hello crafting friends!!
Today we have some cute love birds. This could be for an Anniversary or a new baby, maybe even a wedding gift card.
Instructor/Designer: Paper Arts, Rubber stamper, Scrapbook maker. Cards and scrapbook pages
Hello crafting friends!!
Today we have some cute love birds. This could be for an Anniversary or a new baby, maybe even a wedding gift card.
Hello crafting friends!
Look at this cute round easel card. I used the beautiful bird Christmas paper to start this beauty then added 3D poinsettias.
Hello crafting friends!
Today I'm sharing an easel card made with a shaped die. And this release we have a beautiful robin.

Good morning crafty friends!
Card size: 6 X 6”
Cut a Simple Centerpiece card base using
the largest die in the set on white cardstock. Score right side at 3” then fold
down toward center fold, crease with bone folder then open flat. Cut another
card front from white cardstock with the same die. Glue this piece to the bottom
half only of the 3” scored side (all edges should match. This forms the easel
base.
Cut green and lavender decorative paper for
the front and inside of card using the same large Simple Centerpiece die. Glue the inside piece onto card but wait on
the front. Use the lattice insert curvy
Accent die to cut through front decorative paper piece at an angle. Cut it again from silver then glue the silver
under the decorative paper off set so that silver shows. Trim any excess silver from edges of Centerpiece
die cut. Glue a piece of lavender
decorative paper under lattice opening then glue the card front to the base
front.
Make 2 silver Octagon frames using the largest
Simple Centerpiece die along with the next die in size together. Pop up the top/front silver frame and glue
the inside silver frame to card.
Use a small oval die to cut a piece of
silver and a piece of Fun Foam. Glue these together then glue to the inside of
card to create a stop to keep easel card open (for best results this piece
should be almost at the bottom of the inside).
Stamp Feathery Florals using black on white
cardstock, die cut then color. Shape on
the back using the largest ball stylist in the Deluxe Flower Shaping Kit. (Use
pop ups under flowers and some leaves).
Adhere larger floral to the front of card on the right side and glue/pop
up smaller floral on top of the silver oval inside card.
Stamp Wild Rose using Deep Purple onto
Deluxe Flower Shaping Cardstock. Sponge with Deep Purple, die cut then sponge
edges again and use the shaping mold to form flowers. Glue 2 of the same size blossoms together to
make flowers and then fill with Prills.
Glue 3 on the front with Feathery Florals and 2 inside.
Cut one of the strip sentiments from
decorative paper, line with silver, fish tail both ends then use a pen to make
a wave. Glue it to the front at an
angle.
Good morning!
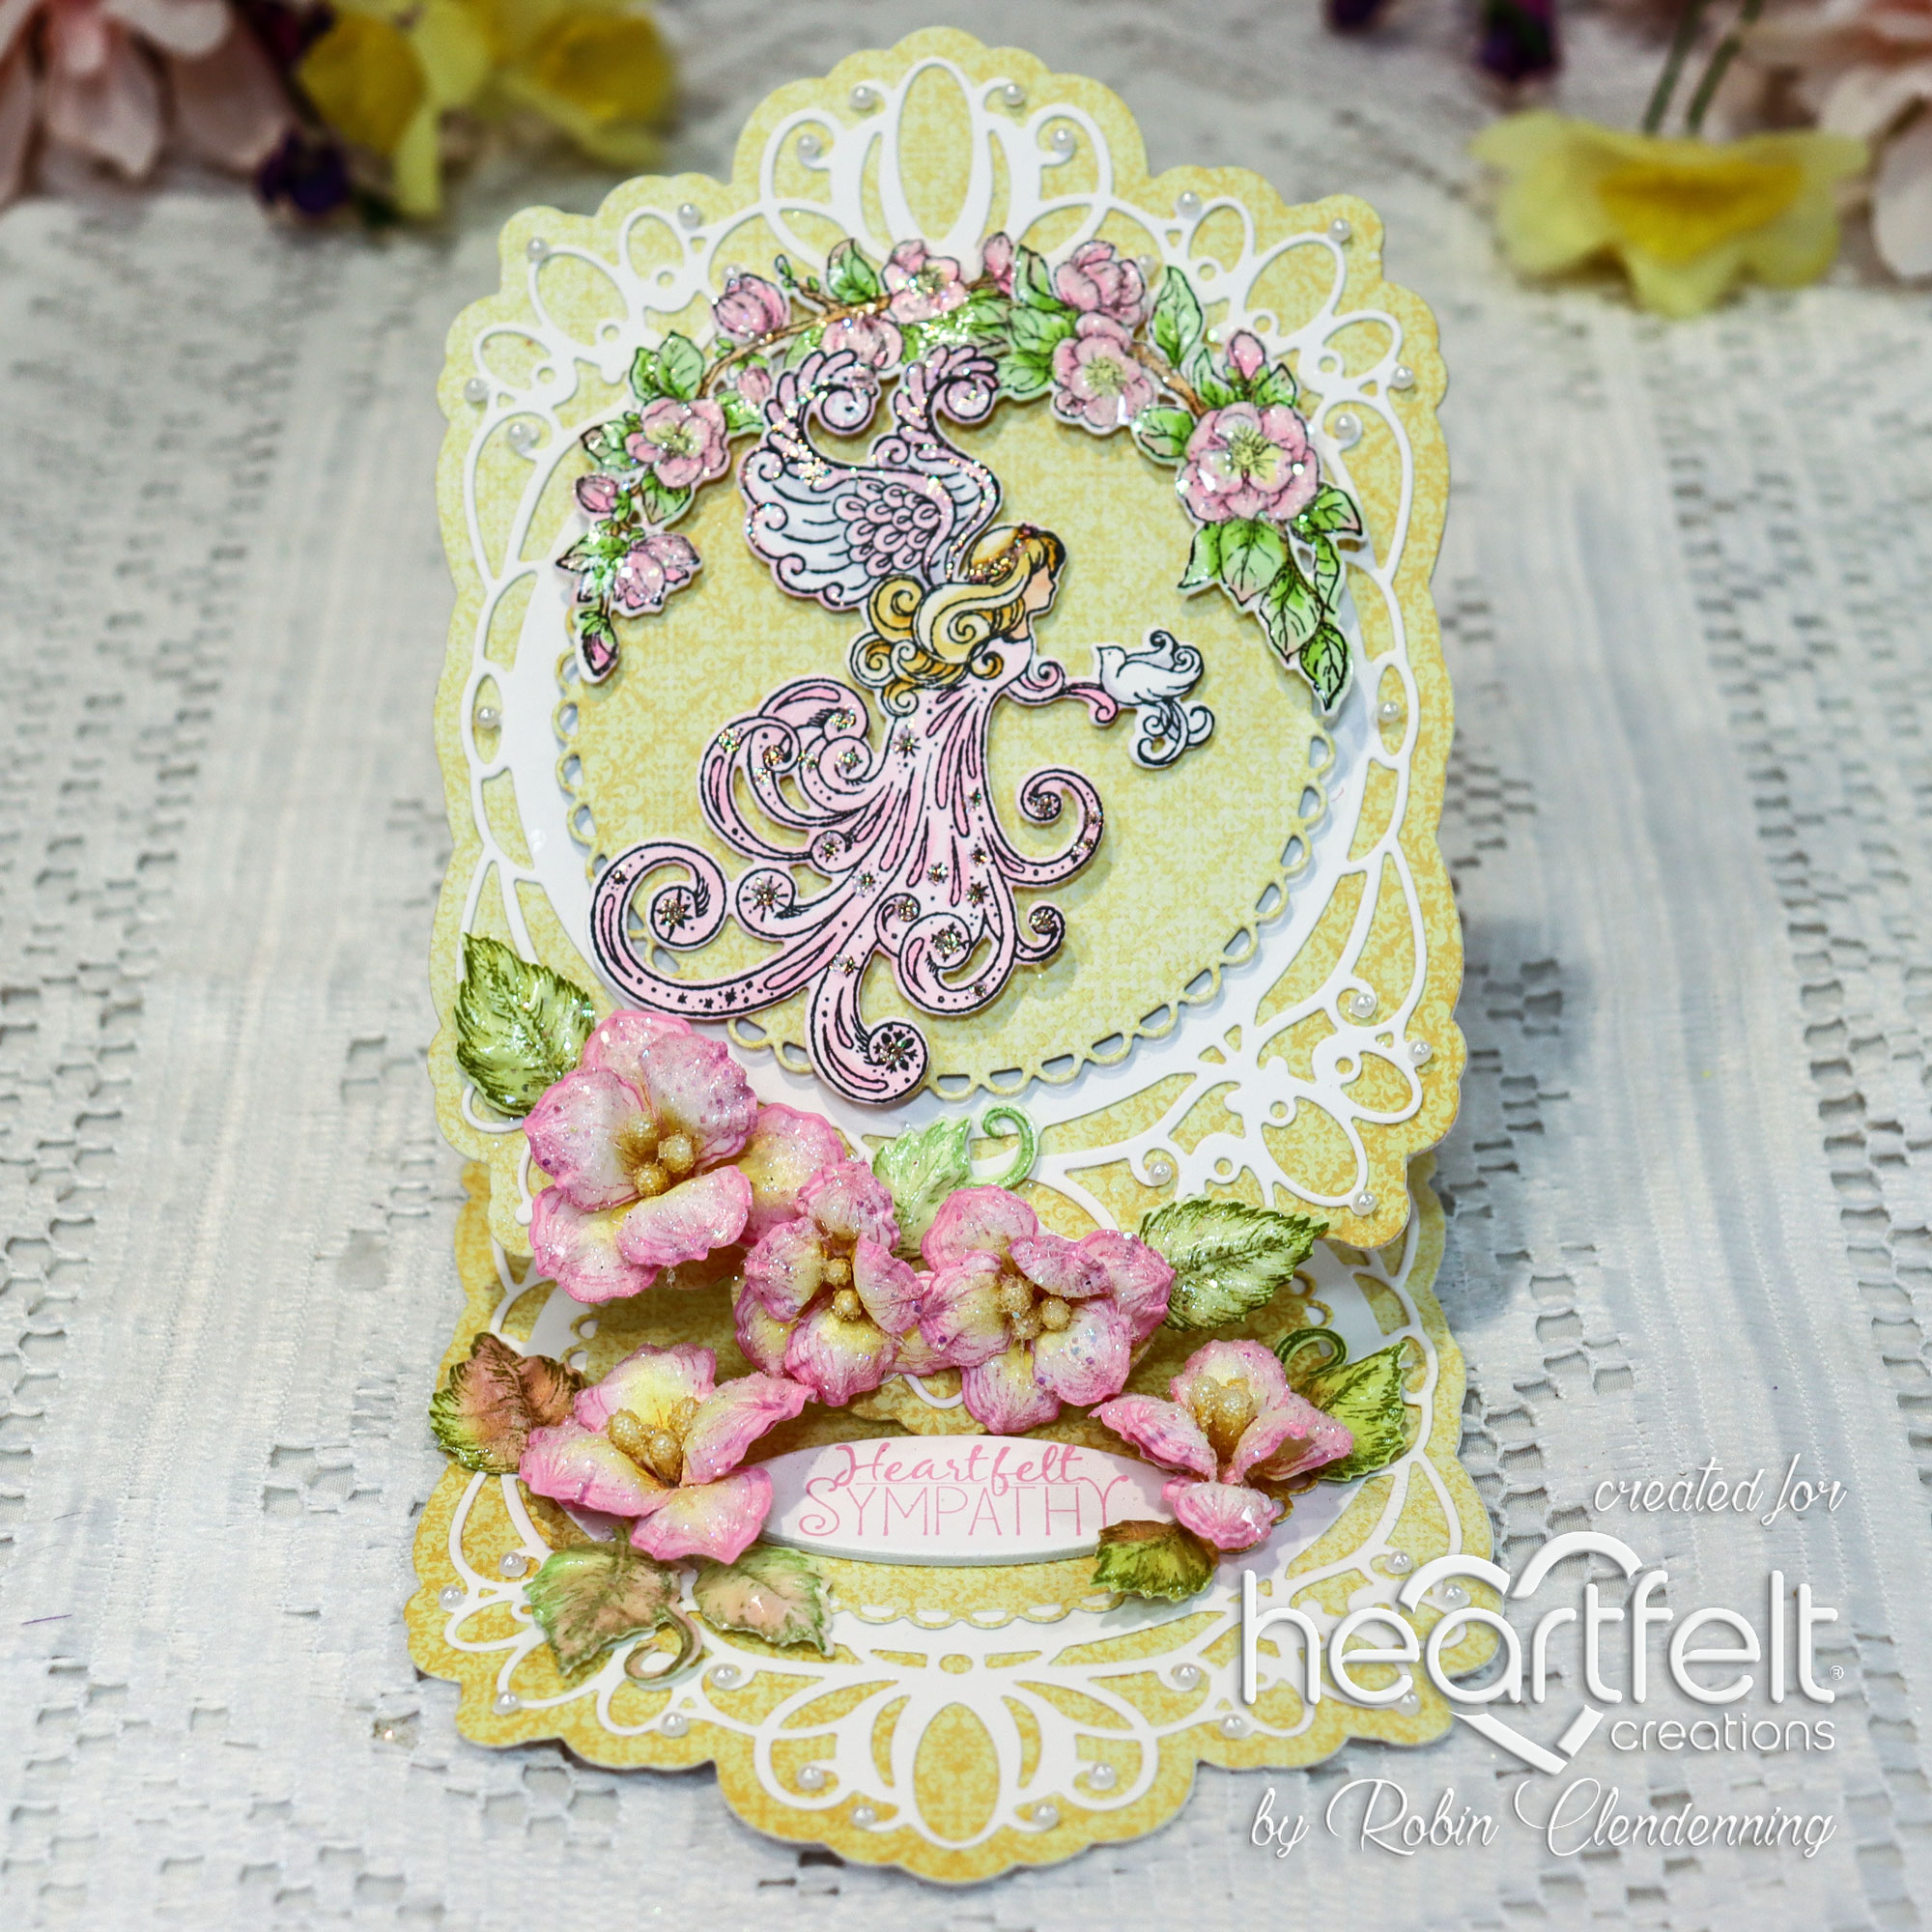
Today I've made a card that is actually very unusual for me, it is a sympathy card. I made a couple of these recently and I hope that it brightens someone's day even a little bit.
Card size: 4 5/8” X 6 5/8”
Make a shaped card by placing the outer die
of the Decorative Circle Frames over the fold of white 12 X 5 piece folded in half at the top,
(it will hang over the edge about 5/8” in this case, see video for further
instruction). On the top half of card
only, score at the center (from the fold it should be about 2 9/16”, it will be
3 3/8” if measuring from the outside edge of top (you can plainly see the
center of the decorative die when it is being scored, don’t worry that it is
not even on both halves. Fold the top
down toward center fold.
Cut another white front of card with the
same outer die then glue it to the front of card on the half that is folded
in. When the card is closed all edges
should match up. Cut 2 panels with this
same outer die from yellow decorative paper, glue one to the front and one to
the inside trimming the top as necessary to fit (do not glue over scored fold
as this makes it hard to close).
Cut 2 white decorative die cuts and 2 yellow
eyelet circles from the Decorative Circle Frames set. Glue one inside trimming at the top and glue
one on the front popping up the yellow circle on the front.
Stamp the angel with bird and Magnolia arch
with memento, die cut, color with Copics, shape slightly from the back and pop
up both on the card front.
Stamp Magnolia blossoms (medium and small)
2 times each using Pink Oxide Ink, sponge with pink on the edges then sponge
with yellow on the insides, form in the mold then glue 2 together for each
flower. Pierce the centers, insert light
yellow stamen, secure with hot glue then snip the wires in the back.
Stamp the leaves using Fern Green, sponge
with Leaf Green and Magenta Hue, die cut, mold then cut apart.
Stamp the sentiment using pink Oxide, die
cut with the small oval from the ovals large set, pop up on the yellow circle
inside of card. This will be the stop to
keep card open to display.
8 I have set the Lord always before me;
Because He is at my right hand I shall not be moved.
Good morning!