Pages

Comments are welcome and very much appreciated!

Wednesday, December 29, 2021

Introducing Garden Shutters


Don’t you love interactive cards? Amazing Paper Grace has added the Garden Shutters Collection for another fun element of motion. It creates a beautiful card and with one pull of a tab, the shutters open to reveal a delightful surprise sentiment on the other side! There are two card base sizes, A2 and 5 x 7-inch, to choose from. Each card base set has all the elements you need to assemble and embellish a card! Which catches your eye? 

Today's projects were created with dies provided by Amazing Paper Grace.

My Projects for Today


I made a shutter card with butterflies on one side and the sentiment on the other side that opens.  It is so cute!  Love how it opens and closes.
 
Designers Tip: Putting spacers between layers would definitely help
 
Garden Shutters Availability:
These dies and plates are available from Spellbinders right now! Click here: Garden Shutters Collection.

Supplies: Patterned paper, white cardstock, various colors cardstock for butterflies, ribbon, pearls, foam adhesive.
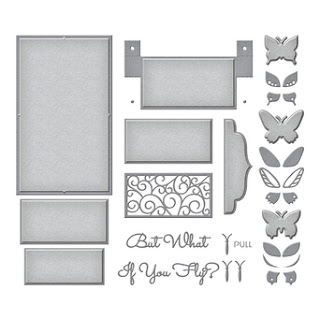
Accessories: 
S6-183 Butterfly Bliss Garden Shutter 5X7 Card Base, S6-184 Eyelet Lace Frame
Paper: Graphic 45


For more Garden Shutters Collection Inspiration

Visit each Creative Team blog linked below for their take on creative paper crafting ideas using the Garden Shutters Collection!


But wait, there's more!  Are you curious how it goes together?  Be sure to drop by amazingpapergrace.com/blog on 12/30/21 for a detailed video on how it goes together as Becca makes a card.

Follow me on Instagram!


Tuesday, December 28, 2021

Moments


Good morning!
I have another time piece for you today!
You can find the Material List HERE

Card size:  6 X 6”.

Start with a folded 6 X 6” heavy weight card.  Cut 1 6 X 6” card panel from the decorative paper with a circle in the center then cut the circle away with the circle die that fits but save the decorative circle.  Cut a slightly larger circle from the all-over small design decorative paper, se circle and circle cut decorative paper aside.  Go back to the 6 X 6” decorative panel and using a craft knife, cut away a square in the center leaving just the two 3/8” outside borders.  Cut the decorative Courtyard Elegance from gold Just the lattice square and cutting away circle from center.  Cut a piece of decorative pink paper to 6 X 6” then use the same circle die from Courtyard Elegance to cut the center of pink panel.  Stack panels (starting from top), the border panel, gold panel, pink panel then, all-over design, glue together in order.  Also cut a 6 X 6” foam sheet panel, cut away center with large circle die then glue under stack. 

On card front, glue the gold center circle of Courtyard Elegance to center of card then glue the foam backed stack to front (it should show the entire gold circle below).  Stamp the sentiment using Mulberry on the decorative paper circle you saved then glue it on top of the gold circle already glued in (the gold only shows from an angle but it still adds a nice finishing touch).   Glitter the sentiment circle and card front using Ultrafine, trying to avoid the gold paper.

Stamp Wild Roses on Deluxe Flower Shaping Paper using Mulberry, sponge with Magenta Hue, die cut then shape in the 3D mold, misting paper with water.   Before paper dries, squeeze petal ends pleating a bit.  Glue 3 flowers together per flower and use the Deluxe Flower Shaping Kit to make a “well” in the center of each flower before piercing with the Golf Groove tool and inserting gold stamen.   Use hot glue to keep stamen in place.  Add a bit of glue around outside of center well then sprinkle with gold Prills. Glitter flowers with Rajni’s Crystal Clear.

Stamp leaves using Leaf Green, sponge with Chartreuse, die cut, mist and shape in 3D mold.  Cut leaves apart into 2’s or 3’s.  Use lacquer and shimmer additive mixed to paint onto leaves.

Arrange leaves and flowers around bottom and left side of sentiment/image circle.

Thanks for visiting today!

Robin

A psalm of David.

Let all that I am praise the Lord; with my whole heart, I will praise his holy name. Let all that I am praise the Lord; may I never forget the good things he does for me.

Read Full Chapter

Monday, December 27, 2021

Thanks!


Good morning!

Today I'm using the Sweet Seranade Colledtion for this card.

I used some pink stamen for the center, inserting them using a wire "needle"
I made.
The paper is from Graphic 45  from my stash. Also used Ivory cardstock, a sage
green cardstock on this card as well as dark green and dark pink for the "Thanks".


I finished this card with a bow made from ivory satin ribbon.

Thanks for visiting today!  I hope you had a wonderful Christmas!!
Happy and healthy New Year to you!

Robin


Tuesday, December 21, 2021

Good Things

Good morning!
I was finally able to use just bits and pieces of the new time pieces 
to get this 1 of a kind card for a friend!
I love how the hands barely show under the beautiful
Clematis flowers and foliage.
Of course there is lots of gold trimming as well, everything
looks better with a bit of gold or silver, right?


Find the material list for this card HERE

Card size:  4 3/4" X 6 3/4"

Make a shaped card (see video) with the outer die of the Decorative Circles Frame.  Lay the die over-lapping folded top by about 1/4", also cut another full front piece to glue onto card base (purple used here).

Cut the inner decorative die out of lavender decorative paper and out of Gold Luxe.  Cut the largest eyelet circle from purple cardstock and from Gold Luxe, also cut a foam sheet circle to fit under stacked purple and gold.  Glue sets together off setting slightly. Cut the next eyelet circle out of decorative lavender paper. Glue to card starting with largest to smallest die cuts (one set is popped up).

Stamp the clock using Tuxedo Black onto white cardstock, die cut decorative circle out of clock and the clock face, cut a circle of foam sheet to fit clock face as well.  Stamp extra hands and die cut, die cut from gold as well.  Stamp sentiment and die cut. Color decorative piece and sentiment piece.  Glue the decorative circle to the lavender eyelet circle (should just barely show) then glue the foam circle and sentiment onto decorative circle.

Cut a gold scallop circle large enough to barely show under the clock face and cut a piece of foam sheet to fit as well.  Glue the gold hands and colored hands onto clock face over printed hands, glue the clock face, gold scallop circle and foam circle onto card up in the left corner. 

Stamp flowers using Majestic Violet on Deluxe Flower Shaping Cardstock, sponge with the same color, die cut then form in the shaping mold (see videos).  Finish forming with the Deluxe Flower Shaping Kit then glue 2 of the same size together per flower.  Insert white stamen (the larger flowers have the white bead stamen and the white pollen stamen.

Stamp leaves using Fern Green onto Deluxe Flower Shaping Cardstock, sponge with Leaf Green and Majestic Violet, die cut, sponge the backs then shape in the mold.

Use a hot glue gun or tacky glue to glue flowers and leaves onto left side of card up and over clock as well just leave part of it showing to give the idea of a timepiece to go with sentiment.

Glitter all the flowers and card front (try to keep glue off of gold cardstock).  Mix Shimmer Additive and 3D Lacquer together then paint onto leaves.

Thanks for visiting!
Robin
And while they were there, the time came for her baby to be born. She gave birth to her firstborn son. She wrapped him snugly in strips of cloth and laid him in a manger, because there was no lodging available for them.
 

Wednesday, December 15, 2021

Merry Christmas Facebook Tutorial

Good morning!

 This is my card for Facebook Talent at the Amazing Paper Grace Creative Encouragement page.

You can find all the step out instructions there.


Thanks for visiting and I hope you head on over to Facebook and check out my tutorial.

Robin
“Don’t be afraid, Mary,” the angel told her, “for you have found favor with God! You will conceive and give birth to a son, and you will name him Jesus. He will be very great and will be called the Son of the Most High. The Lord God will give him the throne of his ancestor David. And he will reign over Israel forever; his Kingdom will never end!”

Tuesday, December 14, 2021

Time We Share

 Good morning!  It's "time" for another time piece!!  I love this little clock with the alarm bells on top!  I did a little paper piecing on this clock to make certain parts gold.


You can find all the materials listed HERE

 Card size:  4 3/4" X 6 3/4".

Make a shaped card (see video) using the outer die of the Simply Classic Ovals, over-lapping the folded edge by about 1/4" then cut another full front with the same die on another piece of white cardstock.  Glue it to the card base.  Sponge the edges of card front with Cactus Flower.

Die cut the decorative dies (2 outer decorative dies together without the outer edge die) out of decorative paper and cut the largest plain oval out of Golf Luxe cardstock.   Glue the decorative paper on top of the gold oval then glue it to the card front.

Stamp the Simple Moments Timepiece using Cactus Flower on watercolor paper 2 times.  Stamp it using Fuchsia StazOn on Gold Luxe cardstock.  Stamp the Sentiment using Purple Delight on watercolor paper. Die cut 1 full watercolor paper clock using outer die then die cut the other 1 of the watercolor clocks using the circle that fits for the decorative inside of clock.  Die cut gold clock in full then die cut again the inner largest circle and the circle that is slightly larger than the decorative circle cut from watercolor paper. Also from the gold clock, cut off handle leaving only the outer circle, bells and gold hammer.  Glue these gold pieces onto the full watercolor paper clock.  Watercolor the outer ring of watercolor paper then glue the next gold circle onto clock face.  Cut foam for the next 2 sections, Watercolor remaining watercolor pieces (should be 2 circles, 1 being the sentiment), glue then to their foam circles the glue them to the clock face.  Pop up entire clock onto card base at the bottom so that legs of clock help balance card to stand.

Stamp leaves using Chartreuse, sponge with the same and some Cactus Flower, die cut, sponge the backs, shape in the mold.  Stamp roses using Cactus Flower, sponge with the same, die cut, sponge backs, shape in the mold. Finish shaping with Deluxe Flower Shaping Kit.  Insert 1 wired stamen then form roses around it in layers, making buds and small full bloom roses.  Make sepals with a small flower punch with pointed petals, wet then squeeze ends to make them more pointed, let dry then add to the bottoms of roses.

Starting with leaves and white pollen stamen, create an arrangement on both sides of the little round clock.  Glitter the clock and the flowers then using a mix of 3D Lacquer and Shimmer Additive, paint the leaves.

For the inside: Cut a piece of decorative paper using the outer die of Simply Classic Ovals.  Cut off the left edge about 1/4" to avoid the scored fold then glue it to the inside of the card.


Thanks for visiting today!

Robin

Isaiah 9:6

For a child is born to us,
    a son is given to us.
The government will rest on his shoulders.
    And he will be called:
Wonderful Counselor,[d] Mighty God,
    Everlasting Father, Prince of Peace.


Monday, December 13, 2021

Happy Holidays

Good morning!
I have a beautiful Christmas card to share today using
The Fluted Circle (S4-1150), the Flourished Sonata (S6-185), Mosaic Bracket (S5-464) and Merry Filigree (S5-461)
The paper I used was from a Memory Box Paper Pad.
I used a light sage green cardstock as well as white and some pearls for embellishments.

Thanks for visiting today!
Robin
Read Luke chapter 2 to prepare your heart for Christmas.


Tuesday, December 7, 2021

Time To Heal

 Good morning!  

It's "Time" to showcase the new Moments in Time Collection.


Find the material list HERE

 Card size:  3 5/8” X 6”.

Make a shaped card using heavy weight white cardstock, with the outer edge die of the Elegant Moments Die, over-hanging the side folded edge by about 1/8 inch. Make another full card front with the same die then glue it to the front of folded card.

Cut a piece of aqua colored decorative paper with the outer die, cut off about 1/8” from left side then glue it to the inside of the card.

Stamp, using Tuxedo Black, the Elegant Moments Timepiece X 2, onto white cardstock, die cut 1 with outer die and the other with the inner die then color the outer section of full timepiece and the inner section of the other timepiece.  Also stamp Sentiment using black, die cut with the 2 inner circle dies that fit.  Cut 2 pieces of foam, 1 for the inner timepiece die cut and 1 for the smallest sentiment circle.  Glue sections together popping up sections with foam.

Stamp smallest Classic Roses onto Deluxe Flower Shaping Cardstock using Deep Purple, sponge with the same, die cut sponge the backs then shape in the mold.  Make most into small buds using 2 smallest petals together, make 2-3 larger buds and 1 small bloomed rose. It is easiest to form around something so use a medium beaded stamen with wire for this then glitter the flowers.  Add a sepal at the bottom with a small punch or die cut flower that has pointed ends, wet punched pieces then squeeze ends to make them more pointed.

Stamp leaves with aqua colored dye ink, sponge with aqua and purple, die cut then form in shaping mold.  Cut leaves apart in groups no larger than 3.

Start forming arrangement at the bottom using leaves then add flowers on top of the leaves.  Paint the leaves with a combination of Shimmer Additive and 3D Lacquer.

Glitter the card front.

Thanks for visiting today!
Robin

Luke 2:16-20
16 They hurried to the village and found Mary and Joseph. And there was the baby, lying in the manger. 17 After seeing him, the shepherds told everyone what had happened and what the angel had said to them about this child. 18 All who heard the shepherds’ story were astonished, 19 but Mary kept all these things in her heart and thought about them often. 20 The shepherds went back to their flocks, glorifying and praising God for all they had heard and seen. It was just as the angel had told them.

Monday, December 6, 2021

Jingle All The Way

 Good morning!


Thank you Amazing Paper Grace for providing all these beautiful dies used on this card.

The paper used is from Graphic 45 also used cardstock: 2 greens, gold color, and ivory.
I used some red rhinestones for embellishments.

The Fluted frames are both popped up.  The sentiment was all one piece so I just did a bit of snipping
to separate the "Jingle" from "all the way" to go better and fit better on this card.

Thank you for visiting today!
Robin

Luke 2:10-14
10 but the angel reassured them. “Don’t be afraid!” he said. “I bring you good news that will bring great joy to all people. 11 The Savior—yes, the Messiah, the Lord—has been born today in Bethlehem, the city of David! 12 And you will recognize him by this sign: You will find a baby wrapped snugly in strips of cloth, lying in a manger.”

13 Suddenly, the angel was joined by a vast host of others—the armies of heaven—praising God and saying,

14 “Glory to God in highest heaven,
    and peace on earth to those with whom God is pleased.”


Saturday, December 4, 2021

Amazing Paper Grace Die of the Month for December


 The Enchanting Pocket Card, Tag and Envelope set has many different options to make your creations stand out! It is a sweet gift card-sized envelope that doubles as a card front pocket. The bonus is that there is a tag too that doubles as a label. The inspiration for this set comes from Becca’s love of giving gift cards! It can be used year-round, dressed up or dressed down, and themed for any occasion. Using the different inlay and insert designs, you can cut and make unique variations to keep the design fresh!
 
**Dies for my creations today were supplied by Amazing Paper Grace.**


There are 14 dies included in the Enchanting Pocket Card, Tag and Envelope. 


 My Project Today using Enchanting Pocket Card, Tag and Envelope.
I made a card first of all using Christmas colors since this is December and I also made a very cute gift tag envelope with a small card inside.


The small gift card


Designer Tip:  On the small gift card, offset the gold layer slightly under the red layer to get the extra wow factor.  The inside portion of the gift card is vellum.  I used the top of the Tag die to make the envelope for this gift card and for the tag inside the gift card envelope.
 
Small Gift Card inside


Supplies: Gold embossing powder, white satin ribbon, gold pearls
Accessories:  Amazing Paper Grace December 2021 Die of the Month – Enchanting Pocket Card, Tag and Envelope
Stamps:   SDS-169 Just A Note Sentiments & Tag
Paper: Red cardstock, white cardstock, gold cardstock, green cardstock, vellum
Ink: VersaMark with gold embossing powder.
 
For more Enchanting Pocket Card, Tag and Envelope Inspiration
Visit each Creative Team blog linked below for their take on creative paper crafting ideas with Enchanting Pocket Card, Tag and Envelope, the Amazing Paper Grace December 2021 Die of the Month!

 
The Amazing Paper Grace Die of the Month is available exclusively at Spellbinders Paper Arts during December 2021. Enchanting Pocket Card, Tag and Envelope at the special kit club price, along with other membership perks.
 
View this month's Amazing Paper Grace Die of the Month!  

Would love to hear from you! Comment on how you will use the dies!
 Follow me on Facebook!
Follow me on Instagram!

Thanks for visiting today!
Robin
Luke 2:8-12
That night there were shepherds staying in the fields nearby, guarding their flocks of sheep. Suddenly, an angel of the Lord appeared among them, and the radiance of the Lord’s glory surrounded them. They were terrified, 10 but the angel reassured them. “Don’t be afraid!” he said. “I bring you good news that will bring great joy to all people. 11 The Savior—yes, the Messiah, the Lord—has been born today in Bethlehem, the city of David! 12 And you will recognize him by this sign: You will find a baby wrapped snugly in strips of cloth, lying in a manger.”


Tuesday, November 30, 2021

Cyber Monday Special

 Good morning!


Inside
Find all the materials HERE

Card size: 4 3/4" X 6 3/4".


Cut 1 piece of white heavy weight cardstock 6 3/4" X 7 1/2", cut another piece 6 3/4" X 4”. Die cut the 6 3/4 X 4” piece on 1 end with edge die, point side out. Cut the other piece of cardstock on 1 end with the edge die, point side in. Score and fold the 6 3/4 X 4” piece and glue onto the other die cut piece (glue straight edges together) so that 2 halves meet and interlock (should be about a 1/2" tab on straight side).


Use medium pink decorative paper to cut both halves with decorative die plus edge die (both halves) and also cut a piece of the decorative paper for the card inside center at 4 3/8” X 6 1/2". Cut a piece of gold for the inside at 4 5/8” X 6 5/8”, 2 pieces for the outside 3 1/2" X 6 5/8” Die cut the 2 smaller pieces with the decorative dies plus edge die. Glue the pink onto the gold for inside and for outside, outside decorative die cut pieces will be off set just slightly so that halves still semi-interlock. Glue center stack to inside of card and glue outside decorative pieces to the 2 matching outside card base fronts. Use the 2 halves of the decorative die (without edge die) to cut a piece of white cardstock for the inside at 4 1/4" X 6 3/8”. Place the lattice looking bar at the “top” of inside.


Stamp the Elegant Rose Banner and the bird from the Cascading Petals collection using London Fog (if coloring with alcohol markers) if using water-based brushes or markers use other light-colored ink best suited for that. Die cut then color. For the Rose Banner, separately stamp sentiment using Magenta Hue then die cut with separate die piece (included with Rose Banner die). Also cut a piece of foam to go under the sentiment, glue together all pieces then glue to the center inside of card.


For the outside: Stamp smallest Wild Rose trio several times using Magenta Hue on Deluxe Flower Shaping Cardstock, Die cut, sponge edges and backs only, place in Shaping Mold then finish shaping with the Deluxe flower Shaping Kit, inside gold stamen then glitter flowers with Crystal Clear.


Stamp Leaves using Fern Green, sponge with Leaf Green, die cut then shape in mold. Cut leaves into leaf groups of 1 or 2.


Decorate the front: Round the back of the bird a bit with the largest stylist tool from the Deluxe Flower Shaping Kit, add dimensional to keep it popped up about 1/4" or so. Glue flowers and leaves of bird image top right. Add 5 roses to image then glue 2 more flowers with Leaves to the bottom right.


Glitter the bird and inside of card.


My next card features another of the Black Friday dies.
Find the Material List HERE

Card size: 5 X 7”.


Make a shaped card by placing the outer die of the Fancy Oval Frames off the fold at the top of a 5 X 7 card. Cut another front from white then glue it to the card base matching bottom and sides.


Glue together the plaid and a piece of floral decorative paper to make 5” X 7” then die cut it using the outer die. Make a strip about ¼” wide to cover the 2 papers meeting from pink cardstock then make a strip of white about 3/16” to go on top of the pink. Use the outer die with the next die in the set to create a border out of pink cardstock. Glue the decorative paper onto card front followed by the strips of pink and white then lastly the pink border. Adhere pearls to the narrow strip.


Cut the center oval and decorative oval from white, the oval again from pink and foam sheet. Glue the pink under the white oval and the decorative oval on top. Glue the foam sheet to the bottom then glue to the center of card front Either remove pearls from directly underneath or make a channel for the pearls in your foam.


Stamp, die cut and color the Elegant Rose Banner heart then stamp the Happy Anniversary in the center of the banner. Cut a foam sheet for the heart, glue them together then glue to the white oval.


Stamp roses using Magenta Hue, sponge with Pink Peony, die cut then shape in the shaping mold. Stamp leaves using Fern Green, sponge with Leaf Green, die cut then shape in the mold. Use the Deluxe Flower Shaping Kit to finish roses and layer them (see video). Glitter the flowers with Crystal Clear, lacquer the leaves.


Arrange roses and leaves around right side of rose banner. Glitter the card front using Ultrafine. Add a pink ribbon under flower arrangement. Add single pearls around the pink border.


Thanks for visiting today!

Robin
During this Christmas season don't forget why we have a Christmas season.
Read Luke 2 for the full amazing story about Jesus' birth, the Nativity.
Prophesied through the Old Testament, His birth changed history.