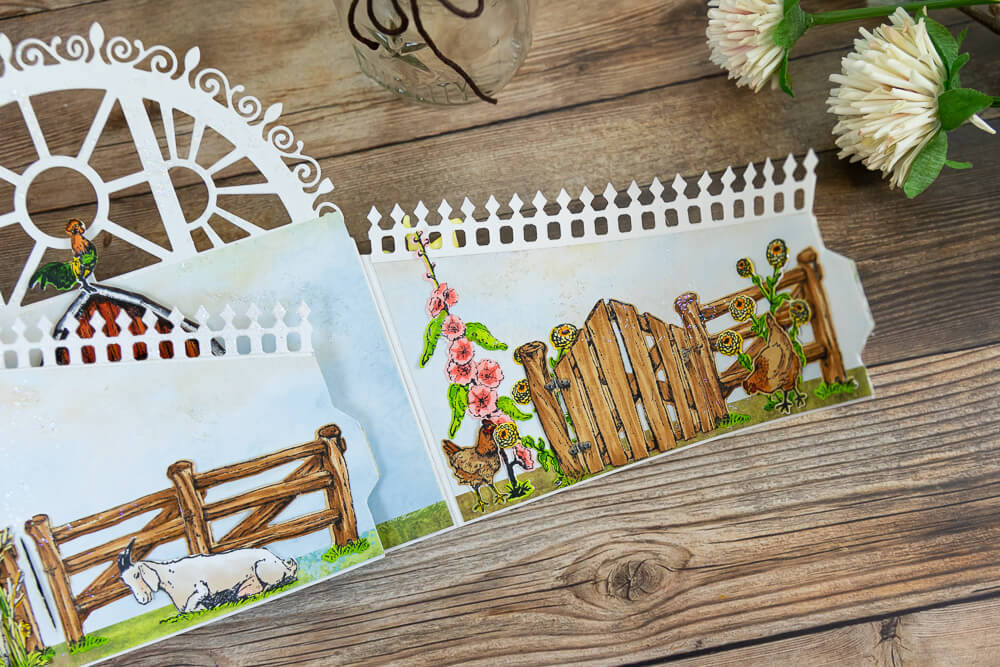
Pages

Comments are welcome and very much appreciated!

Wednesday, October 28, 2020

Farm By The Book

Good morning!
Today I made a book card.


Happy Meadows Die

Happy Meadows Stamp Set

Barnyard Accents Die

Barnyard Accents Stamp Set

Home on the Farm Paper Collection

Classic Sunflower Die

Classic Sunflower Stamp Set

Leafy Accents Die

Leafy Accents Stamp Set

3D Leafy Accents Shaping Mold

Eyelet Circles and Basics Small Die

For My Friend Sentiment Stamp Set

Deluxe Flower Shaping Paper Pack of 50-White

Crystal Ultrafine Transparent Glitter

Rajni Chawla’s Crystal Clear

Metal Tip for Adhesive Bottle

Dries Clear Adhesive

3-D Crystal Lacquer

Peanut Brittle Memento Ink

Tuxedo Black Memento Ink

Cantaloupe Memento Ink

Leaf Green Archival Ink

Fern Green Archival Ink

Redland Elements

White cardstock, Acrylic Shimmer additive, Fun Foam, Ivory cardstock, Copic Markers:  E31, E33, E35,  YG03, YG25, YG17, Y11, Y15, YR04, RV00, C1, C3, C5.  Grass punch.

Card size: 4 1/4 X 5 1/2".  Start with 2 pieces of ivory cardstock, one 5 1/2 X 8 1/2" scored and folded in half.  The other piece is 5 1/4 X 8 ¼”, this piece is cut on 2 long sides starting 3/4" from bottom to 3/4"from top both starting inward at 3/4" as well.  Score the sides at 2 1/2", 4 1/8”, 5 3/4".  Score the center part at 3/4", 1 1/2", 4 1/8”, 6 3/4" and 7 1/2".  Cover each panel of inner card with decorative paper.   Glue the inner card to outer card just at outer 1/3 of both sides but leave 1 /8” all the way around of the outer card showing.   (all the center portion is unglued except the 3/4" sides, the outer edges of the inner card is only open the center 3 1/4").

Stamp small sunflowers using Peanut Brittle, sponge with Cantaloupe, die cut and shape then glue 2 together for each flower.  Stamp leaves with Fern Green, sponge with Leaf Green, die cut and shape in the mold.  Stamp sentiments on ivory using Potter’s Clay, die cut with circles.  Edge circles with Potter’s Clay.

Stamp fence, flowers, and cows, die cut and color.  Glue fence on so that it is half on 1 side of the “book” and half on the other side.  Glue the cows on the right in front of the fence and glue the flowers on the left in front of the gate.  Pop sentiments up on left and right above the fence.

Glue 2 sunflowers and leaves at lower right corner and upper left corner.  Glitter flowers and glitter card base.  Optional, cover card ‘s outside front.

Thanks for visiting!

Robin

19 singing psalms and hymns and spiritual songs among yourselves, and making music to the Lord in your hearts. 20 And give thanks for everything to God the Father in the name of our Lord Jesus Christ.


Tuesday, October 20, 2020

Farm Side Step

Good morning!
My first card is a side step card.


Happy Meadows Die

Happy Meadows Stamp Set

Home on the Farm Die

Home on the Farm Stamp Set

Barnyard Accents Die

Barnyard Accents Stamp Set

Home on the Farm Paper Collection

Thank You Sentiments Stamp Set

Ticket and Tags Die

Crystal Ultrafine Transparent Glitter

Rajni Chawla’s Crystal Clear

Metal Tip for Adhesive Bottle

Dries Clear Adhesive

3-D Crystal Lacquer

Tuxedo Black Memento Ink

Coastal Coral Archival Ink

Other products:

White cardstock, Acrylic Shimmer additive, Foam tape, Copic Markers: E99, E97, E49, E31, E33, E35, E42, E43, E44, E08, Y21, YR31, YR24, YG03, YG25, YG17, Y11, Y15, YR04, RV00, C1, C3, C5. Grass punch.

Card size 4 1/4 X 5 1/2".  Start with 5 1/2 X 8 1/2" white cardstock.  From left side cut in 2” starting 1”from bottom and ending at 2 1/8” from top.  Starting at the bottom, on the right side, score at 1”, 2”, 3”, 4 1/4”, and 6 1/4". Score left side at 4 1/4".  Right side, fold mountain, valley, mountain, valley, and end with mountain.  Left side is a mountain fold.  Cut decorative paper for the left front 1 7/8 X 4 3/16”, cut panels for the right side, 7/8 X 3 1/2" times 2 and 2 1/2 X 3 1/2" for the back step.

Stamp barn, chickens, horses, goats, fence, and flowers using black, die cut and color.  Stamp the sentiment using Coastal Coral on decorative paper and die cut.

Punch grass using green decorative paper for the front and 2nd step.  Glue part of the fence on the front left side then glue flowers on top.  Pop up goats to the front center and right side of front.  Glue the sentiment to the top left corner at an angle.  Pop horses up on the 2nd step.  Pop up the barn on the back step then pop chickens up on both sides.  Pop window and doors slightly open.

Glitter all surfaces of the card.


My second card is also a step card, a center step card.


Home on the Farm Paper Collection

Classic Sunflower Die

Classic Sunflower Stamp Set

Leafy Accents Die

Leafy Accents Stamp Set

3D Leafy Accents Shaping Mold

Ornate Ovals Die

Ornate Pocket Accents Die

Words Of Comfort Stamp Set

Deluxe Flower Shaping Paper Pack of 50-White

Crystal Ultrafine Transparent Glitter

Rajni Chawla’s Crystal Clear

Metal Tip for Adhesive Bottle

Dries Clear Adhesive

3-D Crystal Lacquer

Peanut Brittle Memento Ink

Cantaloupe Memento Ink

Potter’s Clay Memento Ink

Leaf Green Archival Ink

Fern Green Archival Ink

Redland Elements

Other products:

White cardstock, Acrylic Shimmer additive, Fun Foam, Ivory cardstock, brown pearls

Card size 5 1/2 X 5 1/2".  Start with Ivory cardstock 5 1/2 X 11”  Make a cut on both sides starting 1” up from bottom and 1” in from each side.  Cut to 6 1/2" or 4 1/2" from the top on both sides.   Score center at 5 1/2".  Score both sides at 1”, 2” and 6 1/2".  Cut panels for center, front bottom and both sides to fit.

Cut 2 of the Ornate Pocket Accents and 2 outer decorative parts of the Ornate Oval die from ivory and cut an oval from foam sheet to fit small decorative oval. 

Stamp sentiment using Potter’s Clay on the smaller ivory decorative oval, glue foam oval underneath then glue to larger decorative oval.  Glue 2 Ornate Pocket Accents to the center to form a diamond then glue the ovals on top in the center.

Stamp sunflowers using Peanut Brittle and sponge with Cantaloupe, die cut, sponge edges with more Peanut Brittle then shape petals squeezing tips.  Glue 2 together for each flower and fill centers with Redland Elements.  Stamp leaves with Fern Green, sponge with Leaf Green, die cut and shape in mold.  Glue flowers and leaves around left side and add 1 small flower to top right.

Glue pearls to top corners and to bottom in a pattern of 1 on left and 3 at right.  Glitter card randomly and glitter flowers.

Thanks for visiting!

Robin

My child,[a] listen when your father corrects you.
    Don’t neglect your mother’s instruction.
What you learn from them will crown you with grace
    and be a chain of honor around your neck.


Saturday, October 17, 2020

On The Farm Bendi Card Tutorial

 Good morning heartfelt friends!

I have a tutorial this morning, which includes the new Home on the Farm stamps and dies.


Directions:

Step 1: Cut 2 pieces of white cardstock, sizes: 6 x 7” for the inside, and 6 x 6” for the sides. Use the decorative Rounded Sunlight Window Die and Heart of Joy Decorative Die to cut the top of the inside piece. 

Step 2: Cut the side piece into 2 (cut at a diagonal) pieces, 1 measuring 2” x 3 1/2" and the other measuring 2 1/2” x 4”. Score each of the taller sides at 1/2" to make the tabs that will be glued to the back of the inside piece.


Step 3: Make 1/4" tabs at the short ends to fit into slot in the (inside) base at 5” from the left side and the other slot on the left wing (side) at 1 5/8” from score line. Make sure to match all bottoms before cutting slots.


TOP TIP: Re-enforce tabs with acetate packaging to help them go in and out multiple times.


 Step 4: Cover each panel (the sides are covered inside and out) with decorative paper.


When covering panels with decorative paper make sure to recut slots before covering both sides to keep from losing where the cut is.

 After covering each panel, glue sides onto the inside piece.

Step 5: Stamp all farm scene pieces using black (Memento for Alcohol Inks, Archival for water color), 1 cow, 1 horse, 3 each of the chickens, 1 rooster, 1 barn, 5 fence pieces or more if needed, 1 each of the adult goats, 2 sunflowers, 2 wheat stocks, 2 hollyhocks, 3 zinnia, 1 milk can, 1 cat, 1 dog, 1 each mice and a hay bale.


Color all pieces with chosen coloring system. Cut 1 extra barn (no stamping on this one or cut windows) for the inside of the barn (use a dark color).

Step 6: Cut 2 fence border pieces from Border Essentials Die out of white cardstock, then glue them to the tops of sides.


Step 7: Ground scenes inside and out with a 3/8” strip of green decorative paper for grass. Now start gluing stamped pieces to the card to create the little scenes. 


The Barn is popped up over the barn inside with the kitten looking out of the top window, the hay bale and mice just inside the door pieces. Milk can to the right, then chicken and dog on the left of the barn, rooster on top of the barn.


Step 8: For the inside of the right wing, glue a full fence, 2 zinnia, 1 hollyhock and 2 chickens (avoid tab). The inside of the left wing has the horses, 1 chicken, 1 zinnia and 1 hollyhock.


Step 9: For the outside of the 2 side wings: Left side, glue 3 fence pieces avoiding slot and tab. Glue a sunflower and wheat stock to the far-left side then pop up the standing goat in front of them. Glue the laying goat (baby cut off in this scene) over the fences on the right. 


For the right wing: Glue 2 more fence pieces, 1 on the right side and 1 on the left side then glue a sunflower and wheat stock in front of the fence on the right, a chicken in front of the fence on the left. Pop up the cows in the center.


Step 10: Glitter the card especially around all the top sections (avoid the animals if possible).  

 To show the dimension, this is the card laying on its back. Finished closed card is 6” x 7”.


  Heartfelt Creations supplies:

HCD1-783    Border Essentials Die

HCD1-7272  Rounded SunlightWindow Die

HCD1-7256  Heart of JoyDecorative Die

HCD1-7316  Home on The farm Die

HCD1-7317  Happy Meadows Die

HCD1-7318  Barnyard Accents Die

HCPC-3925  Home of the FarmStamp Set

HCPC-3926  Happy Meadows StampSet

HCPC-3927  Barnyard AccentsStamp Set

HCDP1-2120 Home on the Farm Paper Collection

TSMP900     Tuxedo Black Memento Ink

85-glitter      CrystalUltrafine Transparent Glitter

352854          Metal Tip forAdhesive Bottle

159723           Dries Clear Adhesive

 Other Supplies: White cardstock, dimensional pop ups, Brown cardstock (for inside of barn). Copic colors: E31, E33, E35, E37, E50, E51, E21, E53, E08, E49, E43, E44, Y21, Y11, Y15, YR04, YR24, YR27, YG03, YG17, YG23, YG91, C1, C3, C5, R43, R22, R20


Tuesday, October 13, 2020

Home On The Farm Debut

Good Morning!
I'm so happy to see these farm animals and barn...so fun!
I love animals!!
My card is featuring the new Home on the farm and the
Semi new large square decorative dies.
I've made a gatefold.


Other Products: 
White cardstock, Acrylic Shimmer additive, Fun Foam, Ivory cardstock, Copic Markers: E99, E97, E49, E31, E33, E35, E42, E43, E44, E08, Y21, YR31, YR24, YG03, YG25, YG17, Y11, Y15, YR04, RV00, C1, C3, C5.

For more ideas on creating with the Decorative Royale Square & Circle Dies, watch the tutorial at https://youtu.be/tqmtn_TiVVw. 
For more tips on creating with the flower shaping molds, watch the tutorial at https://youtu.be/FSdPL7nXvQE.

Instructions: 
Card size: 6 X 6”.  Cut 2 pieces of heavy weight ivory cardstock, 1 piece 12 X 6 and the other 6 X 6 1/2".  Score 6 1/2" panel at the 1/2" for a tab, making the panel 6 X 6.  Glue the 1/2" tab to the 6 X 12” piece.  Score the 12 X 6 at 6” making three 6” panels.  On the 2 outside panels die cut the inner decorative part minus the round and middle square parts.   Score each side at 3” and fold inward. Use the circle dies to make a plaid decorative paper circle to fit the 2 sides centers then cut another circle a bit smaller to create an animal scene, also cut half circles of green paper for grass, (horses on the left side and cows on the right side) Only circles on the right side are folded in half to be glued down, the circles on the left side is kept flat (it is good to reinforce with another ivory circle on the back.  Cut a plaid 5 7/8 X 5 7/8” for the back inside panel and another 5 1/2 X 5 1/2" with fence and rooster on the right side.  

Stamp barn, chickens, flowers, wheat stocks, horses, cows and fence using black, die cut and color. Stamp sentiment using black on ivory then die cut with small circle.  Sponge edges with Peanut Brittle.  Die cut a small circle of foam sheet for the sentiment.  Pop up horses with foam tape.

Stamp sunflowers using Peanut Brittle, sponge with Cantaloupe.  Stamp leaves with Fern Green, sponge with Leaf Green, die cut flowers and leaves.  Shape leaves with mold, shape flowers with tools on a foam mat.  Squeeze petals at the ends.  Glue 2 flowers together for each flower then fill centers with Redland Elements.

To decorate panels: Starting with the inside back panel, glue barn to the left side, use pieces of foam tape to prop doors and window slightly open.  Glue chickens to the right and left of barn and flowers in front of fence.  Pop up sentiment with foam circle at the top right side of back panel.  Glitter the panel.

Right side panel: glue cows to decorative circles, cows will stick out over the folded center about 1”.  Glue some sunflowers and leaves to the top right side.  Glitter randomly.

Left side panel:  Glue the fence onto middle of circle, rooster on top of the fence post.  Glue the wheat stock in front of the fence on the right side.  Glue popped up hoses toward the center.  Glue more sunflowers and leaves to the bottom left corner.  Glitter randomly.

My second card features the horses (my biggest love)!!

Other Products: 
White cardstock,  Acrylic Shimmer additive, Ivory cardstock, Fun Foam Sheet, Linen Seam Binding (dyed with Buttercup re-inker), Copic Markers: YR24, YR31, Y21, E97

For more ideas on creating with the 5 x 7 Decorative Frame Dies, watch the tutorial at https://youtu.be/qdBFA5VpmSo. 

Instructions: 
Card size: 4 3/4 X 6 3/4".  Score a piece of ivory cardstock (7 X 8 1/2") at 4 1/4” and fold (4 1/4"X 7”).
Use the outer die of the Elaborate Oval Frames Die to cut shaped card (see video), leaving top edge off the fold by about 1/2".  Cut the full front out of ivory and also from decorative paper.  Cut the outer  die with the large decorative Elaborate die at the same time out of ivory to make a frame for the card front.  Glue the full ivory front to the folded card base and then the decorative paper piece on top. (Do not glue the frame on until other die cuts are glued on later).  Make the stand by cutting 2 ivory Swirly Accents and 2 decorative paper Swirly Accents outer die.  Glue sets together then die cut the decorative part of the die set out of ivory, glue them on the decorative paper.  Glue one stand to the inside of the front (make sure stand and card base are straight and even when you do this part), glue the other stand part to the inside in back.

Die cut 2 Petite Pocket Accents and 2 narrow Petite Pocket Accents out of ivory, Cut small circle out of decorative paper (barn scene shown on this card) then cut another circle the same size from Foam Sheet.  Cut the next size up circle out of ivory.  Cut a tag from decorative paper.  Glue the wide and narrow Petite Pocket Accents top and bottom of card front spacing evenly.  Now glue the frame around outside edge.  Cut off any over hanging parts of the pocket accents.  Glue foam to center of card followed by ivory circle then the decorative circle.

Stamp horses using black, die cut then color.  Stamp Sunflowers using Peanut Brittle, sponge with Cantaloupe, die cut, shape.  Glue 2 flowers together for each flower then fill centers with Redland Elements.  Stamp Welcome on tag with black.  Stamp leaves using Fern Green then sponge with Leaf Green, die cut then form in the mold.

Add foam sheet to the part of horses that stick out off the circle and glue down onto card front.  Glue flowers and leaves to each side.  Tie a bow in the yellow ribbon and glue it and the tag up under the flower on the right side.  Glitter flowers and card base. (Tip: the ultrafine is what I use on the card bases, Rajni’s Crystal Clear on flowers).

Thanks for visiting!
Robin


Wednesday, October 7, 2020

Called By Name

Good morning!
Another fun fold card today!
If you have Zinnias you know how many beautiful colors can grow
The butterflies love them too!

Words of Comfort Stamp Set

Royal Elegance Frames Die

Small Garden Zinnia Die

Small Garden Zinnia Stamp Set

Small 3D Zinnia Shaping Mold

Summer’s Garden Paper Collection

3D Leafy Accents Shaping Mold

Leafy Accents Die

Leafy Accents Stamp Set

Go Man Go Prills

Rajni Chawla’s Crystal Clear

Crystal Ultrafine Transparent Glitter

Leaf Green Archival Ink

Fern Green Archival Ink

Magenta Hue Archival Ink

Majestic Violet Archival Ink

Buttercup Archival Ink

Tiger Lily Archival Ink

3-D Crystal Lacquer

Metal Tip for Adhesive

Dries Clear Adhesive

Deluxe Flower Shaping Paper Pack of 50-White

Other materials:

White cardstock, Acrylic Shimmer additive, Fun Foam sheet

For more tips on creating with the flower shaping molds, watch the tutorial at https://youtu.be/FSdPL7nXvQE.

For more ideas on creating with the 5 x 7 Decorative Frame Dies, watch the tutorial at https://youtu.be/qdBFA5VpmSo

Card size: 4 3/4 X 6”.  Use heavy weight white cardstock to cut all the sections of the Royal Elegance Frame Die set (except inner smaller parts), see video for idea and complete instruction for shaped cards). Cut the outer base separately out of heavy weight white cardstock and then again out of decorative paper.  Cut the decorative oval again out of decorative paper.  Score and fold the base in half, do the same for the decorative paper base then glue the 2 together. Also score the large decorative white rectangle in the center then glue it to the base.   Glue the 2 decorative ovals together.  Cut another plain oval out of Foam sheet and glue it to the back of decorative oval at the bottom where it meets the base (cut the rest of the foam away).  Glue the stack to the base (half will stick up over the base edge).  On the plain white oval stamp the sentiment using Magenta Hue then glue it to the decorative oval stack.  Glitter the card base and decorative oval.

Stamp the Small Zinnia set using Buttercup, Tiger Lily, Magenta Hue and Majestic Violet, sponge the flowers with like colors before die cutting.  Die cut the flowers, sponge the edges again then shape in the mold (see video). For small flowers use 2 layers together, staggering petals then fill centers with Prills.  For medium flower use 3 together of the same color then another layer in the center of tubularly shaped Buttercup (Cut Buttercup flower petals apart to make it easier to place them upright in the center), add some Prills as well to the center.  Glitter all flowers.

Stamp Leafy Accents with Fern Green then sponge with flower color and Leaf Green.  Die cut leaves and shape in the mold.  Mix shimmer additive and Lacquer together then paint onto leaves.  When dry glue flowers and leaves together onto the left side of the sentiment.

Thanks for visiting!

Robin

2 Chronicles 7:14

if My people who are called by My name will humble themselves, and pray and seek My face, and turn from their wicked ways, then I will hear from heaven, and will forgive their sin and heal their land.