Pages

Comments are welcome and very much appreciated!
Showing posts with label Bendi Fold. Show all posts

Tuesday, August 17, 2021

Christmas Eve Service

Good morning!


Materials list: HERE
Instructions:

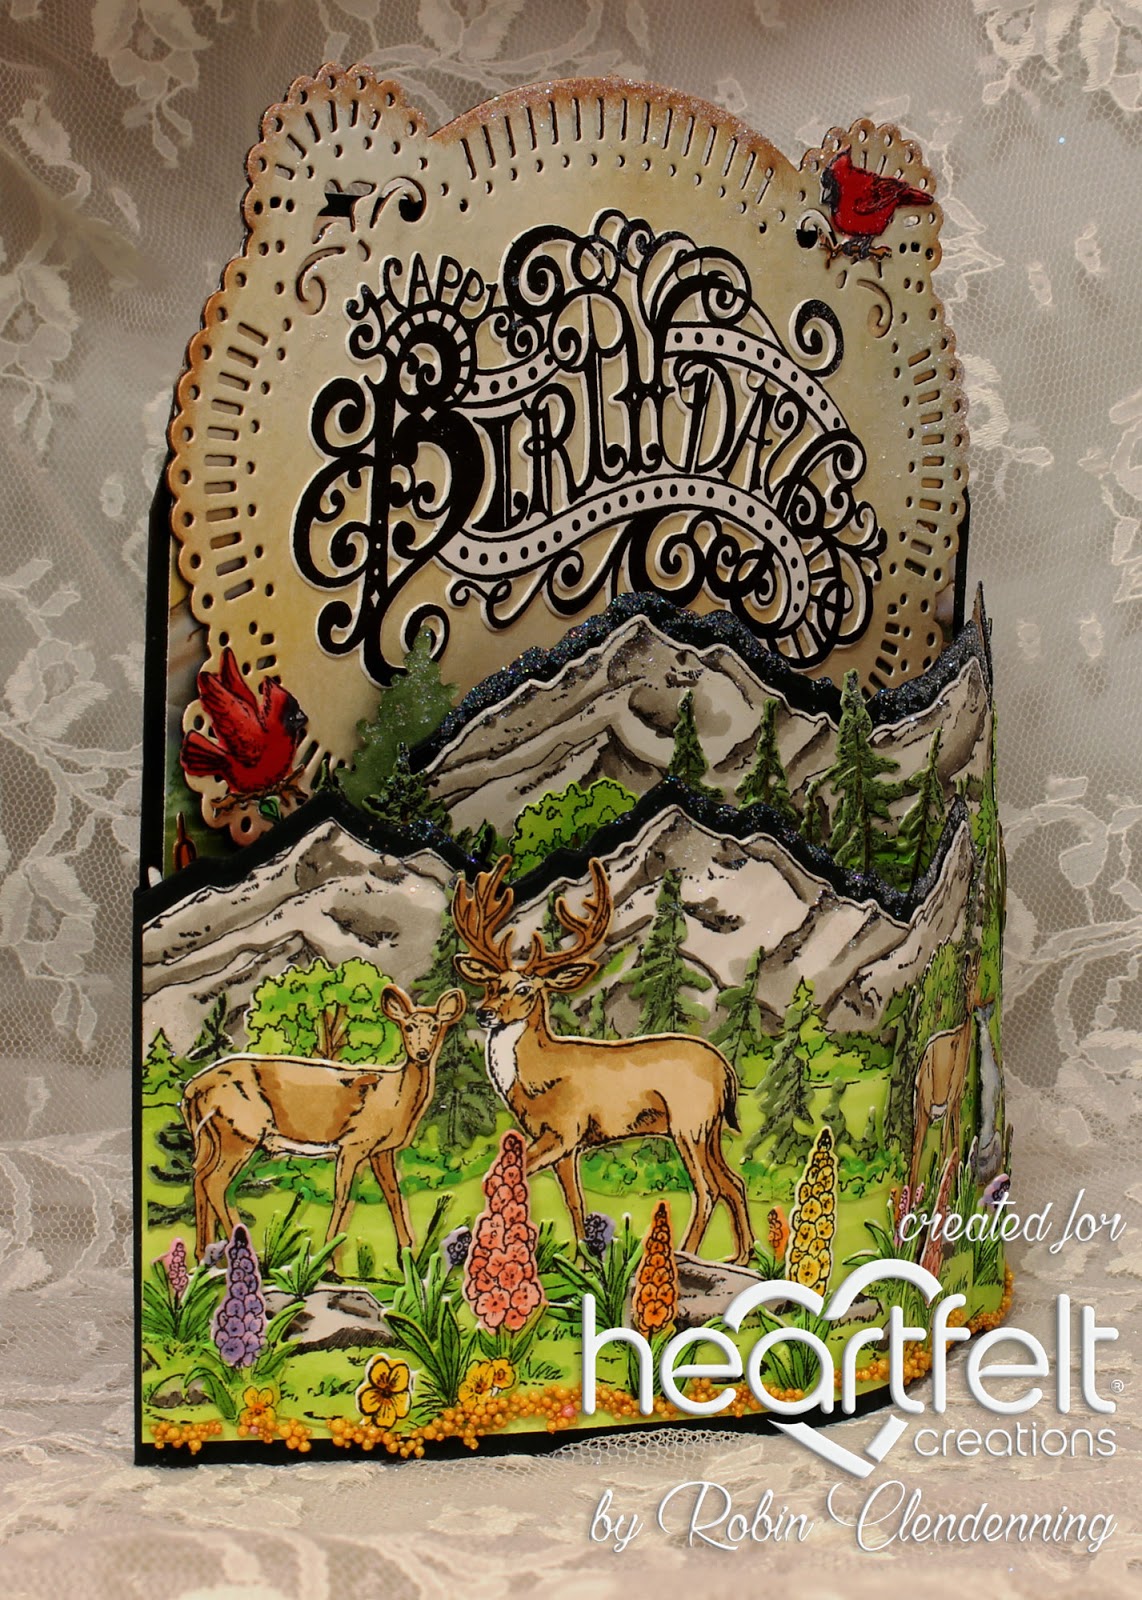
Card size:  4 3/4 X 6 3/4".  Start with 7 X 10” white cardstock, fold to 5 X 7 then die cut (over-hanging top of die over top fold by 1/4") with the Majestic Swirl Frames outer die.  Cut 1 more full white cardstock layer to make a complete card front.  Glue the card front onto base lining up sides and bottom.

Cut plaid decorative paper with the outer die again and then cut white cardstock using the outer die and the next die in to create the white border for card front.  Glue the plaid onto card then the white border.  Cut the 4 X 6” Snowflake die (from Holiday Snowflake Frames) and the next die in from white cardstock to create the snowflake frame/border then glitter with Ultrafine.  Cut the inside part again from light green decorative paper and also from foam sheet.  Glue the frame and green to the foam sheet then glue it to the card front centering.  Cut the smaller 2 1/2 X 4” snowflake frame from foam sheet and from white, glue together then glue to card center.

Stamp using black Memento, the Holiday Village scene 2 times, the extra trees and the mom and daughter onto white cardstock (I use Neenah Bright White 80 pound for coloring with alcohol markers), die cut all, die cutting just the church on 1 of the scenes, then color the full scene minus the church, the church, the ladies and the trees.  Glue the full scene onto white snowflake frame center then pop up the extra church onto uncolored church, double pop the trees at right and also the ladies at right as if heading to church.  Use Dries White and Ultrafine Crystal glitter for snow on trees and roofs.  Use Adhesive and glitter on ground snow.  Use the Glitter Pens, green and red for plaid on skirt, the clear on star and church clock.

Stamp Poinsettia using silver, die cut then shape in the mold.  Paint tips and high spots with some silver metallic paint, glue 3-4 layers together to make flowers and add silver Prills to the centers.  Glitter the flowers with Rajni’s Crystal Clear.  Stamp Holly leaves using black, sponge with green, die cut then shape in the mold.  Paint the leaves with a mix of Lacquer and Shimmer Additive. Glue the Holly and Poinsettias to the bottom left corner of the snowflake die cut.

Choose a sentiment from decorative paper and add it to the inside of card.


My next card is a Bendi Fold card.  I was able to use lots of the new collection on this one card!


Find the material list here: HERE
Instructions:

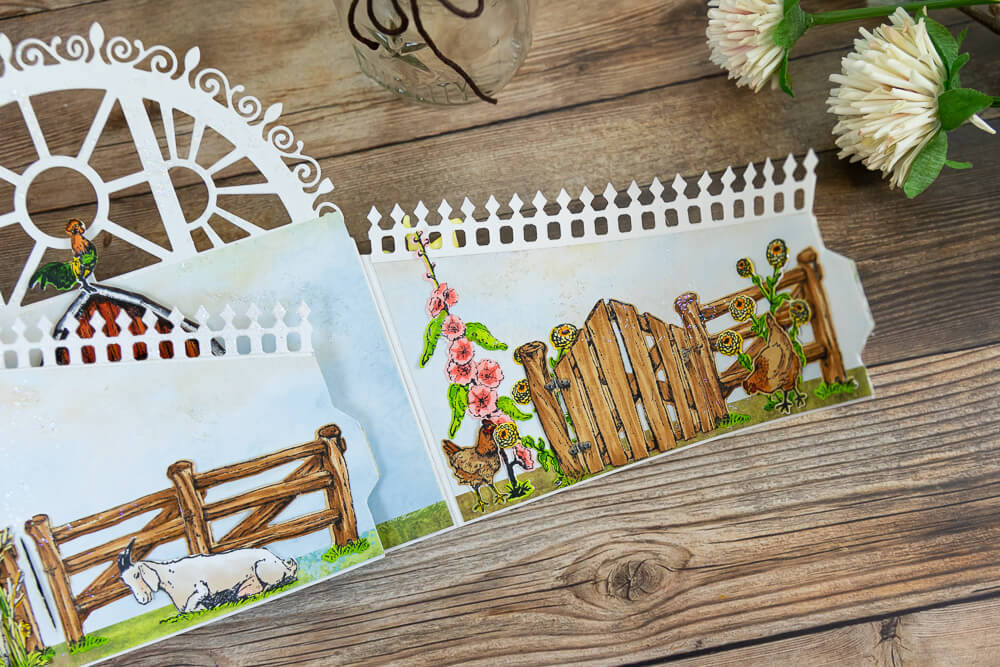
Card size:  5 1/2 X 6 3/4".  Start with one 4 1/4 X 5 1/2", one 3 X 5 1/2" and one 3 1/2 X 5 1/2" white cardstock pieces.   The 4 1/4 X 5 1/2" piece is the back.  Cut a curved Starry Night Border from white and glue it to the top of the back piece, set aside.  For the flap pieces, left and right, score 1/2" on 1 side of each.  On the other side of each, draw a light pencil line 1/4" from the edge.  Make a 1/4" “tab” by cutting to the pencil line on each.  Make a pencil line on the back 4” from the left edge at the point where the left flap tab will enter then cut the line with a craft knife.  Make a line on the left flap (3 1/2” X 5 1/2” piece) 2” from the right side, (1/2” scored side) where the right flap tab will enter then cut with a craft knife.   Glue the 1/2” scored edges of right and left flaps to the back of card.  Cut 2 straight Starry Night Borders from white and glue them to both flaps at the top of each. This is the basic base.

Cut decorative blue paper for the top part of both flaps front and back (to help reduce layers, only add enough blue for the sky) and for the back.  Make a snowy ground for front and back of each flap and glue one side at a time as you will need to re-cut the slits for the left side and for the back.  When all pieces have been glued down, make sure you can still insert tabs of left flap and right flap, if you have a hard time, cut the slit so that it is a wider slit.

Stamp, using black Memento on white cardstock, church scene, 4-5 tree sets, mom and daughter, front truck scene plus extra deer, truck back scene plus extra truck and snowman (these are all from the Home For The Holidays Collection, Also stamp Countryside Winter’scapes deer, snowman and large tree.  Die cut all and color using Alcohol Inks (Copic used here).  If you are water coloring your pieces then make sure you use Archival or Versafine Claire Inks as they are water resistant. 

Start with the inside:  Glue the truck front scene to left flap, add the small extra snowman to the scene.  Use Dries White and Ultrafine Glitter to make snow coming down from the sky (recut slit).  Glue the church scene including 1 extra tree and mom with daughter to the card back (avoid slit).  Glue 2 sets of extra trees and extra (small) deer to the right flap.  Make snow coming down on all sides as you complete them.  When dry, turn card over and finish decorating the outside of left and right flap.  Right flap has the back of truck scene with the extra truck popped up. The left flap has deer, snowman, 2 sets of trees and the large tree.  Deer and snowman is popped up (avoid slit).

To finish this card, cut out enough letters and numbers from both black and silver to make “Merry Christmas! 2021” glue them together then glue them to the curved Starry Night die cut.

Add glitter where desired for sparkly snow.


Time for more, here is one more for you.


Find the materials list HERE
Instructions:

 Card size:  5 X 7”.  Start with 7 1/4 X 10” white cardstock, fold to 5 X 7 1/4" then place outer Holiday Snowflake Frame die on card hanging over fold by about 1/2" then cut.  Cut another white Holiday Snowflake Frame outer die from white and from silver cardstock.  Glue the silver under card slightly off-set and glue the white on top of card matching bottom and sides. Sponge the front around all the edges with Jade Brilliance.  Cut the 4 X 6” Snowflake Frame from white and silver (make the white 1 a frame/border only by using the next die in as well when cutting).    Cut the center portion of 4 X 6” snowflake frame from blue decorative paper and from white.  Cut the white one to look like a hill behind the barn then glue it to the blue matching bottoms and sides.  Cut the center from a piece of foam sheet and glue it under the stack, glue white frame off-set (so silver shows) to top of stack then glue to card center.

Stamp the Home for The Holidays front of truck scene 2 times using black Memento.  On 1 of the scenes, die cut deer and truck only.  Color and pop truck on top also pop-up deer bodies gluing feet down to snowy ground.  Glue the scene to the white and blue die cuts in the center.

Glitter the trees using Dries White Adhesive.  Add glitter to other snowy ground using Adhesive or use Stickles to just edges of ground.  Use the glitter pens on the Christmas lights.  Use the white gel pen for the deer spots and barn trim.

Thank you for coming to visit today!

Have a crafty afternoon!!

Robin

If we live, it’s to honor the Lord. And if we die, it’s to honor the Lord. So whether we live or die, we belong to the Lord.

Isn't it good to know that no matter what happens in this crazy world today that we can belong to God, nothing anyone ever does to you will change that.

Do you know the one who loved you so much He gave His life for you?

Jesus said to seek and you shall find, knock and it will be opened to you.  He also says that He is The Way, The Truth and The Life, no man comes to the Father but by Him.  He isn't just a miracle worker or a prophet, He is the Son of God.

BibleGateway.com: A searchable online Bible in over 150 versions and 50 languages.


Saturday, October 17, 2020

On The Farm Bendi Card Tutorial

 Good morning heartfelt friends!

I have a tutorial this morning, which includes the new Home on the Farm stamps and dies.


Directions:

Step 1: Cut 2 pieces of white cardstock, sizes: 6 x 7” for the inside, and 6 x 6” for the sides. Use the decorative Rounded Sunlight Window Die and Heart of Joy Decorative Die to cut the top of the inside piece. 

Step 2: Cut the side piece into 2 (cut at a diagonal) pieces, 1 measuring 2” x 3 1/2" and the other measuring 2 1/2” x 4”. Score each of the taller sides at 1/2" to make the tabs that will be glued to the back of the inside piece.


Step 3: Make 1/4" tabs at the short ends to fit into slot in the (inside) base at 5” from the left side and the other slot on the left wing (side) at 1 5/8” from score line. Make sure to match all bottoms before cutting slots.


TOP TIP: Re-enforce tabs with acetate packaging to help them go in and out multiple times.


 Step 4: Cover each panel (the sides are covered inside and out) with decorative paper.


When covering panels with decorative paper make sure to recut slots before covering both sides to keep from losing where the cut is.

 After covering each panel, glue sides onto the inside piece.

Step 5: Stamp all farm scene pieces using black (Memento for Alcohol Inks, Archival for water color), 1 cow, 1 horse, 3 each of the chickens, 1 rooster, 1 barn, 5 fence pieces or more if needed, 1 each of the adult goats, 2 sunflowers, 2 wheat stocks, 2 hollyhocks, 3 zinnia, 1 milk can, 1 cat, 1 dog, 1 each mice and a hay bale.


Color all pieces with chosen coloring system. Cut 1 extra barn (no stamping on this one or cut windows) for the inside of the barn (use a dark color).

Step 6: Cut 2 fence border pieces from Border Essentials Die out of white cardstock, then glue them to the tops of sides.


Step 7: Ground scenes inside and out with a 3/8” strip of green decorative paper for grass. Now start gluing stamped pieces to the card to create the little scenes. 


The Barn is popped up over the barn inside with the kitten looking out of the top window, the hay bale and mice just inside the door pieces. Milk can to the right, then chicken and dog on the left of the barn, rooster on top of the barn.


Step 8: For the inside of the right wing, glue a full fence, 2 zinnia, 1 hollyhock and 2 chickens (avoid tab). The inside of the left wing has the horses, 1 chicken, 1 zinnia and 1 hollyhock.


Step 9: For the outside of the 2 side wings: Left side, glue 3 fence pieces avoiding slot and tab. Glue a sunflower and wheat stock to the far-left side then pop up the standing goat in front of them. Glue the laying goat (baby cut off in this scene) over the fences on the right. 


For the right wing: Glue 2 more fence pieces, 1 on the right side and 1 on the left side then glue a sunflower and wheat stock in front of the fence on the right, a chicken in front of the fence on the left. Pop up the cows in the center.


Step 10: Glitter the card especially around all the top sections (avoid the animals if possible).  

 To show the dimension, this is the card laying on its back. Finished closed card is 6” x 7”.


  Heartfelt Creations supplies:

HCD1-783    Border Essentials Die

HCD1-7272  Rounded SunlightWindow Die

HCD1-7256  Heart of JoyDecorative Die

HCD1-7316  Home on The farm Die

HCD1-7317  Happy Meadows Die

HCD1-7318  Barnyard Accents Die

HCPC-3925  Home of the FarmStamp Set

HCPC-3926  Happy Meadows StampSet

HCPC-3927  Barnyard AccentsStamp Set

HCDP1-2120 Home on the Farm Paper Collection

TSMP900     Tuxedo Black Memento Ink

85-glitter      CrystalUltrafine Transparent Glitter

352854          Metal Tip forAdhesive Bottle

159723           Dries Clear Adhesive

 Other Supplies: White cardstock, dimensional pop ups, Brown cardstock (for inside of barn). Copic colors: E31, E33, E35, E37, E50, E51, E21, E53, E08, E49, E43, E44, Y21, Y11, Y15, YR04, YR24, YR27, YG03, YG17, YG23, YG91, C1, C3, C5, R43, R22, R20


Tuesday, September 22, 2020

High Sierra Happy Birthday


Good morning!
Bendi cards are so fun to make!
Today I've featured the new Stamp and die sentiment sets!


Elaborate Birthday Die

Elaborate Birthday Stamp Set

Create a ‘scape Backcountry Die

Create a ‘scape Backcountry Stamp Set

Create a ‘scape Wilderness Die

Create a ‘scape Wilderness Stamp Set

Create a ‘scape Trout Lake Die

Create a ‘scape Trout Lake Stamp Set

Create a ‘scape Nature Die

Create a ‘scape Nature Stamp Set

Wilderness Retreat Paper Collection

Woodsy Critters Die

Woodsy Critters Stamp Set

Memento Tuxedo Black Ink

Metal Tip for Adhesive Bottle

Dries Clear Adhesive

Rajni Chawla’s Crystal Clear

Crystal Ultrafine Transparent Glitter

Go Man Go Prills

I Cannot Tell A Lilac Prills

Minnie Pearl Pearls

Deluxe Flower Shaping Paper Pack of 50-White

Other products:

White cardstock, Dark green cardstock, Acrylic Shimmer additive, Brilliance Copper Ink, Copic Markers: C1, C2, C3, C5, W1, W3, W5, E53, E31, E33, E35, E97, E99, E51,E93,YR04, R43, R24, R39, G94, YG63, YG03, YG17, YG05, B91 ,93, B41, YR82

Card size: 6 X 6 3/4".  Make card base from dark green cardstock: Back is 6 X 6”, side flaps are 3 1/2 X 6” and 4 1/2 X 6”.  Score 1/2" on 1 side of both flaps, fold down and score well.  Draw a line on the other side of both at 1/4" then drawn in a tab (both flaps).  Cut away above and below each tab (to reinforce tabs glue acrylic packaging [like dies are packaged in normally] over the tab and inward about 1”, this will be covered by paper later).  Make a slot for the right flap in the back at 1 1/2"from left side by lining up the bottom of flap and back then drawing a line at the top and bottom of the tab made earlier.  Use a ruler and craft knife to cut.  Make a slot for the left flap into the right side flap at 2” from right side using the same method of lining up the bottoms then drawing lines at top and bottom of tab.  (Nothing is glued together at this point because side flaps still have to be die cut with the mountains). 

Using 2 pieces of the same paper design, cut panels for the inside back and both flaps (a continuous lake used in this sample). Save the sky for the inside mountains (die cut only because they are backwards) and for the die cut base of the large sentiment.  The outside of the flaps are stamped scenes pieced together.  Start with the mountains, you need 5 1/2" of mountains on each side so you have to stamp it once then mask the end and stamp again to lengthen mountains.  When you die cut, be careful to only cut the tops not too far down so that you keep mountains together.  You will want each mountain scape to be the width and height of the side flaps.  Die cut a piece of sky paper along with the stamped mountains so that you have mountains for the inside of flaps (add a little color to make them look more like mountain ridges).  Now place the die cut mountains on the dark green flaps then draw a line on cardstock, now cut the dark green cardstock flaps to match mountains.  Color the mountains and tree line then color the rest of the panel green to blend in with other stamped elements.  Glue the backward mountains on then glue the inside decorative paper lake on both side and the back. Now glue each flap to the back panel (in back) using the 1/2" scored tab.

To finish the inside: Stamp the ducks and 2 extra ducks, the deer set, bunny, squirrel, 2 cardinals, 2 sets of cattails and pine tree using Tuxedo Black, color with Copic markers. Glue deer over paper deer, bunny and squirrel on far left, ducks to the back right side.  Glue cattails where needed.

Die cut large sentiment base from dark green (as well as the sky colored decorative paper die cut, glue them together then glue to the back panel over hanging top of back by about 3/4".  Stamp and die cut sentiment using black then glue it to the sentiment base layer.  Sponge copper ink on the edges of the sentiment base. Now glue the cardinals top right and bottom left of sentiment base, glue 1 extra duck to the bottom right and the other extra duck on top of scene duck.  Add white and lavender Prills to the ground sections.

To finish the outside (front) of flaps: Stamp 2 sets of deer, Trout Lake, extra trees of Trout Lake, flowers, rock landscapes, die cut and color all with Copics.  For the right side, glue the Trout Lake extra trees, deer, flowers (cut apart) and rock landscapes and 1 deer piecing together to look best. For the left flap, glue more extra trees, rock landscapes, flowers and 3 deer.   Add Prills to the bottoms of both flaps.  Glitter mountain ridges and lakes inside and out, glitter Happy Birthday panel. Tuck small tabs into the slots to close card, card stands while closed because of the bowed front.


My second card uses another of the new 
sentiment stamps and dies.


Large Garden Zinnia Die

Small Garden Zinnia Die

Large Garden Zinnia Stamp Set

Small Garden Zinnia Stamp Set

Large 3D Zinnia Shaping Mold

Small 3D Zinnia Shaping Mold

Summer’s Garden Paper Collection

3D Leafy Accents Shaping Mold

Leafy Accents Die

Leafy Accents Stamp Set

Groove Golf Tool Set

Decorative Circle Frames Die

Eyelet Circle & Basics Small Die

Fancy Special Day Die

Fancy Special Day Stamp Set

Archival Ink-Majestic Violet

Archival Ink-Buttercup

Archival Ink-Cactus Flower

Archival Ink-Leaf Green

Archival Ink-Fern Green

3-D Crystal Lacquer

Metal Tip for Adhesive Bottle

Dries Clear Adhesive

Rajni Chawla’s Crystal Clear

Crystal Ultrafine Transparent Glitter

Go Man Go Prills

Deluxe Flower Shaping Paper Pack of 50-White

Other products:

White cardstock, Acrylic Shimmer additive, Fun Foam sheet

For more tips on creating with the flower shaping molds, watch the tutorial at https://youtu.be/FSdPL7nXvQE.

For more ideas on creating with the 5 x 7 Decorative Frame Dies, watch the tutorial at https://youtu.be/qdBFA5VpmSo

Card size: 4 3/4 X 6 3/4".  See video for making shaped cards then cut another front from purple decorative paper.  Cute large decorative die from white also from Fun Foam sheet.  Cut 2 eyelet circles from the die set from purple decorative paper and 1 circle in between eyelet circle sizes out of white along with another Fun Foam sheet circle to fit.  Stamp sentiment using Majestic Violet, die cut and die cut sentiment base from white.  Stack all layers together and glue. Tip, when using foam sheets for dimension, after gluing, lay a book or something with weight on top so that it dries nice and flat, if needed put a piece of wax paper on top before book so that nothing sticks).

Stamp medium and small zinnia using Majestic Violet, sponge with the same plus some Cactus flower in the centers.  Stamp smallest zinnia again using Buttercup, sponge with Buttercup, die cut all the flowers, shape in molds.  Use Groove Golf tool for shaping the tubular yellow centers of the zinnia (larger flower).  Glue 4-5 layers together for each flower and fill centers with Prills.  Stamp leaves with Fern Green, sponge with Leaf Green, die cut, shape in the leaf mold then cut apart to use as needed.  Arrange flowers and leaves on the right and left sides of the circle with sentiment.  Glitter the card front and use Rajni’s Crystal Clear to glitter the flowers.

Thanks for visiting today!

Robin

Psalms 139:23-24

23 Search me, O God, and know my heart;
Try me, and know my anxieties;
24 And see if there is any wicked way in me,
And lead me in the way everlasting.


Tuesday, December 10, 2019

HC Cally Lily Debut, Everything To Me Bendi-Front

Good morning!

"Whimsically delicate, the delightful Calla Lily Collection lays the perfect foundation for creating beautiful projects for any occasion! Tender illustrations of graceful swans and floral sprays establish a quaint assembling of unassuming cling stamp sets, along with the coordinating dies, while an array of die cut Calla Lily petals and foliage illustrations work in unison to create realistic, dimensional blossoms!"
Today I have a Bendi type card for you using the new 
exquisite Calla Lily Collection.
The front only is Bendi Using the Window Hinges to secure
and release so that it can also be opened up
to write your own personal message inside.
I love how the Bendi-front gives the card so much
extra dimension.  The new Calla Lilies come with a special
mold for easy creating.  I did use some tools as
well to curl some of the petals differently so that they
are all a bit different as you would see in your garden.


This is a close up of the closure system.  The left side simply tucks under the stationary
right side to keep it closed.  It displays so elegantly closed.


I used a fun foam sheet, die cut, to pop up the swan.

These new Pollen Stamen are perfect!

HC PRODUCTS USED      
HCD1-7275        Calla Lily Die
HCPC-3897        Calla Lily Stamp Set
HCD1-7277        Swan Lake Die
HCPC-3899        Swan Lake Stamp Set
HCDP1-2110     Calla Lily Paper Collection
HCFB1-484         3DCalla Lily Shaping Mold
HCS1-485           Pastel Pollen Stamens-Medium
HCD1-7271        Rounded Window Frame Die
HCD1-7214        Ornate Pocket Accents Die
HCD1-7155         Circle Basics Large Die
HCD1-7154         EyeletCircle & Basics Small Die
HCD1-7285         WindowHinges Die
RACP436            Leaf Green Archival Ink
RACP962            Fern Green Archival Ink
RACP638            Rose Madder Archival Ink
RACP649            Pink Peony Archival Ink
PGM15015        Rajni Chawla’s Crystal Clear
159723               Dries Clear Adhesive

Other Products:
White Card Stock, Foam Sheet, Foam tape, Tacky Glue, Copic Markers: RV11, R21, R20, YG11, Y11, Y15, N1, N3, YG17, YG03, YG23, Nuvo Crystal Glace, Embossing folder from Crafter’s Companion.

For more tips on creating with the flower shaping molds, watch the tutorial at https://youtu.be/FSdPL7nXvQE
Instructions:
Instructions: Card size 6 X 6 1/8”.  Start with a 6 X 6 1/2" white panel and score at 3/8” on the 6 1/2" side.  The other piece of white cardstock is 6 X 6 1/8”.  On the scored panel, emboss the left side starting after the score line.  Cut the outer edge of the Rounded Window Frame leaving about 1/2" of embossing at the widest part of the round die, this will leave you with a panel 3 X 6”.  Now glue the score edge to the back 6 X 6 1/8” panel.  Cut 2 white outer edge of the Rounded Window Frame then cut 1 of the next largest decorative circles from the set cutting out the center with the largest circle die.

Glue the first outer white die cut onto the cut out edge of the front panel…it is a little tricky but slightly overlap to have something to glue on.  Now glue the second white outer die cut to the back side doing the same thing.  Glue a hinge piece cut from white at the outside right edge of front circle panel hanging over about 1/4".

For the inside Cut 4 corners from the Ornate Pocket Accents, 1 eyelet circle and another hinge piece from white.  Glue the Eyelet circle to be directly below the front panel circle cut out.  Cut a decorative circle with the largest circle die from the paper collection and glue it to the Eyelet circle.  Glue the 4 corners on to the 4 corners of the back panel, edges over-lapping the Eyelet circle.  Pop up the white hinge at the outer edge of the back panel to match the hinge on the circle (the hinge on the circle front will clasp under the popped up hinge on the card back). 

Stamp Lilies using Rose Madder then sponge with Pink Peony. Stamp small leaves using Fern Green then sponge with Leaf Green.  Form flowers and leaf in the Shaping Mold (see video) Sponge wires of stamen with Fern Green then glue stamen in the center of flowers and curl flower around it. Glue it and hold closed until set…set aside to thoroughly dry while working on the next flower.  Twist wire stems together and glue 1 leaf onto the twisted stem.   Use heavy weight glue or glue gun to attach flowers to the front left side of card front.

Stamp the swan with babies on her back using London Fog . Color the swan and flowers with Copic Markers.  Cut another swam from foam sheet.  And glue it to the back of swan (just the swan not the flowers).  Glue the flowers and swan to the decorative paper circle.  Cut sentiment from decorative paper and fish tail the ends then curl it and glue it above the swan.  Add glitter to front and inside of card and on the flowers.
Thanks for visiting today!
Robin
Luke 2:4b-7
to the city of David, which is called Bethlehem, because he was of the house and lineage of David, to be registered with Mary, his betrothed [a]wife, who was with child. So it was, that while they were there, the days were completed for her to be delivered. And she brought forth her firstborn Son, and wrapped Him in swaddling cloths, and laid Him in a [b]manger, because there was no room for them in the inn.
Luke 2:9-11
 And [c]behold, an angel of the Lord stood before them, and the glory of the Lord shone around them, and they were greatly afraid. 10 Then the angel said to them, “Do not be afraid, for behold, I bring you good tidings of great joy which will be to all people. 11 For there is born to you this day in the city of David a Savior, who is Christ the Lord. 
Read the whole history of that night here.