Pages

Comments are welcome and very much appreciated!

Wednesday, May 9, 2018

Heartfelt Creations Coneflower Foldout

Good morning!

Summer brings with it the excitement of a new gardening season, lounging in the open expanse of the backyard and enjoying the beauty of favorite perennial blossoms dancing gently in the warm summer breeze! Among those returning favorites are the attractive, butterfly loving coneflower! Bright and colorful, these pretty flowers come dressed in a wide variety of hues and quietly display their domed centers and soft delicate petals against the backdrops of ornamental grasses and other decorative backyard plantings! Come along with us as we welcome back the summer season with a walk through the Backyard Blossoms Collection by Heartfelt Creations! Brilliantly hued, and filled with a good dose of summer sunshine, the fabulous paper collection showcases happy shades of bright yellows, pretty pinks, luscious lavenders and glorious greens and showcases lovely lace like patterns, elegant swirls and bountiful coneflower blossoms! Included in this jubilant and cheerful assembling are three exquisitely illustrated cling stamps sets with coordinating dies ideal for all of your summer themed paper craft creations! From large coneflower images, ornamental grasses, to smaller backyard blossom accents, these dynamic illustrations are ideal for creating your very own dimensional flower gardens as focal points on card fronts or as accents on scrapbook layouts! So grab your lounge chair, slather on the sunscreen and join us as we kick back and relax in the backyard enjoying our favorite backyard blossoms!


Heartfelt Creations products used:     
  
Other Products: 
Peach card stock, Lavender card stock, ribbon, Copic Markers:B00,B000, B01, R30,R21,R22,V01,V12,V15,E33,YR65,Y11,Y15,Y38,E53,E33,E35,RV000,G43,G82,YG63,YG03,YG23,C01,C02,C03,C05,R81,R83,E000,E00,E93,E01

For more tips on creating with the border dies & foldout cards, watch the tutorial at https://youtu.be/wxX94X84kUo.
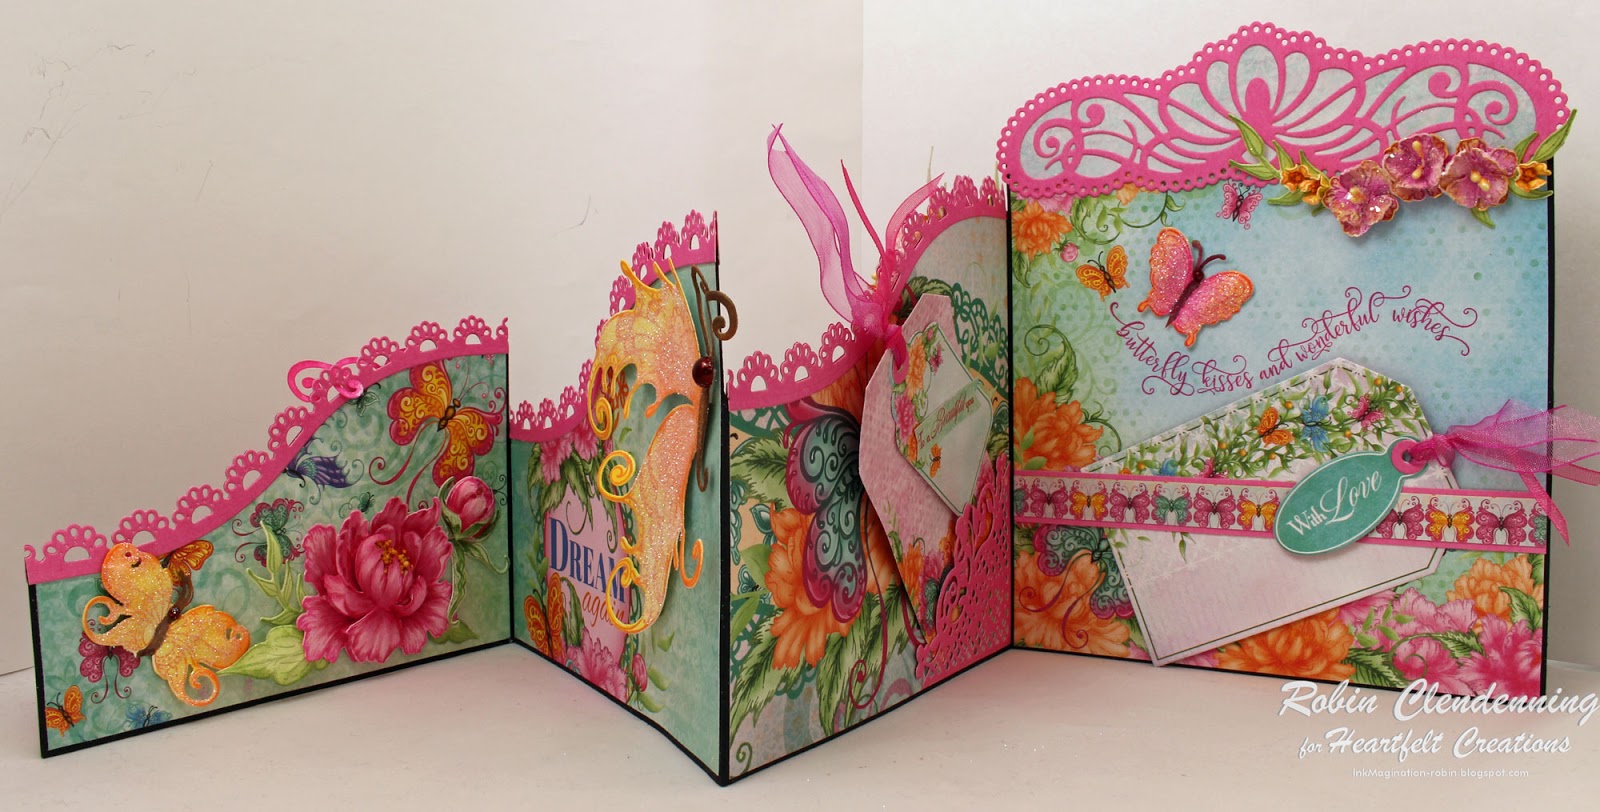
Instructions: 
Card size:  6 X 6 ½”  Cover each panel of foldout card (see video for cutting paper) with the Backyard Blossoms Paper Collection. Die cut borders out of peach card stock and cut narrow borders using the plain edge of the Fleur Borders out of lavender card stock. Cut back border from peach using two of the Delicate Boders and the lavender narrow border using the plain die from the Classic Border set.  Die cut a lavender and a peach using the Festive Holiday Die and one each using the Decorative Medallion Die.  Glue the lavender Decorative Medallion to the back of the card on the right side leaving at least half sticking out from the edge then glue the peach one on (the lavender will appear on top from the front).   On the other side, glue the peach Festive Holiday die to the back of the third panel (third from the front) at an angle and then glue the lavender Festive Holiday die on top of the peach. Cut one pocket from lavender.  Cut a rectangle tag and an oval tag from decorative paper.
Stamp, die cut and color the fairies, blossoms, birds, critters, and coneflowers with Copic Markers.  Glitter all flowers, fairy wings, and butterflies.  On the back panel glue sitting fairy to log on paper, glue one of the birds to top right corner and glue some of the blossoms to the bottom area.  On the inside of third panel glue the lavender pocket to bottom right and insert tags.  Glue some of the blossoms on the left side of the bottom next to the pocket.  On the back side of the same panel, glue the tall coneflower over the Festive Holiday die and then glue a short one next to it (one coral and one purple).    Inside second panel, glue standing fairy to left bottom and the little bird and branch to top left.  Glue small coneflowers to bottom right.  Inside first panel die cut the paper with wheat stocks using the wheat stock die from Backyard Blossoms and then glue them on top of decorative paper.  Glue tiny butterflies and bunny on the bottom.   On the outside of the last panel glue two coneflowers (one purple and one coral) to the left side.  Stamp It’s Your Birthday on decorative paper and die cut with oval die then mat with another oval cut from peach card stock and glue these together then onto the front right bottom.   Glue a bird at the top left on top on one of the coneflowers.
Now make a 3D coneflower using the sunflower stamp and die set.  Sponge deep Purple color onto petals front and back.  Shape by misting flower from the back, place face side down on shaping mat and starting from the outside, use tool to draw petals inward.  Pierce hole in the center and insert a wired stamen (color wire with green ink) from the top (stamen will stick up).  Fold flower in half and even tuck sides in to make it look more like a coneflower then start adding 3D type glue to the stamen and rounded top of the flower to cover with Prills (Mix Go Man Go with Express-O Yourself). Add more glue and more Prills until you have a rounded cone center.  Let dry completely, then glue flower to front panel.   Tie a triple bow with lavender ribbon  (or dyed seam binding) and glue to the front at the bottom of the stems.
Thanks for visiting today, hope you got some ideas for a card!
Robin
Starting with Genesis and on through until the end of the Bible, it all speaks of God's awesome power AND His unfailing love for us, His mercy and His grace.
I'd like to share one of my favorite songs with you, well part of it anyway!
Verse 1
"God of creation there at the start
before the beginning of time
with no point of reference You spoke to the dark
and fleshed out the wonder of light
Chorus 1
And as You speak a hundred billion galaxies are born
In the vapor of Your breathe the planets form
If the stars were made to worship so will I
I can see Your heart in everything You've made
Every burning star a signal fire of grace
If creation sings Your praises so will I
Verse 2
God of Your promise
You don't speak in vain
No syllable empty or void
For once You have spoken all nature and science
follow the sound of Your voice
Chorus 2
And as You speak a hundred billion creatures catch Your breath
Evolving in pursuit of what You said
If it all reveals Your nature so will I
I can see Your heart in everything You say
Every painted sky a canvas of Your grace
If creation still obeys You so will I"
By Hillsong United

It goes on but I will close right here.  I just love the way it speaks of God's almighty creative power and awesomeness! How He speaks and it is done, it is created, it is accomplished. How great Thou art!

Wednesday, May 2, 2018

Heartfelt Creations - Lilac Watering Can

Good morning!

I am in love with the Lush Lilacs and found 
a great template for a watering can (link found below) that I 
wanted to use to do some lilac stems like the
ones on my lilac bushes right now.


HC PRODUCTS USED      

Other Products:
Heavy white card stock, lavender rhinestones, Iridescent grass, Copic: Y11, Y15, Heavy Duty Tacky Glue

For more tips on creating with the Lush Lilac collection, watch the tutorial at https://youtu.be/KDbdzC0MnAI.
For more tips on creating with the flower shaping molds, watch the tutorial at https://youtu.be/FSdPL7nXvQE.

Instructions:
Size is approx. 4 X 7 ½”  I used a tutorial and template from SplitCoastStampers for the watering can and enlarged the template 129%.  It still all fits on one 12 X 12” piece of paper.
Tutorial 
Template
Cut watering Can from heavy white card stock and from decorative paper.  Glue each piece of paper to corresponding card stock.  This makes the watering Can sturdier for filling.  Ink all the edges with Deep Purple and Cactus Flower.  Put can together and sponge adhesive on then glitter with Crystal Clear.  To make flower stocks take 3 wired stamen (I did 3 different colors of purple) and twist stems together.  Cut 2 of the largest circles and quarter them.  Cut the tips off and make little cones.  The stocks in the can (5 of them) use one cone each.  Insert the stamen and glue the tops to stay.  The lilac stock at the base of the can is 2 cones bottom to bottom meeting in the middle and glued together (looks like an elongated diamond).  Let all these dry thoroughly.  For the next step it would be handy to have a piece of foam to stick the stems in to dry.
Stamp Leaves (with Leaf Green), Lush Lilac (with Deep Purple) and butterflies (with Cactus Flower) on white card stock, die cut and sponge with color (I sponge the flowers BEFORE die cutting, including the back sides with a combo of Cactus Flower and Deep Purple). Die cut another Butterfly Kisses butterfly (cut off the tendrils)  to glue to the back of stamped Butterfly Kisses after adding acetate (two strips together for strength).  I used Tacky glue to glue the acetate between layers. The wings are glittered with Ultrafine transparent.  Set aside to dry and start on the Lilac stocks.  Completely cover cones with Lilac blossoms, using both Deep Purple and Cactus Flower blossoms.  Stick stems into foam to dry upright.  For the Lilac stock at the base of the can, wrap stem, adding in leaves off of Classic Leaf stem, as you go with green washi tape or floral tape.  If you use washi tape, glue ends because washi tape is more of a temporary tape.  Glue this one to the base of the can.  The other stocks are glued in the can along with the grass, butterfly on acetate and leaves.  Glue the second, smaller butterfly to the can on the outside.

Thanks for visiting today!
Robin

Hebrews 11:6 New King James Version (NKJV)

But without faith it is impossible to please Him, for he who comes to God must believe that He is, and that He is a rewarder of those who diligently seek Him.


Wednesday, April 25, 2018

Heartfelt White On White Love-Special Release


Good morning!
This is what we've been waiting for, wow, look at these new
amazing dies!!!
They are so beautiful, I just LOVE them!


My main decorative framing die has a layer of Fun Foam under it to really make it stand out.
This side view shows the dimension better.

These flowers are the Lush Lilac blossoms made from Vellum.
I did use the shaping mold and it worked fine on the vellum.
You can't see it but the basket/nest is made with the new
1/4 circle decorative die on an eyelet heart. 

HC PRODUCTS USED     

Other Products:
White linen card stock, white StazOn Ink, Fun Foam, Dove gray card stock, pearl, sheer ribbon, white pearl embossing powder

For more tips on creating with the flower shaping molds, watch the tutorial at https://youtu.be/FSdPL7nXvQE
For more tips on creating with the Lush Lilac collection, watch the tutorial at https://youtu.be/KDbdzC0MnAI

Instructions:
Card size:  5 X 7” Die cut Eyelet Rectangle large, ¼ doily, Intricate Swirl Frame-middle section out of the large Eyelet Rectangle, Cut Eyelet lace frame, 2 largest Eyelet Hearts from white linen, cut one each from Fun Foam.  Stamp and emboss Love then die cut and glitter, die cut 4 more love to layer.  Stamp Lilac blossoms with white StazOn on vellum and die cut (about 30) Place into mold and mist with water then run through die cut machine to form. Stamp Leaves with white stazOn on vellum (7) and die cut.  Stamp doves with white pigment and emboss on dove gray card stock and die cut. 
Let blossoms dry and pierce centers then insert stamen and glue in place and let dry.  Let Fun Foam rest over-night for best results with these intricate die cuts (they need to relax after being flattened in the die cutting machine).  Spritz leaves and blossoms with shimmer spray.  Once everything has a chance to dry and Fun Foam is back to shape, start layering. One layer of Fun Foam behind Eyelet Lace Frame, 1 layers behind the middle cut out section of the Intricate Swirl Frame None under the middle decorative section of Intricate Swirl Frames, one layer on smaller heart and 2 layers under largest heart (cut outside eyelet part off Fun Foam large hearts, it’s un-needed).  On the ¼ doily die cut leave about ¼” borders on each side to use as tabs for gluing.  Glue tabs to heart stack trying to follow sides as close as possible (top corner will stick out a bit).  Fill the “basket” with iridescent grass and start adding leaves and flowers to the basket.  When you have as many flowers as you think you want then add the two doves, foam tape them away from back if needed.  Add the letters for love above the doves and to finish add small and medium pearls.  Tuck a sheer bow under dove’s heads and tuck some sheer ribbon tails into flowers here and there.


HC PRODUCTS USED     


Other Products:
Pearls, white card stock, light blue card stock, light orange card stock, foam tape, hot pink card stock

Instructions:
Card size: 5 1/8 X 7 1/8”  Cut light orange card stock to 5 X 7”.  Die cut 2 long Leafy Frame pieces and 2 shorter Leafy Frame pieces to make a 5 X 7” frame from hot pink.  Glue these pieces to edges of light orange panel starting with 2 side pieces (after gluing the first side, glue center decorative piece in place so that the edges are covered with frame) and then glue top and bottom.   Stamp sentiment using Vibrant Fuchsia onto decorative center.
Stamp butterflies with Vibrant Fuchsia.  Sponge large butterfly with Vibrant Fuchsia and Garden Patina then sponge small butterfly with Tiger Lily and Vibrant Fuchsia then form both butterflies from the back especially the wings.  Sponge with adhesive and use Crystal Clear to glitter.   Glue butterflies to card and then add pearls for heads and to inside corners of card Frame..

Thanks for visiting today!
Robin

John 10:28-30  (NKJV)

28 And I give them eternal life, and they shall never perish; neither shall anyone snatch them out of My hand. 29 My Father, who has given them to Me, is greater than all; and no one is able to snatch them out of My Father’s hand. 30 I and My Father are one.”

Wednesday, April 18, 2018

Heartfelt Creations - Butterfly Shadow Box Card

Good morning!

I have a birthday card to show you today!!!
This beautiful butterflies are wonderful for a friend or sister, mother, daughter aunt...they are so feminine and gorgeous!


I've combined a shadow box with a 5 1/2 X 7" card to create a beautiful scene surrounded by flowers.  
Look how well the sentiment goes with the curved dies!!!


I used ruffled Petunias again on this card...I just love the way they look!

HC PRODUCTS USED     

Other Products:
White card stock, Stickles-Diamond and Crystal,  Cosmic Glimmer glitter, light green card stock

Instructions:
Card size: 5 ½ X 7”.  Make card base  and cut a  piece of decorative paper from the Butterfly Dreams paper to cover the front leaving about 1/16” border of white.  Use a coordinating paper to cover the front of the shadow box then use the square die to cut out the window. Cut another piece of decorative paper for inside the box and then put the box together.  Sponge pink ink around all the edges.  Glue box to card base on the right side of base.
Stamp Sentiment using Vibrant Fuchsia on white then use the plain edge of the Delicate Border to die cut the sentiment.  Sponge pink on the edges.  Cut 2 Delicate Borders out of light green stock to match paper and glue to edges of sentiment.  Die cut 3 Festive Holiday dies, place 2 at an angle on the top portion of the shadow box then glue sentiment on top.  Glue the 3rd Festive Holiday die on the left side, on card base.
Stamp, die cut and sponge color on the Butterfly Dreams Border, Wildwood Blossoms, Petunia Blossoms and leaves.  Form leaves, and wildwood blossoms with Deluxe Flower shaping kit and round the backs of butterfly wings with the large stylist as well.  Place the petunias in mold and mist then run through die cutting machine.  Pinch petunia petals to pleat and ruffle. Let them dry completely then pierce each one in the center and add stamen one layer at a time gluing between each layer.  Add Prills to centers of wildwood blossoms.  Cut one butterfly completely off one of the Butterfly Dreams border to stand alone.  Add Stickles to Butterfly wings and stems of the Butterfly Dreams border (there are two different borders in the Butterfly Dreams Border).  Add Cosmic Glimmer glitter to the little round blossoms on the Butterfly Border.
Glue the Butterfly Border to the left side of the shadow box and the single butterfly to the top right.  Glue the leaves and blossoms on the left side, on the base, over the Festive Holiday die.

Thanks for visiting today!!
God bless you!
Robin


Romans 5:6-8 New King James Version (NKJV)

Christ in Our Place

For when we were still without strength, in due time Christ died for the ungodly. For scarcely for a righteous man will one die; yet perhaps for a good man someone would even dare to die. But God demonstrates His own love toward us, in that while we were still sinners, Christ died for us.
Can you imagine someone taking your punishment even while you still did not know Him or worse yet, hated Him??  That is what Christ Jesus did for ALL who would turn to Him and believe in Him.  ANYONE, no matter how great the sin is welcome if they go to Jesus, ask forgiveness, except that He died and rose to life again, except Him into their heart.  To from whatever sin you are practicing and live according to His word.  He is kind and good and gives good gifts to His children, you don't have to be afraid to follow Him!  He loves you more than father, mother, husband or wife...He loves you without condition and WANTS you to receive His free gift of eternal life with Him.

Wednesday, April 11, 2018

Heartfelt Creations - Celebrating You!

Good morning!

It's officially spring and what reminds me of spring the most are 
flowers and butterflies!

Soft breezes blow carrying the sweet scent of flowers through the air, while the summer sunshine fills your heart with warmth! There’s no grander place to leave your cares and worries behind than a beautiful garden! It’s the perfect place to lose yourself in a day dream as you’re surrounded by bountiful blooms playing host to a kaleidoscope of butterflies! What is it about butterflies that evoke so many feelings of joy, memories of loved ones gone before us, and the gentle reminder that the trials of life can transform us into something beautiful! Join us in celebrating the beauty of life with the new Butterfly Dreams Collection by Heartfelt Creations! Lose yourself in a bright and happy hued paper collection filled with vivid pinks, blazing oranges, soft blues and soothing teals, boasting dynamic imagery of beautifully illustrated butterflies and divine florals encompassed in whimsical swirls and beautiful brocades! Several sizes of artfully illustrated premade card fronts, and elegant scrapbook pages set the perfect scene for hand shaped and embellished butterflies, along with your favorite dimensional flowers! Three fanciful cling stamp sets with coordinating dies lend themselves perfectly to adding a touch of elegance and grace to your one of a kind paper creations with delightfully scripted sentiments, stylish butterfly borders, detailed decorative dies, and several fascinating butterfly illustrations! So close your eyes, allow yourself to relax, and come along with us as we escape to a place filled with Butterfly Dreams!


HC PRODUCTS USED      
HCD1-7178       Fluttering Butterfly Die
HCD1-7120       Fleur Border Basics Die
HCD1-778         Fleur Borders and Pockets Die
HCD1-7146      Festive Holiday Die

Other Products:
Pearls, pink card stock, white card stock, 3-M foam tape, Copic Markers: E44, E43,R81,R83,R85 YG61,G21,G82 Comic Shimmer Glitter Jewels: Icicle Sparkles.

Instructions:
Card size: 6 X 7 closed.  Start with the black 6 X 6 foldout card and cut Butterfly decorative paper for each panel (inside and out, you can cut 2 at once for front and back just make sure paper is facing correct direction especially the back panel).   Glue paper panels to each corresponding card panel.  Cut borders from pink card stock to go on each side, front and back, matching curves.  Cut a 6” Fleur Border for the back panel and line it with decorative paper.  Cut a pocket for inside and a Festive Holiday also from pink card stock.
 Stamp and die cut, from white card stock, and then sponge color onto all the butterflies, Peony flowers, Rain Boots and Blossom flowers and leaves, and tiny Wildwood blossoms.  Place Peony blossoms in the Basic Shaping Mold to form and mist with water then run through cut and emboss machine.  Let dry.  Form tiny flowers and let dry.  After drying, pierce each peony blossom in the center and thread a wired or small stamen through one blossom at a time to form completed flowers. (Piercing the centers also helps to form the “bowl” shape for your flower).  The tiny flowers have Prills for the centers. The little round flowers from Rain Boots and Blossoms is covered with adhesive then sprinkled with the Cosmic Shimmer Glitter.
Sponge color on each butterfly and brush adhesive on the wings then glitter with Ultrafine Transparent.  Brush or sponge some adhesive onto flowers and glitter with Crystal Clear.  Set flowers and butterflies aside to dry completely.
Stamp words on front panel and inside back panel using Vibrant Fuchsia Archival Ink.  Make tages by cutting them out of decorative paper with the Luggage and Tag set.  Add ribbons to each tag.  Glue 2 sides of pocket to the inside of 3rd panel (from the left). Insert on of the tags.  Cut a thin border from the decorative paper and mat with pink card stock.  Glue the 2 short ends to inside of back panel (make sure to leave enough room for sentiment to show above tag) to form a pocket then insert tag.
Decorate panels with flowers and butterflies, (Make sure card is not too bulky to close by making sure that most of the 3-D flowers are above the panel in front of it.  Pop up butterfly wings with foam tape.

Thanks for visiting today!!
Robin

Romans 12: 2
And do not be conformed to this world, but be transformed by the renewing of your mind, that you may prove what is that good and acceptable and perfect will of God.
I love this verse.  I renew my mind by reading and listening to the Word of God each day.  Staying in His Word help to keep me focused on Jesus, His Word is my compass. It helps me to walk in His path not the world's way.
Because narrow is the gate and difficult is the way which leads to life, and there are few who find it.
Jesus said, 
 “I am the waythe truth, and the life. No one comes to the Father except through Me. John 14:6 


Wednesday, April 4, 2018

Heartfelt - Flipfold Ruffled Petunia

Good morning!

I just love all the beautiful decorative dies that Heartfelt Creations has added to their collections!  I think it adds so much delicate elegance.  One of my favorites is the Festive Holiday die, it looks especially good with circles and ovals.

The papers with landscapes always makes me want to show it off in a nature style card like this one.  We live in a place that looks a lot like this especially in the spring with all the wildflowers and blossoming trees that start popping up everywhere.
The main flowers on this card were done with the Small Petunias and the Floral Basics shaping form.  I also gave each petal an extra pinch to make them look a bit more ruffled...easy to do because the form starts it for me.


Heartfelt Creations products used:


Other Products:
Grape Seed Memento , 3M Foam Tape, white card stock, Fun Foam, Copic Markers: E50, E53, E33, YG03, V01, V12, V15, BV01, R20, R81, R83, R85, B00, B01, B000, Mowed Lawn Distress Ink, Pink fiber

For more tips on creating with the flower shaping molds, watch the tutorial at https://youtu.be/FSdPL7nXvQE.

Instructions: 
Card size: Approx. 7 ½ X 7 ½” closed.  Start by cutting left side (leaving right 6” as is) with the plain edge of Fleur Border Basics (fold closed far left panel onto the next panel to make a pocket then cut so that when glued down as the pocket, it marches at the top).  Cut decorative paper from the Sweet Peony collection to match each panel then glue each paper down to card base except the 6” right side.  Slip second to the left down under pocket before gluing pocket down at the top and bottom.   Cut an oval from the 6” piece of paper then  cut a piece of Fun Foam the same size (6”), cut an oval from it as well to match paper then glue the Fun Foam to the back of paper,  glue this stack to card base on the right panel.  The oval that was cut out of the paper will go into oval opening, flat to base, so that it sits inside and card is raised up.   Cut Decorative borders from white linen card stock and glue to top.  Cut a frame for the oval opening with the Eyelet oval and next size down.  Cut 2 Festive Holiday dies from white linen (1 will go right side of oval opening and 1 will go left side of outer edge of pocket.
Stamp, die cut and color 2 sets of deer, the bunnies and the little birds from Woodsy Critters.  Stamp, die cut and color petunia blossoms, Rain Boots & Blossoms flowers and leaves and Wildwood tiny blossoms in 3 colors, purple, pink and yellow.  Stamp trees, die cut and color.  Shape leaves and blossoms (except petunias) place petunias in Basic Flower Shaping Mold and mist with water.  Run through a die cutting machine to form.  Pinch each petal (in a pleating fashion) together after removing from mold and let dry completely.  (Some of the petunia flowers made are actually the petunia leaves colored flower colors and shaped like the others).  After blossoms are dry, pierce each blossom in the center and insert a stamen in through the holes staggering petals on each layer (place a bit of glue between each layer).  Stamp sentiment with Grape Seed and die cut with oval die then edge with Pearlescent Purple.
Glue sentiment to center of oval opening.  Glue one set of deer to bottom part of oval then glue white oval frame to oval.  Glue 1 Festive Holiday die cut to right side of oval.  Glue bunny to center panel, glue trees to left pocket panel then  glue second set of deer (cut apart) to left side panel even over part of pocket but don’t glue that part of the deer down.  Glue second Festive Holiday die cut to back of left pocket panel.  Cut three tags of different sizes and tie together with pink fiber then slide into pocket.
Decorate top right and top left with flowers and leaves.  Use foam tape to attach little birds.  Put dots of glue at the bottom and add Prills for tiny flowers in the fields.

Thanks for visiting today!  Have a blessed day!!
Robin


Hebrews 12:2 (NKJV)

looking unto Jesus, the author and finisher of our faith, who for the joy that was set before Him endured the cross, despising the shame, and has sat down at the right hand of the throne of God.
I love the quote "God is not finished with me yet!"  How true is that!!  He works in willing hearts...Open your heart to Him, He knows you better than you know yourself anyway so you aren't hiding ANYthing from Him, ever...Go ahead and trust Him.  God loves you more than ANYone else ever could...He will do what is best for you!  He gives His children good gifts, trust Him with your life.  I am a testament of the mighty love of God and His grace and mercy!