Good morning!
I was actually raised at the beach and I know that there are flowers so
this week I added some flowers to the corner.
One of the pretty flowers you always see near the beach is on the ice plant
(well, that is what I call it anyway) it comes in lots of colors.


HC PRODUCTS USED
Other Products:
White cardstock, foam sheet, foam tape, Stickles, ribbon,
Copic Markers: B12, B24, Y11, Y15, Y21, Y24, Y38 R17, R29, R81, C2, C3, E81,
E84, W2, W3. W5, R11, E50, BG11, E42, E43, E33, E35, E53, YG03, YG17
For more tips on creating with the flower shaping molds,
watch the tutorial at https://youtu.be/FSdPL7nXvQE
Instructions:
Card size: 6 3/4 X 7 3/4". Cut one of the 6 X 6 frame panels from the
decorative paper that has a square center, cut out the center with the Cut Mat
Create 2A square 3 3/4" die. Cut a piece of foam sheet 5 3/4 X 5 3/4"
then cut out the square to match paper.
Cut 4 Decorative Pocket Accents dies from white, glue 1, facing down
under top of paper frame then glue paper and foam together. Cut another 3 3/4” panel from sunset sky
decorative paper in the pad, also cut a piece of blue about 1” then die cut the
bottom to match bottom of sunset square.
Cut a piece of white cardstock 12 X 6 and fold in half for card base. Glue
3 Decorative Pocket Accents to base facing out (top, right and left) then glue
the frame to the card base.
Stamp
sailboat, sunset, lighthouse, birds, bird on post and 2 shell sets. Die cut (shells have 2 dies, cut one image
with sand and shell and the other just the shells) then color. Glue lighthouse and sunset to square, match
horizon lines. Pop sailboat with foam tape then adhere to bottom center of
square. Slide the square into the cut out window, under the Decorative Pocket
Accent then add a bit of foam tape to decorative Pocket Accent to keep it
popped up over scene.
At the bottom of the frame, glue bird on post, the sand
and shell and pop up the second set of shells.
Die cut tag sentiments and glue to the bottom right side of frame.
Stamp Cherry blossoms using Forget Me Not , sponge, die
cut and form in mold. Stamp leaves using Fern Green, sponge with Leaf Green then
die cut and form in mold. Glue 2-3
blossoms together to make each flower then pierce centers and add stamen. Glue 3 flowers and leaves to the top left
corner of frame. Add glitter to shells, sand, clouds, and flowers. Add Stickles to water and light in
lighthouse.
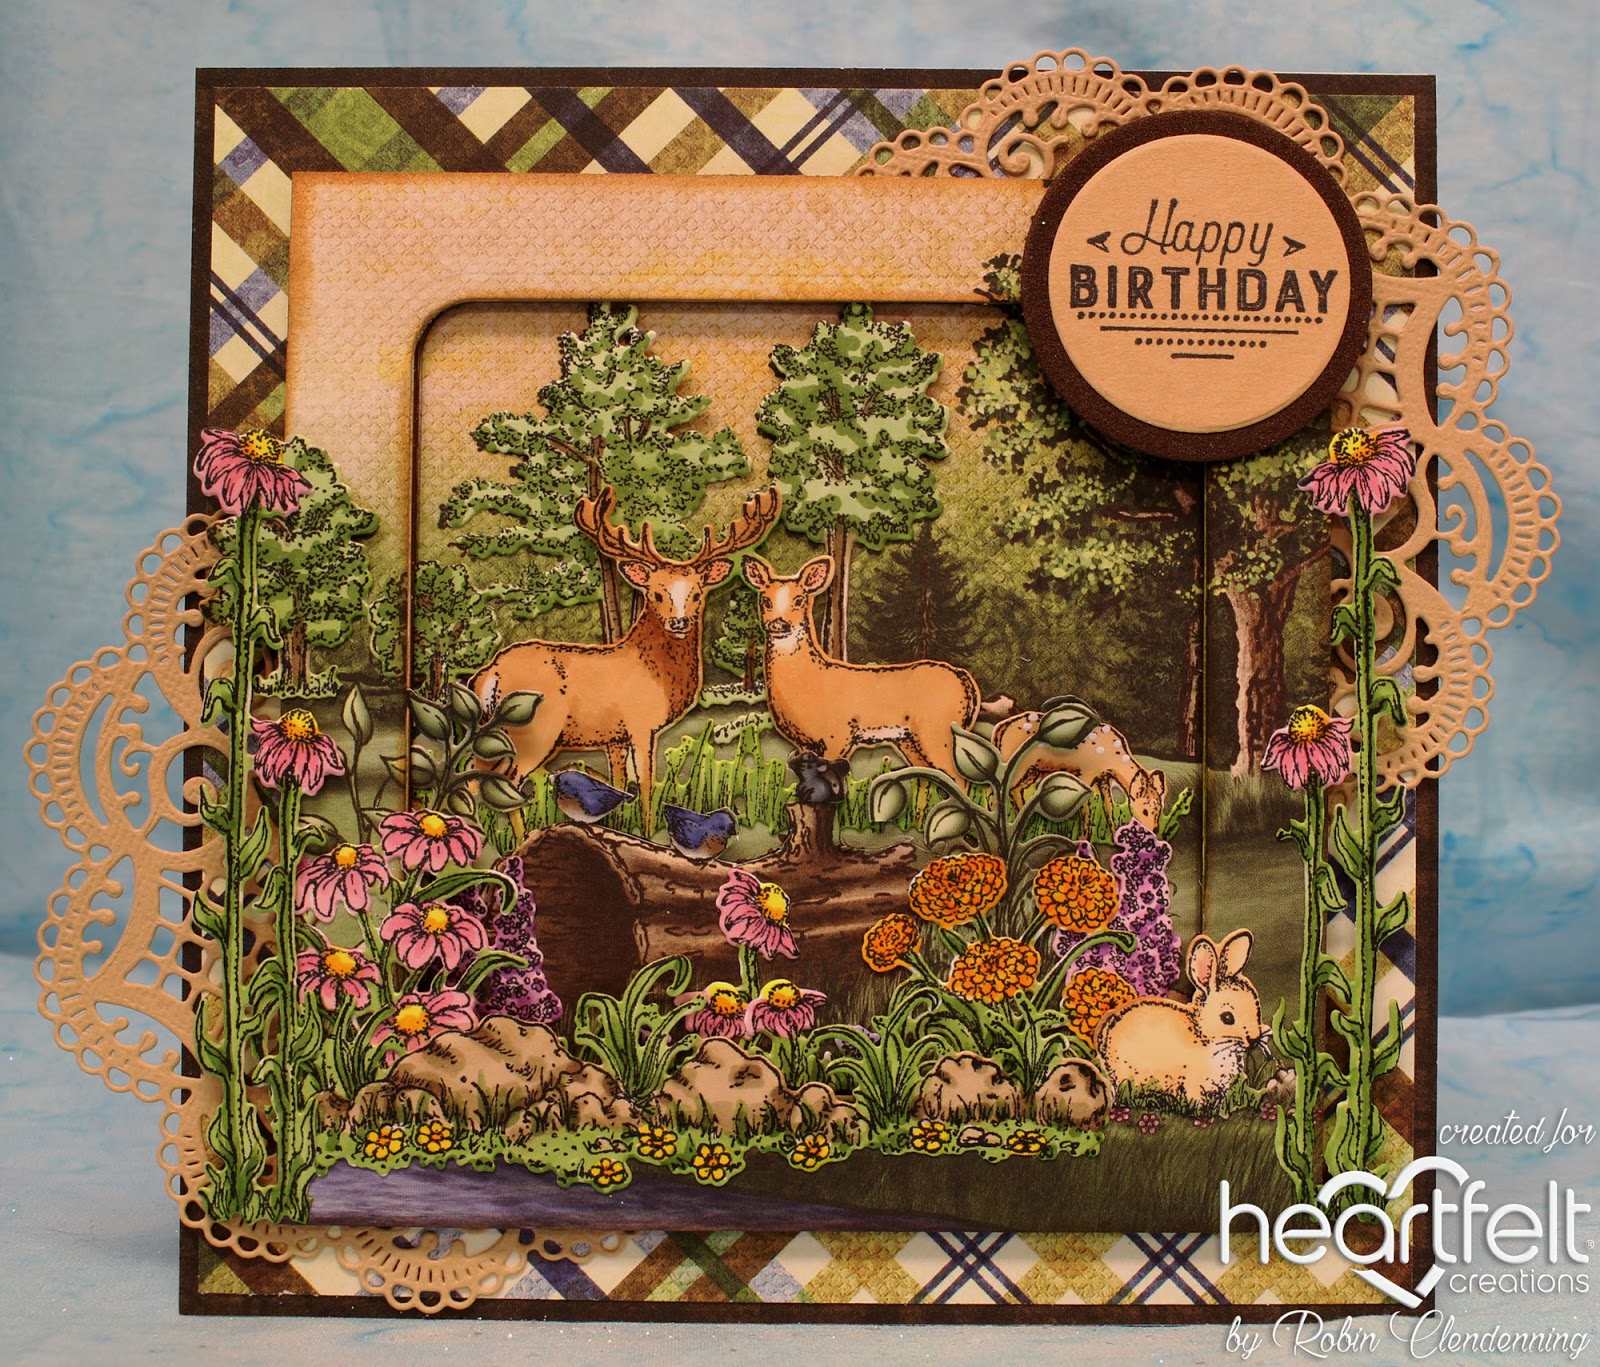
This is a total guy birthday card! The colors, and papers, even the sentiment font says guy to me.
HC PRODUCTS USED
HCPC-3766 Woodsy Treescape Stamp SetHCPC-3767 Woodsy Wonderland Stamp Set
HCPC-3768 Woodsy Critters Stamp Set
HCD1-7122 Woodsy Landscape Die
HCD1-7123 WoodsyWonderland Die
HCD1-7124 Woodsy Critter Die
HCDP1-273 Woodsy Wonderland Paper Collection
HCD1-7182 Garden’s Edge Coneflower Die
HCPC-3828 Garden’s Edge Coneflower Stamp Set
HCD1-7146 Festive Holiday Die
HCD2-751 Cut Mat Create 2A Die
HCD1-7155 Circle Basics Large Die
HCD1-7154 Eyelet Circle & Basics Small Die
HCPC-3843 Special Birthday Sentiments Stamp Set
352854 Metal Tip for Adhesive Bottle
159723 Dries Clear Adhesive
TSMP900 Tuxedo Black Memento Ink
Other Products:
For more tips on creating with the flower shaping molds,
watch the tutorial at https://youtu.be/FSdPL7nXvQE
Instructions:
Card size: 6 1/8 X 7 1/4". Cut white 6 X 12”, score then fold in
half. Cut a piece of dark brown 6 1/8 X
6 1/8”. Cut a piece of foam sheet 4 3/4
X 4 3/4" (brown or black is best but white will be ok). Cut a Plaid 6 X 6
panel from decorative paper and cut it down to 5 3/4 X 5 3/4". Cut a decorative scene with trees and log in
front to 4 3/4 X 4 3/4", cut 2 kraft Festive Holiday dies. On the
decorative scene panel, use the large
square die in the Cut Mat and Create 2A to cut out the center. Use the scene frame as a pattern to cut out
the foam sheet with the square to match (save the inside square for something
else). Glue the paper to the foam sheet,
matching edges and opening edges, glue the kraft die cuts to the back side of
foam frame top right corner and bottom left corner. Sponge Tea Stain Distress Ink on the edges
inside and out of the paper/foam frame then glue it to the plaid panel centering.
Take the square cut out of the scene
panel and glue it down into popped up frame. Glue the plaid to the brown cardstock then to
the card front.
Stamp
critters, trees, landscapes (flowers, rocks/grass), and the coneflowers using
black ink, die cut and color. Glue small
trees to the background over/with scene trees including 1 on and extending over
the frame. Glue deer to the background
(use a craft knife to cut around the leaves etc. to tuck deer behind
them). Pop flowers, bunny, rocks onto
frame, the tall coneflowers up the 2 sides.
Stamp “Happy Birthday” using black onto kraft cardstock
then die cut it with a circle die. Use a
larger circle die to make a mat with
dark brown. Glue the mat to the
sentiment then pop it up on the top right corner of the frame. Because this is a masculine card no glitter
was used.
Thanks so much for visiting today!
Robin
Thanks so much for visiting today!
Robin
2 Samuel 7:22 New King James Version (NKJV)
22 Therefore You are great, [a]O Lord God. For there is none like You, nor is there any God besides You, according to all that we have heard with our ears.
1 comment:
Two gorgeous cards Robin! The coloring on your beach scene is so beautiful and I just love the Woodsy Wonderland card! Amazing!
Post a Comment