Good morning heartfelt friends!
I have a tutorial this morning, which includes the new Home on the Farm stamps and dies.


Step 1: Cut 2 pieces of white cardstock, sizes: 6 x 7” for the inside, and 6 x 6” for the sides. Use the decorative Rounded Sunlight Window Die and Heart of Joy Decorative Die to cut the top of the inside piece.

Step 2: Cut the side piece into 2 (cut at a diagonal) pieces, 1 measuring 2” x 3 1/2" and the other measuring 2 1/2” x 4”. Score each of the taller sides at 1/2" to make the tabs that will be glued to the back of the inside piece.

Step 3: Make 1/4" tabs at the short ends to fit
into slot in the (inside) base at 5” from the left side and the other slot on
the left wing (side) at 1 5/8” from score line. Make sure to match all bottoms
before cutting slots.

TOP TIP: Re-enforce tabs with acetate packaging to help them go in and out
multiple times.

Step 4: Cover each panel (the sides are covered
inside and out) with decorative paper.

When covering panels with decorative paper make sure to recut slots before covering both sides to keep from losing where the cut is.
After covering each panel, glue sides onto the inside piece.
Step 5: Stamp all farm scene pieces using black (Memento for Alcohol Inks, Archival for water color), 1 cow, 1 horse, 3 each of the chickens, 1 rooster, 1 barn, 5 fence pieces or more if needed, 1 each of the adult goats, 2 sunflowers, 2 wheat stocks, 2 hollyhocks, 3 zinnia, 1 milk can, 1 cat, 1 dog, 1 each mice and a hay bale.

Color all pieces with chosen coloring system. Cut 1 extra barn (no
stamping on this one or cut windows) for the inside of the barn (use a dark
color).
Step 6: Cut 2 fence border pieces from Border Essentials Die out of white
cardstock, then glue them to the tops of sides.

Step 7: Ground scenes inside and out with a 3/8” strip of green decorative paper for grass. Now start gluing stamped pieces to the card to create the little scenes.

The Barn is popped up over the barn inside with the kitten looking out
of the top window, the hay bale and mice just inside the door pieces. Milk can
to the right, then chicken and dog on the left of the barn, rooster on top of
the barn.
Step 8: For the inside of the right wing, glue a full fence, 2 zinnia, 1 hollyhock and 2 chickens (avoid tab). The inside of the left wing has the horses, 1 chicken, 1 zinnia and 1 hollyhock.
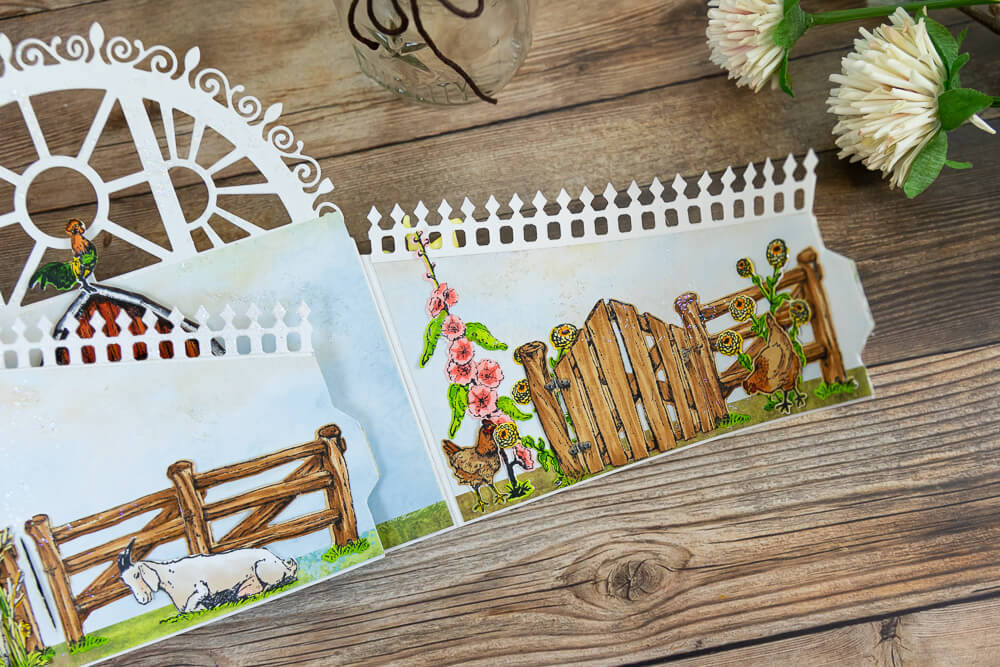
Step 9: For the outside of the 2 side wings: Left side, glue 3 fence pieces avoiding slot and tab. Glue a sunflower and wheat stock to the far-left side then pop up the standing goat in front of them. Glue the laying goat (baby cut off in this scene) over the fences on the right.


For the right wing: Glue 2 more fence pieces, 1 on the right side and 1 on the left side then glue a sunflower and wheat stock in front of the fence on the right, a chicken in front of the fence on the left. Pop up the cows in the center.

Step 10: Glitter the card especially around all the top sections (avoid the animals if possible).
To show the dimension, this is the card laying on its back. Finished closed card is 6” x 7”.

Heartfelt Creations supplies:
HCD1-783 Border Essentials Die
HCD1-7272 Rounded SunlightWindow Die
HCD1-7256 Heart of JoyDecorative Die
HCD1-7316 Home on The farm Die
HCD1-7318 Barnyard Accents Die
HCPC-3925 Home of the FarmStamp Set
HCPC-3926 Happy Meadows StampSet
HCPC-3927 Barnyard AccentsStamp Set
HCDP1-2120 Home on the Farm Paper Collection
TSMP900 Tuxedo Black Memento Ink
85-glitter CrystalUltrafine Transparent Glitter
352854 Metal Tip forAdhesive Bottle
Other Supplies: White cardstock, dimensional pop ups, Brown cardstock (for inside of barn). Copic colors: E31, E33, E35, E37, E50, E51, E21, E53, E08, E49, E43, E44, Y21, Y11, Y15, YR04, YR24, YR27, YG03, YG17, YG23, YG91, C1, C3, C5, R43, R22, R20
2 comments:
It looks like you had heaps of fun creating this. Every bendi inch makes me smile sweet Robin.
I absoluletly love this card Robin! You've inspired me to try making a bendi card. Great tutorial!!!
Post a Comment