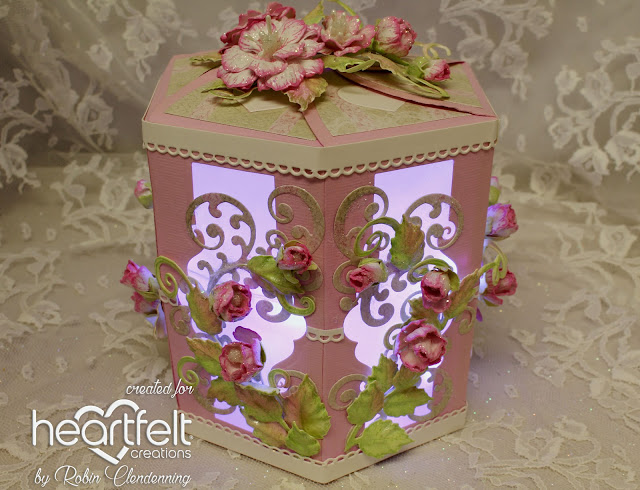
Step 1: Cut out 12 of the Treasured Heart Gift Box pieces. (This is a six sided box). This sample uses a light pink, but any color would be fine.

Step 2: Cut the half oval top off of 6 box pieces. Making sure to have gluing tabs all on the left side, glue 2 box pieces together vertically (line up score line carefully for a straight box). Now there should be 6 double high box pieces.

Step 3: Use the inner die from the Ornamental Tags die set to create a tall narrow “hole” on each side. (Do this before gluing sides together).

Step 4: Cut 6 pieces of vellum measuring 2 1/8” x 4 1/4" each, then glue to the inside of each box panel.

Step 5: Glue box sides together matching score lines at the bottom and cut lines at the top until all sides are glued but wait on gluing last sides together forming the box.

Step 6: Cut out accessory pieces; 6 curl hearts, strips of straight eyelet (made with the long eyelet die in the Tickets and Tags Die Set), 12 inner box tops with the heart cut out (6 in one direction and 6 in the opposite direction as far as the heart placement) and 6 white plain hearts (these will go inside and outside the box for the closed box and for the open box as a lantern).
Set pieces aside in one place until needed.

Step 7: Use the eyelet pieces between box panels at the center seam. Glue the inside box tops on with hearts upside down and then glue the curly hearts into the heart openings. Glue the box top outsides with heart cut out being right side up.
Then glue the solid white hearts into the heart openings. When box is closed with top half ovals tucked, hearts should look right side up. When box is left open for the fairy lantern, hearts will appear right side up as well, if glued on correctly.

Step 8: Stamp using Magenta Hue, sponge both sides, die cut and form Wild Roses in Small Wild Rose 3D Shaping Mold. Make 18 of the smallest Wild Roses, 3 for each of 6 sides. Roses should be pressed in the centers of the back side so that petals come up with stamped side showing. Glue some tight and some a bit looser with a beaded wired stamen in the center of each.
Stamp using Leaf Green, sponge both sides using New Sprout, die cut and form Leafy Accents leaves in 3D Leafy Accents Shaping Mold. Give leaves a bit more color by adding some flower color to the edges of some.

Step 9: Stamp, sponge (using green) and die cut Lilac Blossoms for the Sepals at the bottom of each rose bud. Glue some tight and some loose.

Step 10: Cut 6 Swirly Border Accents, 1 for each side, out of light green decorative paper (Wild Rose Collection). Then glue 1 to each side having every 2 sides facing each other.

Step 11: To make it a little easier for arranging buds, twist wires together spacing buds and curve wires to match Swirly Border Accents. Use heavy duty glue (like Tacky Glue) to glue wired flowers on to each side then cut leaves apart and add them to the buds as desired.

Step 12: Glue final sides together to form box and use clamps or just hold with your fingers until firmly set and dry. Then, cut 2 bottom pieces from light pink and glue one of the bottoms inside the box, wait till totally dry then glue the other bottom on the outside. (This last step is not necessary but will give the box/lantern a finished look.)


Step 13: Die cut white straight edge eyelet again, measure 1/4" from edges and cut to make small top and bottom borders for box.

Step 14: Stamp, sponge, die cut and form more roses for the top of box. Use a set of leaves as a base (place on waxed paper or scrap decorative paper to be cut away later). Glue flowers and more leaves on top and leave to dry (this would also be a good time to add a small tag as a gift card).
When flowers are completely dry and hard, glitter them and gloss the leaves (do the same to the flowers and leaves on the box itself), peel the waxed paper away (or cut scrap paper close) and use a glue dot or other temporary adhesion to add flowers to the top of closed box.


TOP TIP: Learn more creative ideas with the Treasured Gift Box die, watch this video here: https://www.heartfeltcreations.us/video/how-to-create-elegant-flowers-gift-boxes-the-ez-way


No comments:
Post a Comment