Pages

Comments are welcome and very much appreciated!

Tuesday, October 19, 2021

Christmas Wishes

Good morning!
I've used the wreath pieces this time for a Christmas card!
I love the bell included with this set!

find the materials list HERE

Card size:  4 7/8 X 6 7/8”

Cut shaped card (see video) from white cardstock folded to 5 X 7”.  Leave cutting edge of outer Lattice Swirl Gateway hanging over the fold by about 1/4".  Cut another white front of card then glue in place matching bottom, top and right-side edges.  Cut 1 decorative Lattice Swirl die from red and 1 from gold cardstock using the outer die with the decorative die to make a frame.  Glue gold frame and red decorative die to card front. 

Cut Seasonal Wreath outline from green paper and 1 from green decorative paper.  Cut some Seasonal Wreath holly from Gold Luxe.  Cut bow from gold luxe and red cardstock (gold will be the outline of bow).  Cut one of the sentiments from decorative paper then cut a gold mat for it, fishtail ends.

Stamp all winter pieces multiple times, die cut, color.  Glaze some pieces with Lacquer.  Glitter other pieces.  Hang bell in the center of wreath with gold thread (easiest to do before decorating wreath). Make the wreath with all the winter pieces colored and cut out.  Glue the bow at the top then pop wreath up inn the center of Gateway opening.  Support bell with double layer of pop up dot.

Stamp poinsettia using Vermillion, sponge with Red carnation, die cut then shape in mold (see video).  Insert gold bead stamen through double layer of poinsettia for each flower.  Stamp leaves using Fern Green, sponge with Leaf Green, die cut and shape in mold.  Glue 3 flowers and several leaves to the bottom of card. 

Curve the sentiment and glue it between wreath and poinsettia.  Glitter flowers and card.

Robin

Psalm 139:1-6, 13-16

O Lord, you have searched me and known me!
2 You know when I sit down and when I rise up;
    you discern my thoughts from afar.
3 You search out my path and my lying down
    and are acquainted with all my ways.
4 Even before a word is on my tongue,
    behold, O Lord, you know it altogether.
5 You hem me in, behind and before,
    and lay your hand upon me.
6 Such knowledge is too wonderful for me;
    it is high; I cannot attain it.

For you formed my inward parts;
    you knitted me together in my mother's womb.
14 I praise you, for I am fearfully and wonderfully made.[a]
Wonderful are your works;
    my soul knows it very well.
15 My frame was not hidden from you,
when I was being made in secret,
    intricately woven in the depths of the earth.
16 Your eyes saw my unformed substance;
in your book were written, every one of them,
    the days that were formed for me,
    when as yet there was none of them.
 

Monday, October 18, 2021

Merry Christmas Scrollwork


Hello Amazing Paper Grace Fans!

Today I have another Christmas card for you.  
I've gone with a darker than ivory background and this gorgeous scroll 
slimline in metallic gold (it is actually half this size, 
I doubled it making a diamond in the center).
I used a red and dark cream plaid paper that has thin gold lines.
It matches so perfectly!
I had to go with some beautiful poinsettias again but this time in a darker red.  
I used some tiny gold micro beads for the centers.
To finish off this card I made a double metallic gold bow.

I hope you give this one a try!  Go get crafty!!
Robin


Silent Night Make A Scene


God speaks these words over those who love and honor Him.

Psalm 91: 14-16
14 "Because he holds fast to Me in love, I will deliver him;
    I will protect him, because he knows My name.
15 When he calls to Me, I will answer him;
    I will be with him in trouble;
    I will rescue him and honor him.
16 With long life I will satisfy him
    and show him my salvation.”


Friday, October 15, 2021

Shaped Gift Cards


This magical menagerie of dies helps celebrate one of the most festive times of the year through paper crafting! The Holiday Medley Collection consists of eight die sets and a Glimmer Hot Foil Plate Set that coordinates with one of the die sets. The array of dies can be mixed within existing die sets to offer more creative options. These include the Make a Scene Card Base and 3D Vignettes. The versatile new Merry Filigree Card Builder, Celebrate Scrollwork Card Builder and Joy Crescent Card Builder sets create different card formats from A2, A7, Mini Slimline, to Slimline. In addition, you can remove the Christmas Motifs and use them year-round.

Head on over to the Amazing Paper Grace Creative Encouragement page on FaceBook for step by step instructions on how to create the little shaped
Christmas Gift Cards!

Robin

Tuesday, October 12, 2021

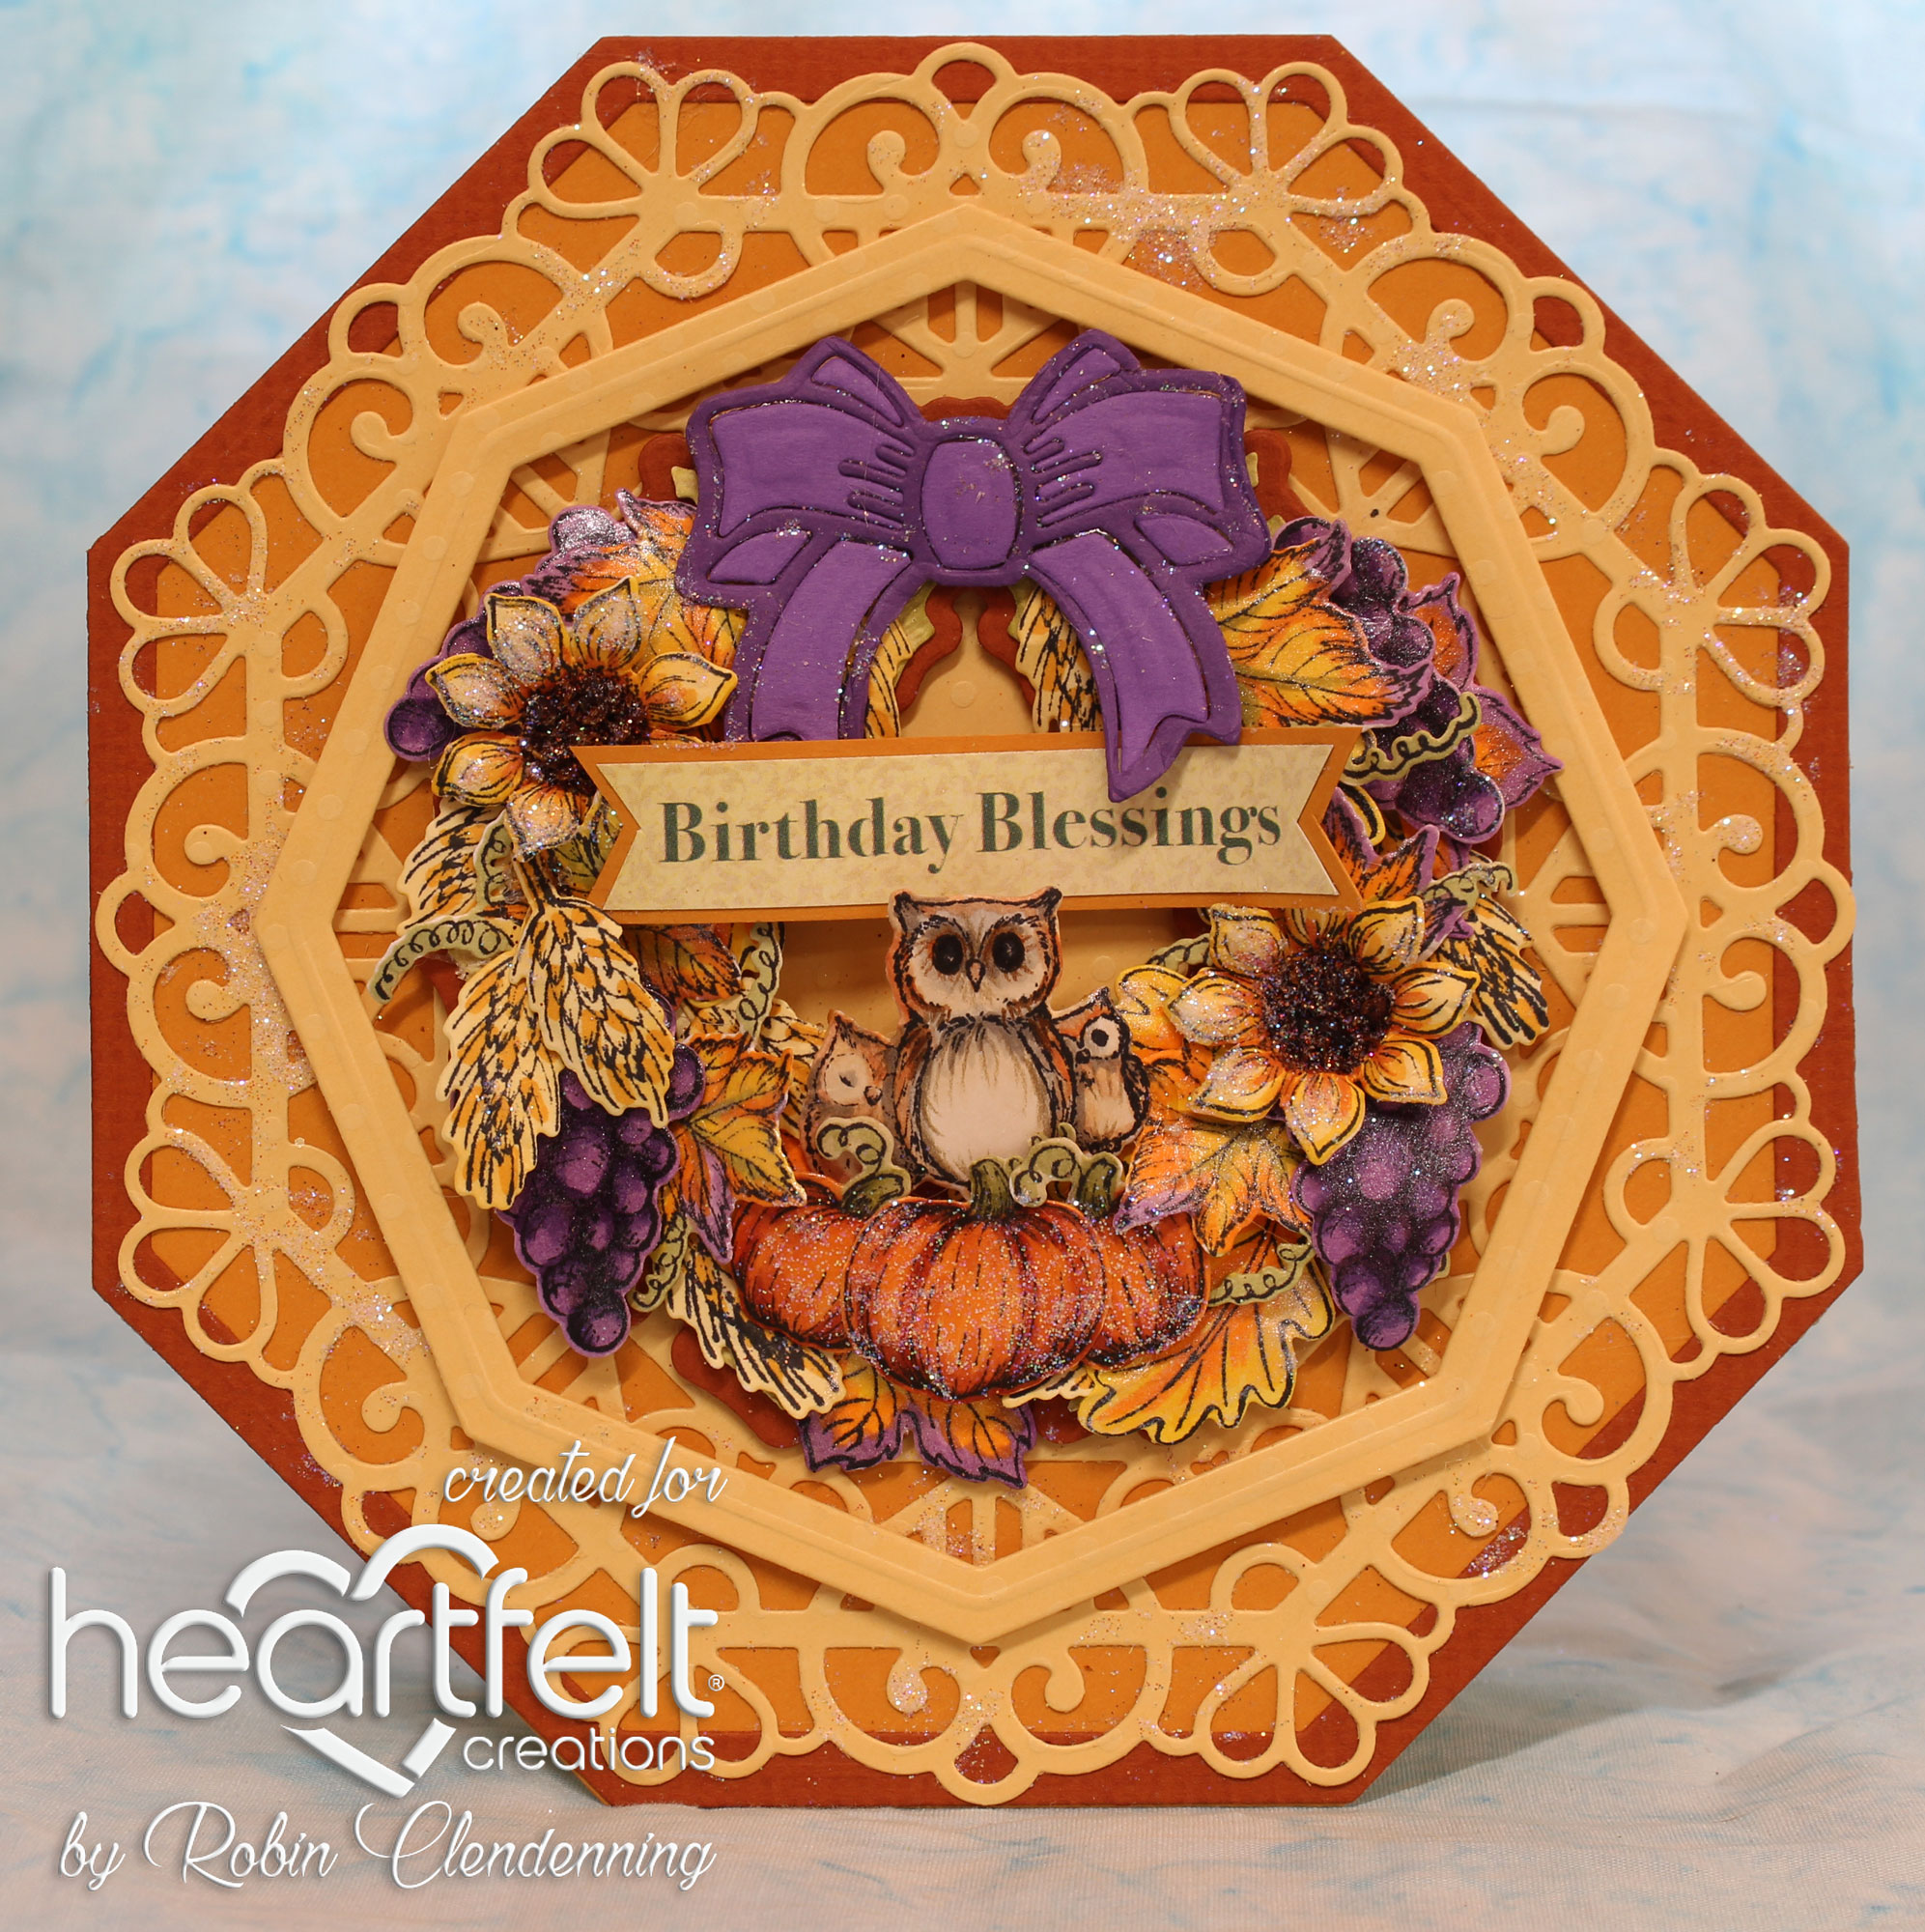
Wreath Debut

Good morning!
Look at these fun wreaths, we all like to make wreaths don't we?
Join in the fun then post your creation on the Heartfelt Creation FaceBook page for all to admire!

For a list of materials click HERE

Card size:  5 1/2 X 5 1/2"

Fold ivory cardstock to 5 3/4 X 5 3/4" then place largest Octagon die on it with cutting edge off of the fold, barely, it will still cut a full octagon if straight cutting edge is just outside of fold.

Cut another large octagon from gold color cardstock and cover front matching edges.  Cut one from Rust cardstock with the next size down octagon also to make an octagon frame for front of card, cut and glue to card front.  Cut a large octagon from light gold color decorative paper for the inside of card then glue in place.  Cut a smaller octagon frame (4 1/2") from light gold color cardstock then pop it up placing octagon with point down, this frame will be perfect for the fall wreath.

Cut the Seasonal Wreath outline die from rust cardstock then pop it up in the center of light gold octagon frame.  Stamp all the fall décor or the pieces you want on the wreath (some will need to be stamped 3 or 4 times and stamp the smallest Rustic Sunflowers using Tuxedo Black, die cut then color all with Copic Markers.

Glaze the grapes and some of the leaves with 3D Lacquer.  Glitter the flowers and pumpkins.  Glue wreath pieces down on wreath base and pop some of the pieces up.  Pop pumpkins at the bottom with owl trio on top of them.  Add Redland Elements to the sunflowers.

Die cut the bow using Seasonal Wreath Die set from dark purple and from purple.  Use the dark purple for the outline part of bow.  Glue it to the top of wreath. 

Cut out one of the sentiments and mat it with medium gold color cardstock, fishtail the ends and curve it around a fat pen (I use a Copic Marker).  Glue it to the center of wreath.  Glitter the card.


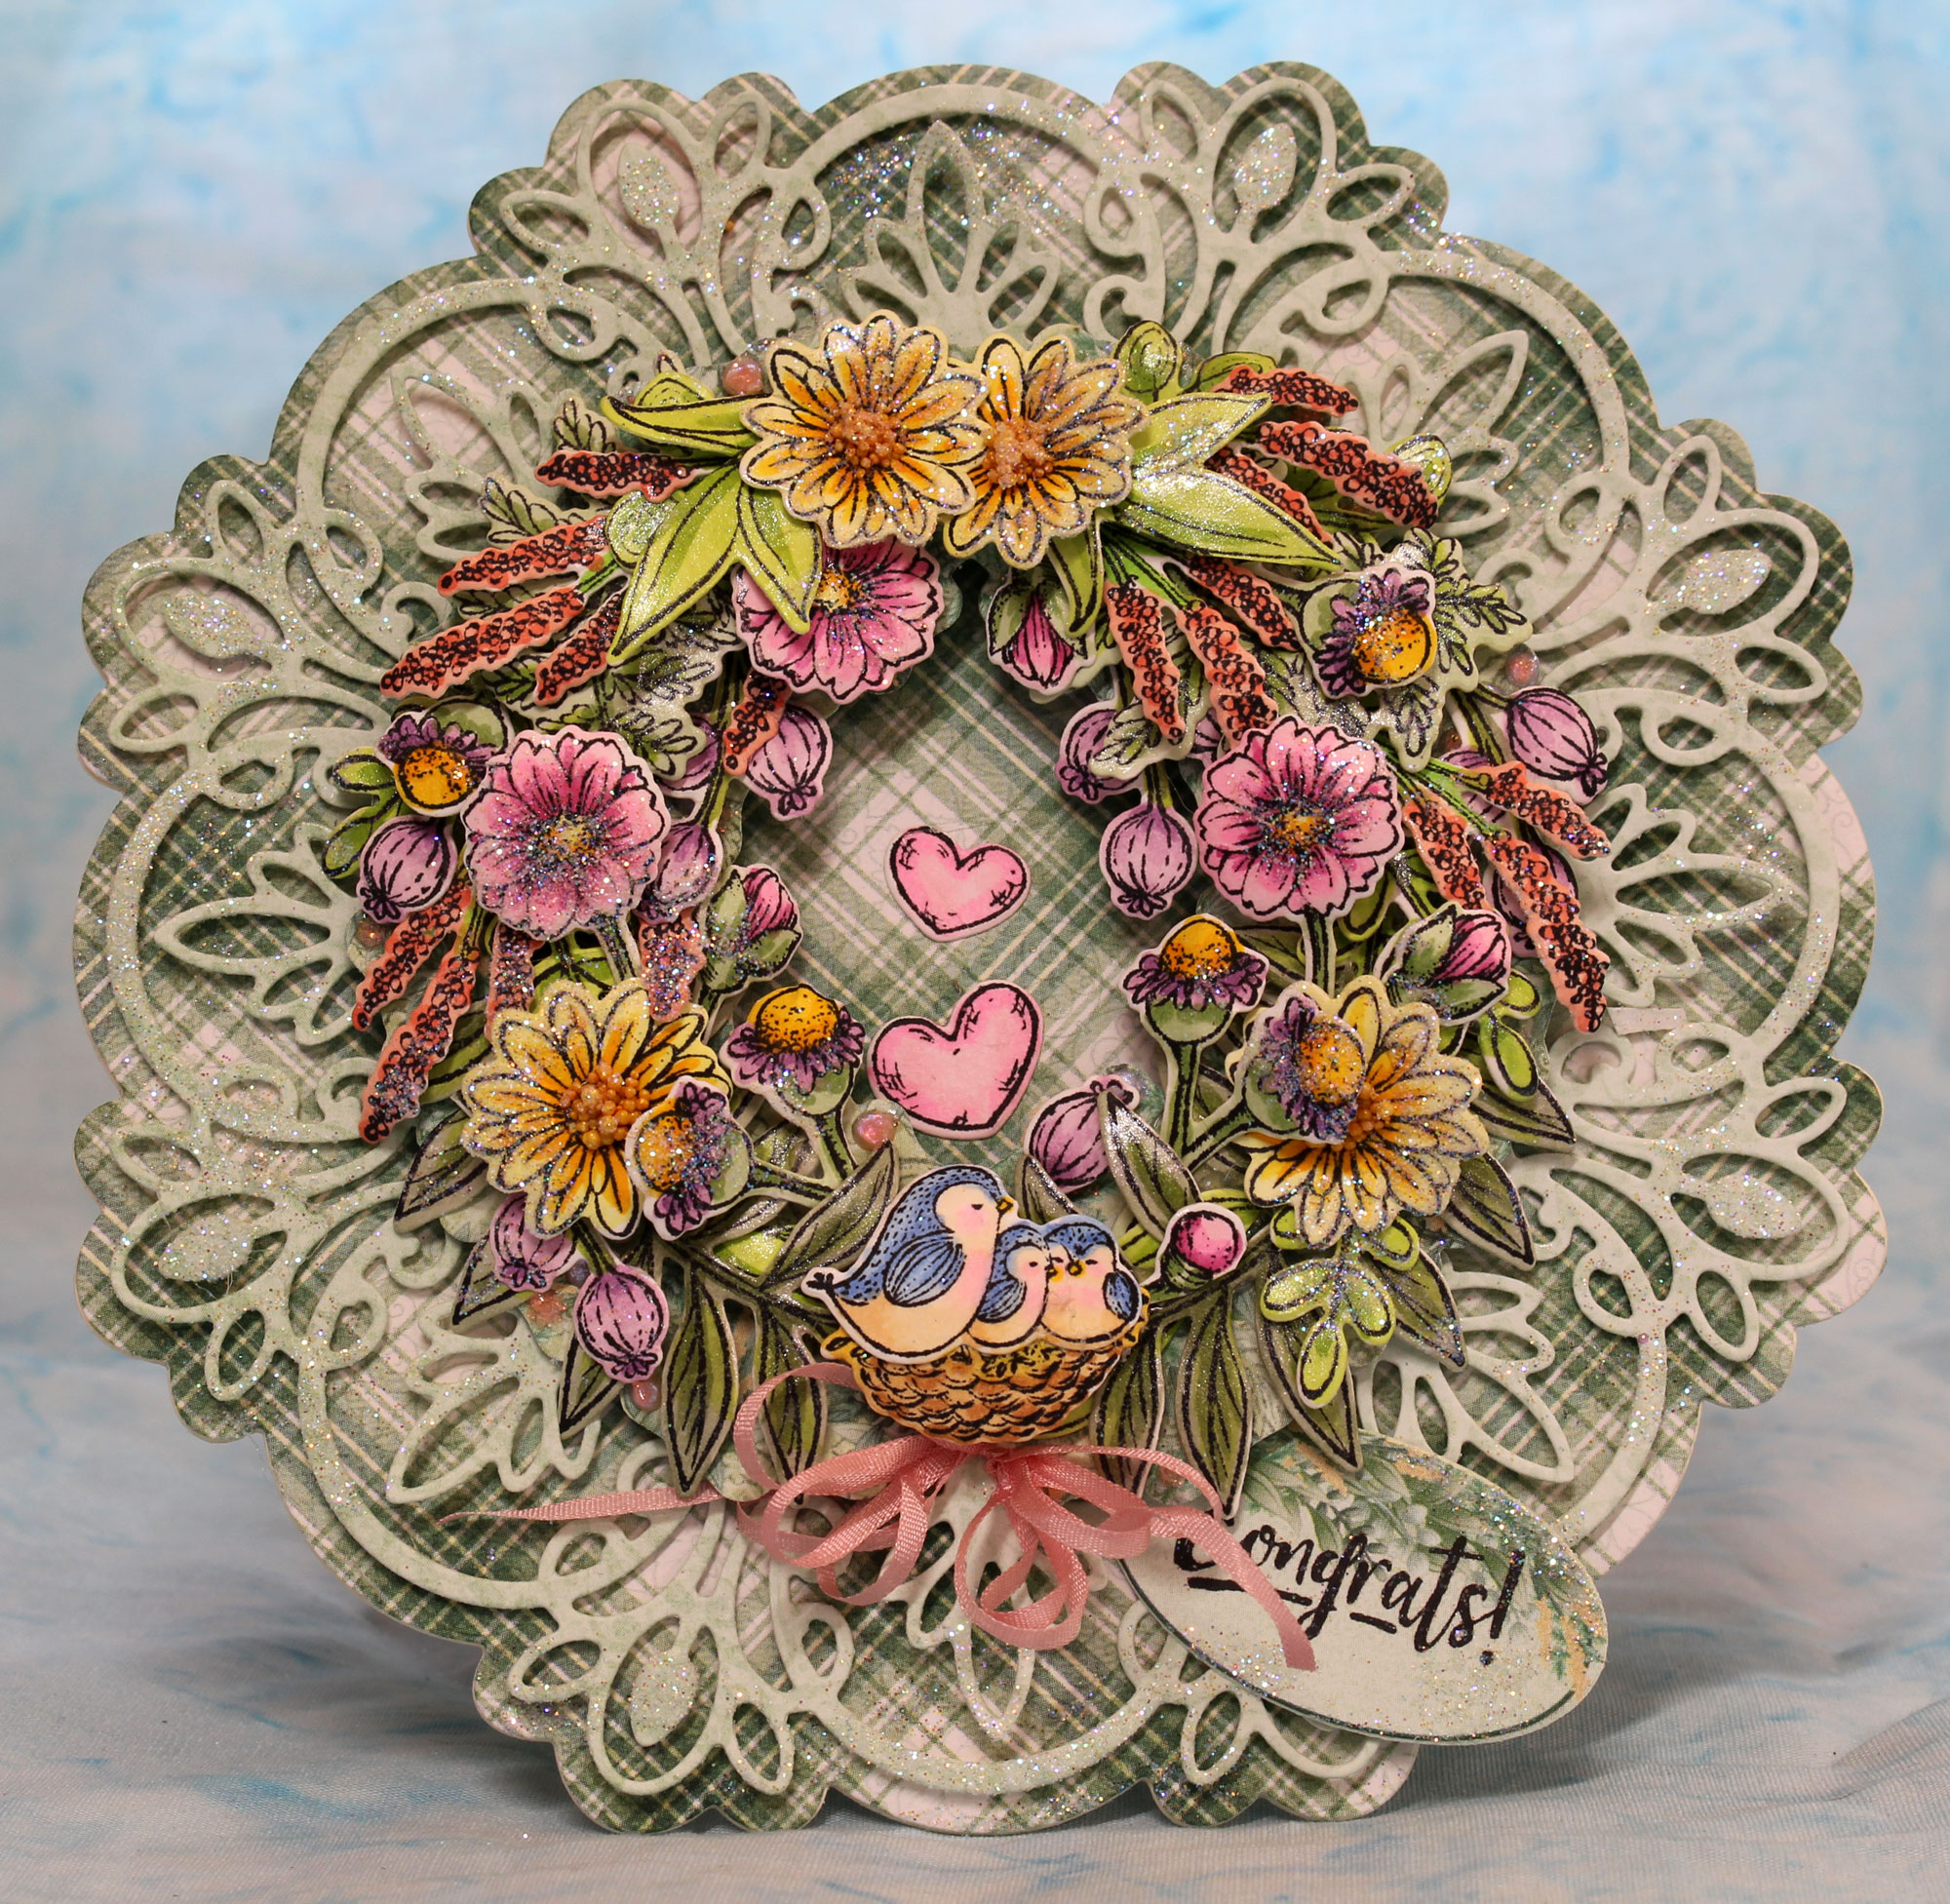
My next card is spring related with a twist, looks like someone has had a new addition to their family!

Find the list of materials for this card HERE

Card size:  5 1/2 X 5 1/2"

Use the outer die of the Simply Elegant Centerpiece to cut a folded 5 3/4 X 5 3/4" white heavy weight card leaving top part of the die off the edge of fold about 1/4".  Use the outer die again to cut green plaid decorative paper and another white cardstock piece then glue to top of card matching edges.  Cut the large inside decorative part of octagon from light green decorative paper then pop it up onto card front.

Stamp all the pieces (at least 2 times) of the summer wreath and the (congrats on decorative paper) using Tuxedo Black on white cardstock, die cut all, color with Copic Markers.  Cut Seasonal Wreath outline from green, pop up on center of card.

Arrange leaves and flowers around wreath, leaving room at the bottom for the birds and nest.  Glue and pop up some of the pieces around wreath, pop up nest and birds then add tag and ribbon under nest.  Add the little hearts to the center of wreath.   Glitter the wreath and card, add some lacquer to some leaves.

Thanks for visiting today and I hope you got some inspiration!
Go get crafty!

Robin 

Loving One Another

Dear friends, let us continue to love one another, for love comes from God.
Let us think of ways to motivate one another to acts of love and good works.


Monday, October 11, 2021

October Die of The Month From Amazing Paper Grace


 Good morning!

Elegance is our go-to style at Amazing Paper Grace.  It's a cascade of tendrils that can be snipped here and there to be used for top and bottom card decoration.  Say welcome to the Amazing Paper Grace October 2021 Die of the Month - Flourished Fleurit.
 
The inspiration for Flourished Fleurit comes from looking through our stashes for just the right Rectangle or just the right Square.  Guess what - Flourished Fleurit can be both.  A snip here or a snip there give this just the right proportion to be a rectangle or a square.  We cleverly added in sprigs of flowers so that you can cover your transitions.  Hunting for elegant corners for a slimline - look no further.  A snip or two has you covered.


For my card today:
I used the Flourished Fleurit, the Cinch and Go Poinsettias (S4-960) and Mosaic Bracket Card Builder (S5-461) for the sentiment.
My card base is Ivory which I cut to the shape of the outer die to make a shaped card. The decorative die cuts are gold (sometimes that is hard to see
in photos), glued to the ivory card base.  I then cut the sentiment outline
from Ivory and the inner words from gold, glued them to the inner
decorative gold die cut.
I cut the poinsettias from red and green (same size per flower times 2 red 
plus 1 green each).
From the back of each petal I used the Golf Groove Tools to give a bit of form to the flowers then used hot glue to put them together after inserting gold stamen.

I hope you've been inspired to create today!!  Go get crafty!
Robin
Die of the Month Flourished Fleurit

Matthew 5: 43-46
43 “You have heard the law that says, ‘Love your neighbor’[q] and hate your enemy. 44 But I say, love your enemies![r] Pray for those who persecute you! 45 In that way, you will be acting as true children of your Father in heaven. For he gives his sunlight to both the evil and the good, and he sends rain on the just and the unjust alike. 46 If you love only those who love you, what reward is there for that? 

This world today needs to be shown love no matter how differently we all think....
think about it.


Tuesday, October 5, 2021

Magnolia special fold

Good morning!


 Find the list of materials used HERE

Card size:  5 1/2 X 6 3/4".

Start with Pink cardstock sized: 6 3/4 X 11”.  Score in the middle at 5 1/2", then score again at 2 3/4" on left side only. Use a cutter that you can pick up blade and set it down anywhere (like CutterBee or Friskars) then cut with card while folded at 5 1/2" fold at: (1 1/2" up from bottom) to 1 1/2" horizontally then again from fold to 1 1/2” horizontally (1 1/2" down from top) (This makes a rectangle pop out when card opens).  Open card and score both sides from cut to cut vertically (fold and cuts should look like a rectangle with a score through the middle).  Make the card fold like a Z but with the center part folding inside of card, the middle fold will be valley on card base, the center pop up will be mountain fold, it may take a little practice to get the fold right.

Sample of what the inside should look like after cutting.


Cut decorative paper to fit each panel then glue them onto card.  Cut with Diamond Basics, 2 small decorative paper diamond and 2 slightly larger gold basic diamonds.  Use the Eyelet Diamonds to cut 2 white eyelet diamonds to fit between decorative paper and gold.   Glue them all together in 2 sets.  Cut a tag from gold and inside tag from white then glue them together.  Cut another inside tag from decorative paper then trim to fit inside of white tag then stamp and emboss sentiment, glue it to white tag.  Add a white hole reinforcer then glue 2 tassels onto tag.

Cut a gold and a white Lacy Diamond, glue them together off-set slightly then cut them in half top to bottom long ways.  Glue 1 half to the center pop up.  Cut a gold and a white Ornate Pocket Accent corner, glue them together slightly off-set then glue it (bottom and side only) to the bottom right side of card while open.  Tuck the tag into the pocket.

Fold card closed like a Z then glue the 2 small diamond sets to the center of fold, left side of diamonds only so that card can still open all the way.  Glitter all the card base and tag with fine glitter.

Stamp Magnolias using Magenta Hue, die cut, place in shaping mold to form then glue 2 together for each flower.  Buds use 1 blossom and 1/2 of a Zinnia blossom for sepal.  Stamp, emboss with white, die cut French Cottage small flowers, shape on mat with tools.  Insert white bead stamen into all flowers, glitter with Rajni Chawla’s Crystal Clear.  Stamp leaves and small Zinnia blossoms (for sepals) using Fern Green, sponge with Leaf Green and Magenta Hue, glitter.  Stamp Magnolia Buds using London Fog, color with Copic Markers.

Arrange flowers and leaves on the top of card over small diamond to the left edge of card, tuck the Magnolia buds in on right side of arrangement over diamonds.  Tuck some gold and white cord (left over from tassels) into arrangement on the left side.

Thank you so much for visiting today!

Robin 

1 Peter 1:3-4
3 All praise to God, the Father of our Lord Jesus Christ. It is by his great mercy that we have been born again, because God raised Jesus Christ from the dead. Now we live with great expectation, 4 and we have a priceless inheritance—an inheritance that is kept in heaven for you, pure and undefiled, beyond the reach of change and decay. 

Tuesday, September 28, 2021

Sunflower Chicks

Good morning!
I love these chickens and they go so well with our
Sunflowers today!

You can find a list of materials here

Card size:  6 X 6”.

Start with a 6 X 12” piece of white cardstock then fold in half.  Place outer die of Simply Elegant Centerpiece set so that die hangs over fold about 1/4".  Cut another front from white and 2 from decorative stripe paper.  Glue white onto front then glue 1 paper die cut to the front and 1 inside.  Trim inside die cut at the top to avoid fold. Cut 1 decorative Simply Elegant from blue decorative paper then glue to front of card.

Stamp fence, 2 chickens and 3 sunflower images using Tuxedo Black on white cardstock.  Die cut then color with Copic Markers.  Stamp Rustic Sunflowers using Peanut Brittle, sponge with Sunflower, die cut.  Stamp leaves using Fern Green, sponge with Leaf Green, die cut.  Shape flowers and leaves in the Shaping Mold.  Glue 2 flowers per Sunflower then fill centers with Redland Elements.

Stamp sentiment on light gold cardstock using black ink, trim and fishtail end.  Mat with copper cardstock.  Glue 2 nail head stickers onto left side of sentiment (or copper brads would work). Use some foam under the sentiment and set aside.

Glue and pop up the fence, sunflower images and chickens to the bottom of the card.  Glue 3 small sunflowers to the image sunflowers then arrange the rest of the sunflowers and leaves along the left side.  Pop the sentiment above the gate with sunflowers. 

Glitter flowers and card front then brush a mix of shimmer and lacquer to the leaves.

Thanks for visiting today!
Robin
For the wages of sin is death, but the free gift of God is eternal life through Christ Jesus our Lord.
 

Tuesday, September 21, 2021

Thinking of You Octagon

Good morning!
I actually used all the new Octagon dies (called the Elegant Centerpiece Dies), Elegant Heart Centerpiece, 
Simple Centerpiece and 
Simply Elegant Centerpiece on this first card.
One of my favorite color combos is aqua and lavender (or turquoise and purple, which ever way you choose to call it).

Find materials listed HERE

Card size:  6 X 6”.

Start with a 6 X 12” piece of white heavy weight cardstock, fold to 6 X 6” and place the Simple Centerpiece die so that the top cutting edge is just above the fold so it won’t cut the fold off (The die should fit just right).  Cut another Simple Centerpiece die from light turquoise then glue it to the front of card.  Cut 1 for the inside as well or a coordinating decorative paper for the inside. 

Next, cut the Elegant Hearts Centerpiece die from dark turquoise and glue it onto card.  Cut the Simply Elegant Centerpiece die from light turquoise then glue it on leaving center section loose to slide the sentiment octagon in.

Stamp the sentiment on light turquoise using black ink die cut it with the Simple Centerpiece 2” die then die cut the mat from medium turquoise using the 2 1/2" die plus the 2” die together (making a frame), leave the dies on and emboss the “crack” between the dies.  Now slide the sentiment under points of the loose Simply Elegant die cut, use tweezers to lift points if necessary. 

Stamp magnolias using Cactus Flower, sponge with a combo of Majestic Violet and Cactus Flower, die cut.  Stamp leaves using Fern Green, sponge with Leaf Green and Cactus Flower, die cut then form flowers and leaves in the mold.  Stamp Sepal using the Lilac Blossoms on dark green with Fern Green ink, die cut and shape in the mold.  Shape further with the Deluxe Flower Shaping Kit to make a tight cup.

Use 3 small magnolia blossoms to make buds, ink side out, using tools to make a rounded deep cup, use glue to keep the petals together then glue sepal under.  For full blossoms glue to of the same size together for each flower.  Insert yellow stamen.  These colors make a nice Triad. Glitter all flowers.

Stamp Magnolia branches using London Fog on white (this makes an almost no-line image after coloring).  Die cut then color with Copic makers.  Stamp the small butterfly on vellum 2 times using Cactus Flower, sponge the backs with yellow and Cactus Flower.  Glue them together in the center only.

Arrange flowers, leaves and buds with magnolia branches along the left, top and bottom of Octagons.  Glue the butterfly toward the top at right side.

Mix shimmer additive and lacquer together to brush onto leaves and sepals.  Glitter the card front.

My second card is an easel card using the new Simply Elegant
Centerpiece die


Find the materials listed HERE

Card size:  6 X 6”.

Start with white heavy weight cardstock 6 X 12, fold in half then place outer die of Simply Elegant Centerpiece set so that the top of die hangs over the fold by about 1/4".  Cut then score folded die cut in the center of the right side only (2 5/8” from center fold), fold down toward card center.  Cut another front piece from white and 2 from decorative blue paper with sunflowers at the corners.  Glue the white front onto the folded down half of the right side of base matching bottoms of base and card front.  Glue the decorative paper onto the front.  For the inside, cut about 1/4" off the top of decorative paper to avoid center score then glue it to the inside.

From light gold color cardstock cut the decorative dies (the inside uses the small outer die for the sentiment along with the large and the front uses the small decorative part along with the large), cut a small tag from Ornamental Tags.  Glue the large onto both the front and inside.  Glue the decorative small in the center of the front.

Stamp the sentiment using Rich Cocoa on tag and on solid small light gold piece.  Glue the light gold piece to the center of inside.  Glue a small bow to the top of the tag and set aside.

Stamp Rustic Sunflowers using Peanut Brittle, sponge with Sunflower, die cut.  Stamp Leaves using Fern Green, sponge with Leaf Green, die cut then shape flowers and leaves in the Shaping Mold.  Glue 3 layers of flowers for each sunflower then fill centers with Redland Elements.  Cut some of the leaves apart to make a few small leaves for fill in’s.

Find the place where you want the card to stay open then glue a flower to the inside to hold it there.  Now finish arranging flowers and leaves for the inside and for the front of card (sample shows a sort of “S” design with the flowers when card is open. 

Glitter card front and flowers then brush a mix of shimmer additive (Amazon) and lacquer onto to leaves.

Thanks for visiting today!

Robin 

Don’t use foul or abusive language. Let everything you say be good and helpful, so that your words will be an encouragement to those who hear them.

Proverbs 18:21a
21 The tongue can bring death or life;


Tuesday, September 14, 2021

You Are Thoughtful


Find the material list HERE

Card size:  4 3/4 X 6 3/4".

Start with a 7 X 11” piece of white cardstock folded to 5 1/2 X 7”, place the outer die of the Royal Elegance Frame Die on card so that the die hangs over the fold by about 1/4" then cut (see video).  Cut another front with the same die.  Using decorative paper cut 2 more panels with the outer die, 1 for the front and 1 for the inside.  Glue all panels onto card.

Using the outer die and the decorative die together, die cut a Gold Luxe border for the front of card (save the Gold Luxe decorative die cut for another card).  Glue the gold border to the front of card matching edges.

Use the decorative die alone to cut a green decorative paper die cut. Place foam under this layer to pop it up and adhere to card front.  Use the next die in (oval shaped decorative die) to die cut a Gold Luxe and a piece of decorative paper.  Glue these together off-setting slightly.  Use foam to pop it up on top of rectangle popped up layer.  Cut a Gold Luxe oval and a decorative paper oval and off-set them then glue onto decorative oval.

Stamp sentiment using black on decorative paper and die cut with the next oval smaller.  Cut the decorative frame for this oval out of Gold Luxe.  Pop the oval and frame up and adhere to the center.

Stamp Sunflowers with Peanut Brittle, sponge with Sunflower then die cut.  Stamp leaves with Fern Green, sponge with Leaf green, die cut then shape flowers and leaves in the mold (see video).

Glue 3 flowers together for each sunflower, fill with Redland Elements, glitter flowers.  Brush a mix of lacquer and shimmer together onto leaves.  Arrange leaves and flowers on the left side of card around oval.  Glitter the non-gold parts of the card front.


My next card is featuring the milk can on a shaped 3/4 front.
It has another half circle pocket inside with 
tags for personal messages.


Find the material list HERE

Card size:  4 1/2 X 6”.

Start with a 6 X 6 Shutter Fold card and cut off the right side.  Glue the 2 semi-circle halves together to form 1 semi-circle flap for the front of card.  Cut a 4 1/2 X 6” piece of decorative paper for the inside trimming to leave a slight white border.  Cut a decorative paper semi-circle to fit front flap.  Cut 2 medium tags using the Ornamental Tags from decorative paper tags.  Glue the inside piece and the front piece onto card.

From white cardstock die cut the Rounded Lattice Window frame 2 times (just 1 half of it or use both halves if desired, you need 2).  Cut 2 of the corners from the Swirly Accents Spray die.  Glue the front Lattice half to the card front but on the inside just glue the left side and about 2’ top and bottom of the semi-circle to make a pocket opening for the tags.  Glue the corners to the top and bottom right side of card inside. Tuck the 2 tags in the pocket and add ribbon to the top of tags.

Stamp can and sunflower bouquet using Tuxedo Black then color with Copic Markers and die cut.  Pop up the extra lid then glue flower bouquet as if coming out of the can.  Glue the can and flowers to the card front at the right edge of the flap.

Stamp Rustic Sunflowers using Peanut Brittle, sponge with Sunflower then die cut.  Stamp the leaves with Fern Green, sponge with Leaf Green then die cut.  Shape leaves and flowers in the Shaping Mold (see video).  Glue 3 of the same size together to make each Sunflower then fill centers with Redland Elements.  Glitter the flowers, brush a mix of lacquer and shimmer together onto leaves.  Glue 1 flower inside right bottom then glue the other 2 on the left side of front flap.

Glitter the card and tags.

Thanks for visiting!  Go be crafty!!

Robin


Philippians 4:6-7

6 Don’t worry about anything; instead, pray about everything. Tell God what you need, and thank him for all he has done. 7 Then you will experience God’s peace, which exceeds anything we can understand. His peace will guard your hearts and minds as you live in Christ Jesus.


Tuesday, September 7, 2021

Get Well Wishes


Good morning to you!
Happy sunflowers, how else can they be described!
What brings a smile to your face more than bright yellow
and sunflowers!!
Pairing them with these great accessories makes it even better, the bucket in this first one and the rusty pail in the second.

Find the materials listed HERE

Card size:  4 3/4 X 6 3/4".

Start with 7 X 11 heavy white cardstock, fold to 5 1/2 X 7” then place the outer die of the Decorative Circle Frames so that the top of die overhangs the fold by about 1/4".  Cut the card then cut another full front and glue it to the folded card front.  Cut a gold color decorative paper with the same die, twice (1 for the inside 1 for the front).  Glue both pieces onto card. 

Using the outer die and next die in of the Decorative Circle Frames, cut both at the same time to create Gold Luxe frame for the front (use the inner part some other time).  Also using the decorative part of the Decorative Circle Frames cut an ivory and a dark gold color cardstock.

Using the Eyelet Circle and Basics Small and the Circle Basics Large cut a combination of ivory, Gold Luxe and gold color decorative paper for layers in the frame (end with decorative paper).

Glue the Gold Luxe Frame to the card front and glue the ivory color and dark gold color decorative die cuts together, Under the decorative die cuts use foam to pop-up then attach the decorative cuts to the card front.  Layer the circles together then glue them to the center.

Stamp the wooden pail and extra sunflower images and the sentiment using Black Tuxedo (the sentiment is stamped on decorative paper and other images on white).  Die cut the sentiment with small tag and die cut other images with coordinating dies, color and add foam to the back of pail and extra sunflowers.  Add a bow to the top of the tag.  Adhere these to the left side of layered circles.

Stamp Rustic Sunflowers using Peanut Brittle, sponge with Sunflower, die cut.  Stamp leaves with Fern Green, sponge with Leaf Green, die cut then shape flowers and leaves in the Shaping Mold.  Stamp ladybug with ladybug Red Memento then use a fine tip black pen to color in the black parts and over the legs.

Glue 3 layers of flowers the same size for each Sunflower then fill the centers with Redland Elements (it smells a bit like coffee which is fun).  Arrange flowers and leaves on the left side of the wooden pail, glitter flowers and card front avoiding Gold Luxe paper and brush the leaves with a mixture of lacquer and shimmer additive, lacquer ladybug as well.


Second card has a partial front with die cut edge shape and hidden 
sentiment circle inside revealed when opening.

Find all the materials HERE


Card size: 4 1/2 X 6”.
Start with a white card 6 X8, fold to 4 1/2 X 6. Place the inner circle of the Rounded Window Frame with the grid insert on the top about halfway down vertically and so that the right side reaches to the right side of the card. Make pencil marks at the halfway mark of the circle then place the top cutting plate to the pencil marks, cut (top of card only). Now use a cutter or kraft knife to make straight cuts vertically from the top of circle and again from circle to the bottom of card. Cut a separate vellum circle to cover back.


Cut decorative paper to fit front and inside, glue in place then cut 1 long eyelet tag from Tickets and Tags, trim each long side to about 1/4" wide. Glue 1 to the right side of the inside and the other 1 to the right side of the front. Cut 1 narrow Sweetheart Border then glue it to the left side of front.


Using black Memento ink stamp bucket and floral with 3 sunflowers, die cut then color. Stamp sentiment from Just For You Sentiments using Sunflower Archival, die cut with small Ornamental Tag. Stamp Rustic Sunflowers using Peanut Butter, sponge with Sunflower, die cut then mold using the shaping mold.


Glue 3 of the same size blossoms together for each flower then fill center with Redland Elements. Glue the bucket to the card front at about the center line then glue the Rustic Sunflowers over the image flowers. Add the small tag to the bouquet and glue a ribbon to the top of it.


Stamp the inside sentiment also from Just For You Sentiments on white using Sunflower Archival then die cut with the circle basics large. Glue it directly under the half circle top.


Glitter card and flowers.


Thanks for visiting today!

Robin

Jesus came and told his disciples, “I have been given all authority in heaven and on earth. Therefore, go and make disciples of all the nations, baptizing them in the name of the Father and the Son and the Holy Spirit. Teach these new disciples to obey all the commands I have given you. And be sure of this: I am with you always, even to the end of the age.”

Read Full Chapter